- Welcome to the Kancolle Wiki!
- If you have any questions regarding site content, account registration, etc., please visit the KanColle Wiki Discord
Difference between revisions of "Spring 2025 Event/E-2"
| Line 116: | Line 116: | ||
==Map Overview== | ==Map Overview== | ||
| + | E2 is a single and combined fleet, two-phase map consisting of one transport and one boss phase. | ||
| + | * 2 [[LBAS]] is available to sortie on this map | ||
| + | |||
| + | * This map uses 2 locks: | ||
| + | ** [[File:{{ROOTPAGENAME}} Tag 2.png|40px]] '''1st Fleet''', Starting point 1 (reused from E-1) | ||
| + | ** [[File:{{ROOTPAGENAME}} Tag 3.png|40px]] '''5th Fleet''', Starting point 2 (reused in E-3) | ||
| + | |||
| + | The use of {{IconText|{{Aviation Personnel}}|AGDP}} {{EquipmentLink|Arctic Gear & Deck Personnel|text=AGDP}} on CV(B/L), {{Class|Ise|Kai Ni}}, [[Akitsu Maru Kai]], [[Kumano Maru]], and [[Yamashio Maru]], is required to sortie these ships on the map. | ||
| + | |||
| + | * {{Balloon}} '''[[Barrage Balloon]]s''' can be deployed on node {{MapRoute|W|red}} | ||
| + | |||
| + | ==Gimmick 1 - Unlock== | ||
| + | To unlock the next part of the map, the following steps have to be performed: | ||
| + | |||
| + | {|class="wikitable" | ||
| + | ! !! F1!! F2!! C | ||
| + | |- | ||
| + | | Hard|| A+ x2|| A+ x2|| S x2 | ||
| + | |- | ||
| + | | Medium|| A+|| A+|| S x2 | ||
| + | |- | ||
| + | | Easy|| ?|| ?|| ? | ||
| + | |- | ||
| + | | Casual|| ?|| ?|| ? | ||
| + | |} | ||
| + | |||
| + | {{FleetGuide | ||
| + | | Map = Nodes C, F1 & F2 | ||
| + | | Fleet = '''Striking: 0-1 (F)BB(V), 1 CV(B/L), 1 CL, 0-1 CLT, 3-4 DD [[File:{{ROOTPAGENAME}} Tag 2.png|30px]] | ||
| + | | Route = {{MapRoute|1||A|blue|A2|pink|B|blue|D|red|E|blue|F1|red}} | ||
| + | {{MapRoute|1||A|blue|A2|pink|B|blue|D|red|E|blue|F|pink|F2|red}} | ||
| + | |||
| + | {{MapRoute|1||A|blue|A2|pink|B|blue|C|red}} | ||
| + | | ASC = 107 | ||
| + | | ASE = 158 | ||
| + | | ASM = 158 | ||
| + | | AS = 227 | ||
| + | | Note = All relevant nodes are surface combat one. | ||
| + | *Bringing an [[AACI]] is recommended to pass the air nodes | ||
| + | | Range = Node {{MapRoute|C|red}}: 7 ; Node {{MapRoute|F1|red}}: 4 ; Node {{MapRoute|F2|red}}: 3 | ||
| + | | LBASS = 141 / 141 / 141 / 161 | ||
| + | | LBASD = 158 / 209 / 230 / 281 | ||
| + | | NoteLBAS = Sending all LBAS on the relevant nodes is advised. | ||
| + | }} | ||
| + | |||
| + | ==Gimmick 2 - Unlock== | ||
| + | To unlock the 1st phase, the following steps have to be performed: | ||
| + | |||
| + | {|class="wikitable" | ||
| + | ! !! K!! F | ||
| + | |- | ||
| + | | Hard|| A+ x3|| AS | ||
| + | |- | ||
| + | | Medium|| A+ x3|| - | ||
| + | |- | ||
| + | | Easy|| A+ x3|| - | ||
| + | |- | ||
| + | | Casual|| A+ x3?|| - | ||
| + | |} | ||
| + | |||
| + | {{FleetGuide | ||
| + | | Map = Node K | ||
| + | | Fleet = '''Striking: 0-1 (F)BB(V), 1 CV(B/L), 1 CL, 0-1 CLT, 3-4 DD [[File:{{ROOTPAGENAME}} Tag 2.png|30px]] | ||
| + | | Route = {{MapRoute|1||A|blue|A2|pink|B|blue|C|red|H|red|I|red|K|red}} | ||
| + | | ASC = 189 | ||
| + | | ASE = 189 | ||
| + | | ASM = 159 | ||
| + | | AS = 198 | ||
| + | | Note = The node is surface combat. | ||
| + | *Btinging [[AACI]] and some ASW is advised to reach the node. | ||
| + | | Range = Node {{MapRoute|K|red}}: 6 ; Node {{MapRoute|I|red}}: 7 | ||
| + | | LBASS = 192 / 197 / 167 / 206 | ||
| + | | LBASD = 158 / 209 / 230 / 281 | ||
| + | | NoteLBAS = Sending half LBAS node I and the other on node K is advised to maxime the passing rate | ||
| + | }} | ||
| + | |||
| + | ;Nodes {{MapRoute|F|pink}} | ||
| + | *Refer to [[#Gimmick 1 - Unlock]]'s fleets for composition and routing (node F2's path). | ||
| + | |||
| + | ==Phase 1 - TP== | ||
| + | Phase 1 is a new kind of [[Transport Operation]], where "tanks" do work better: | ||
| + | |||
| + | {|class="wikitable mw-collapsible mw-collapsed sortable" | ||
| + | !colspan=4|Landing Operation [https://x.com/Durielist223/status/1898837077938323536] | ||
| + | |- | ||
| + | ! Type!!Equipment!! S-Rank!! A-Rank | ||
| + | |- | ||
| + | !rowspan=10|{{Landing Craft}} | ||
| + | |{{EquipmentLink|Daihatsu Landing Craft}}<br>{{EquipmentLink|Toku Daihatsu Landing Craft}}<br>{{EquipmentLink|Armed Daihatsu}}<br>{{EquipmentLink|Soukoutei (Armored Boat Class)|text=Soukoutei}} | ||
| + | | 6|| 4.2 | ||
| + | |- | ||
| + | |{{EquipmentLink|Daihatsu Landing Craft (Type 89 Medium Tank & Landing Force)|text=DLC + T89 Tank}}|| 15|| 10.5 | ||
| + | |- | ||
| + | |{{EquipmentLink|Daihatsu Landing Craft (Panzer II/North African Specification)|text=DLC + Panzer II}}|| 22|| 15.4 | ||
| + | |- | ||
| + | |{{EquipmentLink|Toku Daihatsu Landing Craft + Type 1 Gun Tank|text=Toku DLC + Ho-Ni Tank}}|| 41|| 28.7 | ||
| + | |- | ||
| + | |{{EquipmentLink|Toku Daihatsu Landing Craft + 11th Tank Regiment|text=Toku DLC + 11th Reg}}|| 47|| 32.9 | ||
| + | |- | ||
| + | |{{EquipmentLink|M4A1 DD}}|| 25|| 17.5 | ||
| + | |- | ||
| + | |{{EquipmentLink|Toku Daihatsu Landing Craft + Panzer III (North African Specification)|text=Toku DLC + Panzer III}}|| 28|| 19.6 | ||
| + | |- | ||
| + | |{{EquipmentLink|Toku Daihatsu Landing Craft + Chi-Ha|text=Toku DLC + Chi-Ha}}|| 23|| 16.1 | ||
| + | |- | ||
| + | |{{EquipmentLink|Toku Daihatsu Landing Craft + Chi-Ha Kai|text=Toku DLC + Chi-Ha Kai}}|| 29|| 20.3 | ||
| + | |- | ||
| + | |{{EquipmentLink|Toku Daihatsu Landing Craft + Panzer III Ausf J|text=Toku DLC + Panzer III J}}|| 33|| 23.1 | ||
| + | |- | ||
| + | !rowspan=3|{{Amphibious Tank}} | ||
| + | |{{EquipmentLink|Special Type 2 Amphibious Tank|text=Ka-Mi tank}}|| 10|| 7 | ||
| + | |- | ||
| + | |{{EquipmentLink|Special Type 4 Amphibious Tank|text=Ka-Tsu tank}}|| 7|| 4.9 | ||
| + | |- | ||
| + | |{{EquipmentLink|Special Type 4 Amphibious Tank Kai|text=Ka-Tsu tank Kai}}|| 9|| 6.3 | ||
| + | |- | ||
| + | !rowspan=4|{{Landing Force}} | ||
| + | |{{EquipmentLink|Army Infantry Corps}}|| 15|| 10.5 | ||
| + | |- | ||
| + | |{{EquipmentLink|Type 97 Medium Tank (Chi-Ha)|text=Chi-Ha}}|| 17|| 11.9 | ||
| + | |- | ||
| + | |{{EquipmentLink|Type 97 Medium Tank New Turret (Chi-Ha Kai)|text=Chi-Ha Kai}}|| 23|| 16.1 | ||
| + | |- | ||
| + | |{{EquipmentLink|Army Infantry Corps + Chi-Ha Kai|text=Infantry + Chi-Ha Kai}}|| 38|| 26.6 | ||
| + | |- | ||
| + | !{{Drum}} | ||
| + | |{{EquipmentLink|Drum Canister (Transport Use)|text=Drum Canisters}}|| 0|| 0 | ||
| + | |- | ||
| + | !{{Rations}} | ||
| + | |{{EquipmentLink|Combat Ration|Combat Ration (Special Onigiri)|Canned Saury|text=Rations}}|| ?|| ? | ||
| + | |} | ||
| + | |||
| + | {{FleetGuide | ||
| + | | Map = STF | ||
| + | | Main = '''1 CVL/CA, 2 CA, 1-2 CL, 1-2 DD [[File:{{ROOTPAGENAME}} Tag 3.png|30px]] | ||
| + | | Escort = '''1 CL, 5 DD [[File:{{ROOTPAGENAME}} Tag 3.png|30px]] | ||
| + | | Route = {{MapRoute|2||L|blue|M|red|N|blue|P|red|R|red|T|green|U|red}} | ||
| + | | Speed = Fast | ||
| + | | ASC = 189 | ||
| + | | ASE = 189 | ||
| + | | ASM = 0 | ||
| + | | AS = 198 | ||
| + | | Note = Bringing an [[AACI]] and some ASW is advised to reach the boss. | ||
| + | Having 1 or 2 good night cut-ins is recommended to farm for S rank. | ||
| + | | Range = Node {{MapRoute|U|red}}: 3 | ||
| + | | LBASS = 0 / 0 / 0 / 0 | ||
| + | | LBASD = 158 / 209 / 230 / 281 | ||
| + | | NoteLBAS = All LBAS should be sent on the boss. | ||
| + | }} | ||
| + | * It is recommended to field between 3-5 DD that can carry [[Landing Craft]] to drain the TP Gauge. | ||
| + | ** Please refer to the Landing Craft table above for what Landing craft to use to maximize TP Drain per run. | ||
| + | |||
| + | ==Phase 2 - Boss== | ||
| + | {{FleetGuide | ||
| + | | Map = STF | ||
| + | | Main = '''1 CVL, 1-2 CA, 1-2 CL, 1-3 DD [[File:{{ROOTPAGENAME}} Tag 3.png|30px]] | ||
| + | | Escort = '''0-1 CA, 1 CL, 4-5 DD [[File:{{ROOTPAGENAME}} Tag 3.png|30px]] | ||
| + | | Route = {{MapRoute|2||L|blue|M|red|N|blue|O|pink|Q|red|V|red|V1|blue|W|red}} | ||
| + | | LOS = Cn3: 70 / 55 / 75 / 95 (C/E/M/H) | ||
| + | | ASC = 0 | ||
| + | | ASE = 0 | ||
| + | | ASM = 0 | ||
| + | | AS = 167 | ||
| + | | Note = The boss is a submarine, it is required to bring very strong ASW and [[OASW]] to kill it. | ||
| + | *Only sniping the boss is the recommended way to clear the map. | ||
| + | | Range = Node {{MapRoute|W|red}} : 5, Node {{MapRoute|V|red}} : 4 | ||
| + | | LBASS = 0 / 0 / 0 / 180 | ||
| + | | LBASD = 158 / 209 / 230 / 281 | ||
| + | | NoteLBAS = [[Toukai]] LBAS is recommended to help chip the boss. | ||
| + | }} | ||
| + | |||
| + | *{{Smoke}} Smokes are highly recommended for {{MapRoute|V|red}} to avoid taking damage. | ||
| + | *Using the {{IconText|{{CommandFacility}}|FCF}} {{Equipment/Link|Fleet Command Facility|text=FCF}} can help increase the reach rate. | ||
| + | |||
| + | ==Gimmick 3 - Debuff== | ||
| + | Once LD has been reached, the following steps have to be performed to debuff the boss. | ||
| + | |||
| + | {|class="wikitable" | ||
| + | ! !! F1!! F2!! K!! U!! LBAS | ||
| + | |- | ||
| + | | Hard|| A+ x2|| A+ x2|| A+ x2|| A+ x2|| AS x2 | ||
| + | |- | ||
| + | | Medium|| -|| A+ x2|| A+ x2|| A+ x2|| AS | ||
| + | |- | ||
| + | | Easy|| -|| A+ x2|| A+ x2|| A+ x2|| AS | ||
| + | |- | ||
| + | | Casual|| -|| A+ x2|| A+ x2|| A+ x2|| AS | ||
| + | |} | ||
| + | |||
| + | <tabber> | ||
| + | |-|Nodes F1 & F2= | ||
| + | Refer to [[#Gimmick 1 - Unlock]]'s fleets for composition and routing. | ||
| + | |-|Node K= | ||
| + | *Refer to [[#Gimmick 2 - Unlock]]'s fleet for composition and routing. | ||
| + | |-|Node U= | ||
| + | *Refer to [[#Phase 1 - TP]]'s fleet for composition and routing. | ||
| + | |-|LBAS= | ||
| + | {|class="wikitable" | ||
| + | ! LBAS!! AS | ||
| + | |- | ||
| + | | Hard|| 281 | ||
| + | |- | ||
| + | | Medium|| 230 | ||
| + | |- | ||
| + | | Easy|| 209 | ||
| + | |- | ||
| + | | Casual|| 158 | ||
| + | |} | ||
| + | </tabber> | ||
| + | |||
| + | Once on LD, the CG will change to the following: | ||
| + | {|class="wikitable" | ||
| + | ![[Submarine Seerfish Water Demon]] | ||
| + | |- | ||
| + | |<gallery> | ||
| + | Enemy Full Submarine Seerfish Water Demon.png|Regular | ||
| + | Enemy Full Submarine Seerfish Water Demon Damaged.png|Last Dance | ||
| + | Enemy Full Submarine Seerfish Water Demon Damaged Debuffed.png|Debuffed | ||
| + | </gallery> | ||
| + | |} | ||
==Enemy Compositions== | ==Enemy Compositions== | ||
Revision as of 23:59, 14 March 2025
 
| |||||||||
|---|---|---|---|---|---|---|---|---|---|
 
Time until the end of the event:
| |||||||||
音威子府防衛線
![]()
![]()


| Information | ||||
|---|---|---|---|---|
| Event Tag | ||||
| Boss Gauges | Hard (甲): 960 TP + 3234 HP | |||
| Medium (乙): 680 TP + 2648 HP | ||||
| Easy (丙): 600 TP + 2648 HP | ||||
| Casual (丁): 480 TP + 1584 HP | ||||
| Map Bosses | Ra-class DestroyerRa-class Destroyer | |||
Submarine Seerfish Water Demon
| ||||
| Rewards[edit] | ||||
|---|---|---|---|---|
| Ship |  Wahoo | |||
| Choice | 丁 Casual |
丙 Easy |
乙 Medium |
甲 Hard |
Equipment Slots |
3 | 4 | 5 | |
| OR | ||||
Improvement Material |
3 | 4 | 5 | |
| Reward | 丁 Casual |
丙 Easy |
乙 Medium |
甲 Hard |
|---|---|---|---|---|
Food Supply Ship Mamiya |
1 | 2 | 3 | |
Reinforcement Expansion |
1 | 1 | 1 | |
Remodel Blueprint |
1 | 1 | ||
Medal |
2 | |||
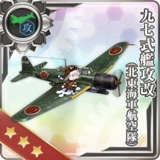
 Type 97 Torpedo Bomber Kai (Northeastern Air Group) |
1 (★2) | 1 (★4) | 1 (★8) | |
 21inch 6-tube Bow Torpedo Launcher (Late Model) |
1 (★2) |

The event guides are to be constructed through the respective Event map page guide sandbox and reviewed by editors before being approved here.
- Do not update the guides through this page unless it is a minor fix. Please only update guides through their respective sandbox pages.
Branching Table
| E-2 Branching Rules (Start Points) ▼/▲ | ||
|---|---|---|
| Nodes | Rules | |
| Start | 1 |
|
2 |
| |
| E-2 Branching Rules (Start Point 1) ▼/▲ | ||
|---|---|---|
| Nodes | Rules | |
A |
A1 |
|
A2 |
| |
B |
C |
Active Branching |
D | ||
C |
G |
|
H |
| |
E |
F |
Active Branching |
F1 | ||
F |
F2 |
|
H |
I |
|
I |
J |
|
K |
| |
| E-2 Branching Rules (Start Point 2) ▼/▲ | ||
|---|---|---|
| Nodes | Rules | |
2 |
H |
|
L |
| |
E |
F |
Active Branching |
F1 | ||
F |
F2 |
|
R |
| |
H |
L |
|
M |
| |
M |
D |
|
N |
| |
N |
O |
Active Branching |
P | ||
P |
F |
|
R |
| |
Q |
S |
|
V |
| |
V1 |
V2 |
|
W |
| |
* = Rule under review
? = Ship type/amount under review
Branching compositions are reported over the course of the event.
- Please refer to KCNav for up to date map content (fleets used, LoS/speed requirements/drops/LBAS ranges, ...)
Historical Bonuses
Do note that several of the 5th fleet members will have historical significance in the "2nd Stage Operations"!
| Ships [1] [Toggle Names] |
Map-wide | Gimmick NodesA1/C/D/F1/F2/H/I/K |
Node U |
Node V |
Node W | ||
|---|---|---|---|---|---|---|---|
| Damage | Damage | Damage | Damage | Damage | |||
| Coastal Defense Ships (DE) | 1.12x | - | |||||
| Destroyers (DD) | 1.03x | ||||||
| Light Cruisers (CL) NOT CLT |
1.04x | ||||||
| Seaplane Tenders (AV) | 1.08x | ||||||
| Submarine Tenders (AS) | 1.08x | ||||||
Souya Ootomari |
1.28x | - | - | ||||
| 5th Fleet | 1.16x | 5th Fleet | |||||
| CA | Ashigara Nachi |
1.12x | 1.06x | 1.16x | |||
| CL(T) | Abukuma Kiso Tama |
1.08x | 1.05x | 1.12x | |||
| DD | Akebono Kasumi Shiranui Hatsushimo Wakaba Ushio Hatsuharu Usugumo |
1.06x | 1.04x | 1.08x | |||
|
1.12x | - | |||||
|
- | 1.16x | |||||
| Equipment | Map-wide | ||
|---|---|---|---|
| Damage | Evasion | ||
 ★+7 7+ ★+7 7+ |
1.12x | Good [2] | |
|
1 | 1.18x | - |
| 2 | 1.28x | - | |
- The torpedo bomber bonus only works on a non-zero slot.
- LBAS


- The bonus is only applied once (does not stack)
Map Overview
E2 is a single and combined fleet, two-phase map consisting of one transport and one boss phase.
- 2 LBAS is available to sortie on this map
- This map uses 2 locks:
 1st Fleet, Starting point 1 (reused from E-1)
 5th Fleet, Starting point 2 (reused in E-3)
The use of ![]() AGDP AGDP
AGDP AGDP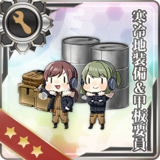 on CV(B/L), Ise-class Kai Ni, Akitsu Maru Kai, Kumano Maru, and Yamashio Maru, is required to sortie these ships on the map.
 Barrage Balloons can be deployed on node W
Gimmick 1 - Unlock
To unlock the next part of the map, the following steps have to be performed:
| F1 | F2 | C | |
|---|---|---|---|
| Hard | A+ x2 | A+ x2 | S x2 |
| Medium | A+ | A+ | S x2 |
| Easy | ? | ? | ? |
| Casual | ? | ? | ? |
| Nodes C, F1 & F2 | |||||||||||||||||||||||||||||||||||||||||||||
|---|---|---|---|---|---|---|---|---|---|---|---|---|---|---|---|---|---|---|---|---|---|---|---|---|---|---|---|---|---|---|---|---|---|---|---|---|---|---|---|---|---|---|---|---|---|
|
| ||||||||||||||||||||||||||||||||||||||||||||
| Fleet Notes | |||||||||||||||||||||||||||||||||||||||||||||
All relevant nodes are surface combat one.
| |||||||||||||||||||||||||||||||||||||||||||||
| LBAS Notes | |||||||||||||||||||||||||||||||||||||||||||||
| Sending all LBAS on the relevant nodes is advised. | |||||||||||||||||||||||||||||||||||||||||||||
Gimmick 2 - Unlock
To unlock the 1st phase, the following steps have to be performed:
| K | F | |
|---|---|---|
| Hard | A+ x3 | AS |
| Medium | A+ x3 | - |
| Easy | A+ x3 | - |
| Casual | A+ x3? | - |
| Node K | |||||||||||||||||||||||||||||||||||||||||||||
|---|---|---|---|---|---|---|---|---|---|---|---|---|---|---|---|---|---|---|---|---|---|---|---|---|---|---|---|---|---|---|---|---|---|---|---|---|---|---|---|---|---|---|---|---|---|
|
| ||||||||||||||||||||||||||||||||||||||||||||
| Fleet Notes | |||||||||||||||||||||||||||||||||||||||||||||
The node is surface combat.
| |||||||||||||||||||||||||||||||||||||||||||||
| LBAS Notes | |||||||||||||||||||||||||||||||||||||||||||||
| Sending half LBAS node I and the other on node K is advised to maxime the passing rate | |||||||||||||||||||||||||||||||||||||||||||||
- Nodes F
- Refer to #Gimmick 1 - Unlock's fleets for composition and routing (node F2's path).
Phase 1 - TP
Phase 1 is a new kind of Transport Operation, where "tanks" do work better:
| Landing Operation [3] | |||
|---|---|---|---|
| Type | Equipment | S-Rank | A-Rank |
Daihatsu Landing Craft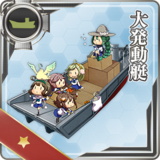 Toku Daihatsu Landing Craft 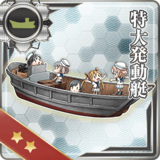 Armed Daihatsu 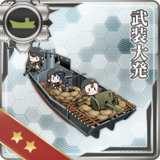 Soukoutei 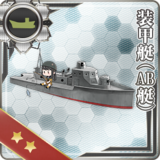
|
6 | 4.2 | |
DLC + T89 Tank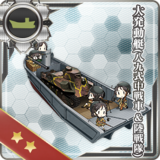 |
15 | 10.5 | |
DLC + Panzer II |
22 | 15.4 | |
Toku DLC + Ho-Ni Tank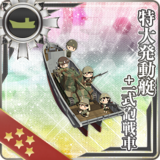 |
41 | 28.7 | |
Toku DLC + 11th Reg |
47 | 32.9 | |
M4A1 DD |
25 | 17.5 | |
Toku DLC + Panzer III |
28 | 19.6 | |
Toku DLC + Chi-Ha |
23 | 16.1 | |
Toku DLC + Chi-Ha Kai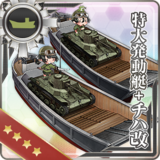 |
29 | 20.3 | |
Toku DLC + Panzer III J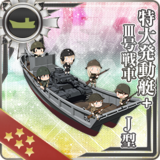 |
33 | 23.1 | |
Ka-Mi tank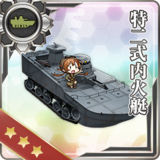 |
10 | 7 | |
Ka-Tsu tank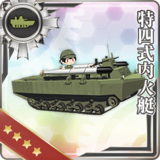 |
7 | 4.9 | |
Ka-Tsu tank Kai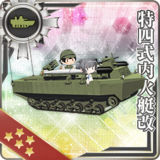 |
9 | 6.3 | |
Army Infantry Corps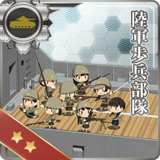 |
15 | 10.5 | |
Chi-Ha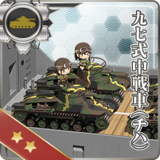 |
17 | 11.9 | |
Chi-Ha Kai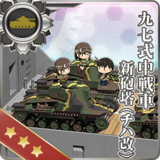 |
23 | 16.1 | |
Infantry + Chi-Ha Kai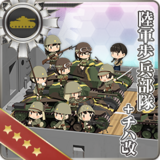 |
38 | 26.6 | |
Drum Canisters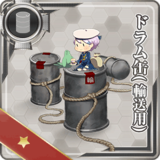 |
0 | 0 | |
Rations 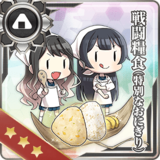 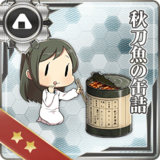 |
? | ? | |
| STF | |||||||||||||||||||||||||||||||||||||||||||||||||
|---|---|---|---|---|---|---|---|---|---|---|---|---|---|---|---|---|---|---|---|---|---|---|---|---|---|---|---|---|---|---|---|---|---|---|---|---|---|---|---|---|---|---|---|---|---|---|---|---|---|
|
| ||||||||||||||||||||||||||||||||||||||||||||||||
| Fleet Notes | |||||||||||||||||||||||||||||||||||||||||||||||||
| Bringing an AACI and some ASW is advised to reach the boss.
Having 1 or 2 good night cut-ins is recommended to farm for S rank. | |||||||||||||||||||||||||||||||||||||||||||||||||
| LBAS Notes | |||||||||||||||||||||||||||||||||||||||||||||||||
| All LBAS should be sent on the boss. | |||||||||||||||||||||||||||||||||||||||||||||||||
- It is recommended to field between 3-5 DD that can carry Landing Craft to drain the TP Gauge.
- Please refer to the Landing Craft table above for what Landing craft to use to maximize TP Drain per run.
Phase 2 - Boss
| STF | |||||||||||||||||||||||||||||||||||||||||||||||||
|---|---|---|---|---|---|---|---|---|---|---|---|---|---|---|---|---|---|---|---|---|---|---|---|---|---|---|---|---|---|---|---|---|---|---|---|---|---|---|---|---|---|---|---|---|---|---|---|---|---|
|
| ||||||||||||||||||||||||||||||||||||||||||||||||
| Fleet Notes | |||||||||||||||||||||||||||||||||||||||||||||||||
The boss is a submarine, it is required to bring very strong ASW and OASW to kill it.
| |||||||||||||||||||||||||||||||||||||||||||||||||
| LBAS Notes | |||||||||||||||||||||||||||||||||||||||||||||||||
| Toukai LBAS is recommended to help chip the boss. | |||||||||||||||||||||||||||||||||||||||||||||||||
 Smokes are highly recommended for V to avoid taking damage.
- Using the
 FCF FCF
 can help increase the reach rate.
Gimmick 3 - Debuff
Once LD has been reached, the following steps have to be performed to debuff the boss.
| F1 | F2 | K | U | LBAS | |
|---|---|---|---|---|---|
| Hard | A+ x2 | A+ x2 | A+ x2 | A+ x2 | AS x2 |
| Medium | - | A+ x2 | A+ x2 | A+ x2 | AS |
| Easy | - | A+ x2 | A+ x2 | A+ x2 | AS |
| Casual | - | A+ x2 | A+ x2 | A+ x2 | AS |
Refer to #Gimmick 1 - Unlock's fleets for composition and routing.
- Refer to #Gimmick 2 - Unlock's fleet for composition and routing.
- Refer to #Phase 1 - TP's fleet for composition and routing.
| LBAS | AS |
|---|---|
| Hard | 281 |
| Medium | 230 |
| Easy | 209 |
| Casual | 158 |
Once on LD, the CG will change to the following:
| Submarine Seerfish Water Demon |
|---|
|


Enemy Compositions

| Type | Ships |
|---|---|
| DE | |
| DD |
| Type | Ships |
|---|---|
| DE | |
| DD | |
| AO |
| Type | Ships |
|---|---|
| DE | |
| DD | |
| AO |
| Type | Ships |
|---|---|
| DE | |
| DD | |
| AO |
| Type | Ships |
|---|---|
| DE | |
| DD | |
| AO |
| Type | Ships |
|---|---|
| DE | |
| DD | |
| LHA | |
| AO |
| Type | Ships |
|---|---|
| DE | |
| DD |
| Type | Ships |
|---|---|
| DE | |
| DD | |
| AO |
| Type | Ships |
|---|---|
| DE | |
| DD | |
| AO |
| Type | Ships |
|---|---|
| DE | |
| DD | |
| LHA | |
| AO |
| Type | Ships |
|---|---|
| DE | |
| DD | |
| LHA | |
| AO |
| Type | Ships |
|---|---|
| DE | |
| DD | |
| CVL | |
| SS | |
| SSV | |
| LHA | |
| AO |
| # | Empty Node | ||
|---|---|---|---|
| A | 気のせいだった。 Must be my imagination. | ||
| # | Empty Node | ||
| # | Formation | Normal Battle Node | AD/AP AS/AS+ |
|---|---|---|---|
| A1 | Echelon Line Abreast |
0/0 0/0 | |
| Echelon Line Abreast |
0/0 0/0 | ||
| Echelon Line Abreast |
0/0 0/0 | ||
| # | Formation | Normal Battle Node | AD/AP AS/AS+ |
| # | Formation | Air Defense Node | AD/AP AS/AS+ |
|---|---|---|---|
| A2 | Diamond (HA) |
47/94 210/420 | |
| Diamond | 23/45 99/198 | ||
| Diamond | 27/54 120/240 | ||
| Diamond (HA) |
51/101 227/453 | ||
| # | Formation | Air Defense Node | AD/AP AS/AS+ |
| # | Selection Node | ||
|---|---|---|---|
| B | 艦隊の針路を選択できます。提督、どちらの針路をとられますか? You can decide the fleet's course. Admiral, which heading should we take? | ||
| # | Selection Node | ||
| # | Formation | Normal Battle Node | AD/AP AS/AS+ |
|---|---|---|---|
| C | Line Ahead Echelon Vanguard |
0/0 0/0 | |
| # | Formation | Normal Battle Node | AD/AP AS/AS+ |
| # | Formation | Normal Battle Node | AD/AP AS/AS+ |
|---|---|---|---|
| D | Line Ahead | 0/0 0/0 | |
| Line Ahead | 0/0 0/0 | ||
| Line Ahead | 0/0 0/0 | ||
| # | Formation | Normal Battle Node | AD/AP AS/AS+ |
| # | Selection Node | ||
|---|---|---|---|
| E | 艦隊の針路を選択できます。提督、どちらの針路をとられますか? You can decide the fleet's course. Admiral, which heading should we take? | ||
| # | Selection Node | ||
| # | Formation | Air Defense Node | AD/AP AS/AS+ |
|---|---|---|---|
| F | Diamond (HA) |
47/94 210/420 | |
| Diamond (HA) |
47/93 209/417 | ||
| Diamond (HA) |
52/103 230/459 | ||
| Diamond (HA) |
46/92 206/411 | ||
| Diamond (HA) |
46/92 206/411 | ||
| Diamond (HA) |
51/101 227/453 | ||
| # | Formation | Air Defense Node | AD/AP AS/AS+ |
| # | Formation | Normal Battle Node | AD/AP AS/AS+ |
|---|---|---|---|
| F1 | Line Ahead Double Line Diamond |
36/72 161/321 | |
| # | Formation | Normal Battle Node | AD/AP AS/AS+ |
| # | Formation | Normal Battle Node | AD/AP AS/AS+ |
|---|---|---|---|
| F2 | Line Ahead | 0/0 0/0 | |
| Line Ahead | 0/0 0/0 | ||
| Line Ahead | 0/0 0/0 | ||
| # | Formation | Normal Battle Node | AD/AP AS/AS+ |
| # | Formation | Air Defense Node | AD/AP AS/AS+ |
|---|---|---|---|
| G | Diamond (HA) |
47/94 210/420 | |
| Diamond | 23/45 99/198 | ||
| Diamond | 27/54 120/240 | ||
| Diamond (HA) |
51/101 227/453 | ||
| # | Formation | Air Defense Node | AD/AP AS/AS+ |
| # | Formation | Normal Battle Node | AD/AP AS/AS+ |
|---|---|---|---|
| H | Echelon Line Abreast |
0/0 0/0 | |
| Echelon Line Abreast |
0/0 0/0 | ||
| Echelon Line Abreast |
0/0 0/0 | ||
| # | Formation | Normal Battle Node | AD/AP AS/AS+ |
| # | Formation | Normal Battle Node | AD/AP AS/AS+ |
|---|---|---|---|
| I | Diamond | 45/89 198/396 | |
| Diamond | 45/89 198/396 | ||
| Diamond | 45/89 198/396 | ||
| # | Formation | Normal Battle Node | AD/AP AS/AS+ |
| # | Empty Node | ||
|---|---|---|---|
| J | 敵影を見ず。 No enemy spotted. | ||
| # | Empty Node | ||
| # | Formation | Normal Battle Node | AD/AP AS/AS+ |
|---|---|---|---|
| K | Line Ahead | 0/0 0/0 | |
| Line Ahead | 0/0 0/0 | ||
| Line Ahead | 0/0 0/0 | ||
| # | Formation | Normal Battle Node | AD/AP AS/AS+ |
| # | Empty Node | ||
|---|---|---|---|
| L | 気のせいだった。 Must be my imagination. | ||
| # | Empty Node | ||
| # | Formation | Normal Battle Node | AD/AP AS/AS+ |
|---|---|---|---|
| M | Diamond | 45/89 198/396 | |
| Diamond | 45/89 198/396 | ||
| Diamond | 45/89 198/396 | ||
| # | Formation | Normal Battle Node | AD/AP AS/AS+ |
| # | Selection Node | ||
|---|---|---|---|
| N | 艦隊の針路を選択できます。提督、どちらの針路をとられますか? You can decide the fleet's course. Admiral, which heading should we take? | ||
| # | Selection Node | ||
| # | Formation | Air Defense Node | AD/AP AS/AS+ |
|---|---|---|---|
| O | Diamond (HA) |
47/94 210/420 | |
| Diamond (HA) |
47/93 209/417 | ||
| Diamond (HA) |
52/103 230/459 | ||
| Diamond (HA) |
46/92 206/411 | ||
| Diamond (HA) |
46/92 206/411 | ||
| Diamond (HA) |
51/101 227/453 | ||
| # | Formation | Air Defense Node | AD/AP AS/AS+ |
| # | Formation | Normal Battle Node | AD/AP AS/AS+ |
|---|---|---|---|
| P | Echelon Line Abreast |
0/0 0/0 | |
| Echelon Line Abreast |
0/0 0/0 | ||
| Echelon Line Abreast |
0/0 0/0 | ||
| # | Formation | Normal Battle Node | AD/AP AS/AS+ |
| # | Formation | Normal Battle Node | AD/AP AS/AS+ |
|---|---|---|---|
| Q | Echelon Line Abreast |
0/0 0/0 | |
| Echelon Line Abreast |
0/0 0/0 | ||
| # | Formation | Normal Battle Node | AD/AP AS/AS+ |
| # | Formation | Normal Battle Node | AD/AP AS/AS+ |
|---|---|---|---|
| R | Line Ahead Double Line Vanguard |
0/0 0/0 | |
| # | Formation | Normal Battle Node | AD/AP AS/AS+ |
| # | Formation | Normal Battle Node | AD/AP AS/AS+ |
|---|---|---|---|
| S | Line Ahead Double Line Vanguard |
0/0 0/0 | |
| # | Formation | Normal Battle Node | AD/AP AS/AS+ |
| # | Landing Node | ||
|---|---|---|---|
| T | 輸送物資の揚陸地点に到達しました。本海域の輸送作戦は無事完了しています。 The landing point of the convoy has been reached. The transport operation here has already been completed successfully. | ||
| # | Landing Node | ||
| # | Formation | Boss Battle Node | AD/AP AS/AS+ |
|---|---|---|---|
| U | Line Ahead Double Line Echelon |
0/0 0/0 | |
| # | Formation | Boss Battle Node | AD/AP AS/AS+ |
| # | Formation | Normal Battle Node | AD/AP AS/AS+ |
|---|---|---|---|
| V | Line Ahead | 43/85 189/378 | |
| Line Ahead | 43/85 189/378 | ||
| Line Ahead | 45/89 198/396 | ||
| # | Formation | Normal Battle Node | AD/AP AS/AS+ |
| # | Empty Node | ||
|---|---|---|---|
| V1 | 気のせいだった。 Must be my imagination. | ||
| # | Empty Node | ||
| # | Empty Node | ||
|---|---|---|---|
| V2 | 敵影を見ず。 No enemy spotted. | ||
| # | Empty Node | ||
| # | Formation | Boss Battle Node | AD/AP AS/AS+ |
|---|---|---|---|
| W | Cruising Formation 1 | 0/0 0/0 | |
| Cruising Formation 1 (Final)
|
38/75 167/333 | ||
| # | Formation | Boss Battle Node | AD/AP AS/AS+ |
| Type | Ships |
|---|---|
| DE |
| Type | Ships |
|---|---|
| DE | |
| DD |
| Type | Ships |
|---|---|
| DE | |
| DD | |
| AO |
| Type | Ships |
|---|---|
| DE | |
| DD | |
| AO |
| Type | Ships |
|---|---|
| DE | |
| DD | |
| AO |
| Type | Ships |
|---|---|
| DE | |
| DD | |
| LHA | |
| AO |
| Type | Ships |
|---|---|
| DE | |
| DD |
| Type | Ships |
|---|---|
| DE | |
| DD | |
| AO |
| Type | Ships |
|---|---|
| DE | |
| DD | |
| AO |
| Type | Ships |
|---|---|
| DE | |
| DD | |
| LHA | |
| AO |
| Type | Ships |
|---|---|
| DE | |
| DD | |
| LHA | |
| AO |
| Type | Ships |
|---|---|
| DE | |
| DD | |
| CVL | |
| SS | |
| SSV | |
| LHA | |
| AS | |
| AO |
| # | Empty Node | ||
|---|---|---|---|
| A | 気のせいだった。 Must be my imagination. | ||
| # | Empty Node | ||
| # | Formation | Normal Battle Node | AD/AP AS/AS+ |
|---|---|---|---|
| A1 | Echelon Line Abreast |
0/0 0/0 | |
| Echelon Line Abreast |
0/0 0/0 | ||
| Echelon Line Abreast |
0/0 0/0 | ||
| # | Formation | Normal Battle Node | AD/AP AS/AS+ |
| # | Formation | Air Defense Node | AD/AP AS/AS+ |
|---|---|---|---|
| A2 | Diamond | 17/33 72/144 | |
| Diamond (HA) |
36/71 158/315 | ||
| Diamond | 23/45 99/198 | ||
| Diamond | 27/54 120/240 | ||
| # | Formation | Air Defense Node | AD/AP AS/AS+ |
| # | Selection Node | ||
|---|---|---|---|
| B | 艦隊の針路を選択できます。提督、どちらの針路をとられますか? You can decide the fleet's course. Admiral, which heading should we take? | ||
| # | Selection Node | ||
| # | Formation | Normal Battle Node | AD/AP AS/AS+ |
|---|---|---|---|
| C | Line Ahead Echelon Vanguard |
0/0 0/0 | |
| # | Formation | Normal Battle Node | AD/AP AS/AS+ |
| # | Formation | Normal Battle Node | AD/AP AS/AS+ |
|---|---|---|---|
| D | Line Ahead | 0/0 0/0 | |
| Line Ahead | 0/0 0/0 | ||
| Line Ahead | 0/0 0/0 | ||
| # | Formation | Normal Battle Node | AD/AP AS/AS+ |
| # | Selection Node | ||
|---|---|---|---|
| E | 艦隊の針路を選択できます。提督、どちらの針路をとられますか? You can decide the fleet's course. Admiral, which heading should we take? | ||
| # | Selection Node | ||
| # | Formation | Air Defense Node | AD/AP AS/AS+ |
|---|---|---|---|
| F | Diamond (HA) |
36/71 158/315 | |
| Diamond (HA) |
47/94 210/420 | ||
| Diamond (HA) |
36/71 158/315 | ||
| Diamond (HA) |
47/93 209/417 | ||
| Diamond (HA) |
52/103 230/459 | ||
| Diamond (HA) |
35/69 155/309 | ||
| Diamond (HA) |
46/92 206/411 | ||
| # | Formation | Air Defense Node | AD/AP AS/AS+ |
| # | Formation | Normal Battle Node | AD/AP AS/AS+ |
|---|---|---|---|
| F1 | Line Ahead Double Line Diamond |
32/63 141/282 | |
| # | Formation | Normal Battle Node | AD/AP AS/AS+ |
| # | Formation | Normal Battle Node | AD/AP AS/AS+ |
|---|---|---|---|
| F2 | Line Ahead | 0/0 0/0 | |
| Line Ahead | 0/0 0/0 | ||
| Line Ahead | 0/0 0/0 | ||
| # | Formation | Normal Battle Node | AD/AP AS/AS+ |
| # | Formation | Air Defense Node | AD/AP AS/AS+ |
|---|---|---|---|
| G | Diamond | 17/33 72/144 | |
| Diamond | 23/45 99/198 | ||
| # | Formation | Air Defense Node | AD/AP AS/AS+ |
| # | Formation | Normal Battle Node | AD/AP AS/AS+ |
|---|---|---|---|
| H | Echelon Line Abreast |
0/0 0/0 | |
| Echelon Line Abreast |
0/0 0/0 | ||
| Echelon Line Abreast |
0/0 0/0 | ||
| # | Formation | Normal Battle Node | AD/AP AS/AS+ |
| # | Formation | Normal Battle Node | AD/AP AS/AS+ |
|---|---|---|---|
| I | Diamond | 36/71 159/318 | |
| Diamond | 36/71 159/318 | ||
| Diamond | 36/71 159/318 | ||
| # | Formation | Normal Battle Node | AD/AP AS/AS+ |
| # | Empty Node | ||
|---|---|---|---|
| J | 敵影を見ず。 No enemy spotted. | ||
| # | Empty Node | ||
| # | Formation | Normal Battle Node | AD/AP AS/AS+ |
|---|---|---|---|
| K | Line Ahead | 0/0 0/0 | |
| Line Ahead | 0/0 0/0 | ||
| Line Ahead | 0/0 0/0 | ||
| # | Formation | Normal Battle Node | AD/AP AS/AS+ |
| # | Empty Node | ||
|---|---|---|---|
| L | 気のせいだった。 Must be my imagination. | ||
| # | Empty Node | ||
| # | Formation | Normal Battle Node | AD/AP AS/AS+ |
|---|---|---|---|
| M | Diamond | 36/71 159/318 | |
| Diamond | 36/71 159/318 | ||
| Diamond | 36/71 159/318 | ||
| # | Formation | Normal Battle Node | AD/AP AS/AS+ |
| # | Selection Node | ||
|---|---|---|---|
| N | 艦隊の針路を選択できます。提督、どちらの針路をとられますか? You can decide the fleet's course. Admiral, which heading should we take? | ||
| # | Selection Node | ||
| # | Formation | Air Defense Node | AD/AP AS/AS+ |
|---|---|---|---|
| O | Diamond (HA) |
36/71 158/315 | |
| Diamond (HA) |
47/94 210/420 | ||
| Diamond (HA) |
36/71 158/315 | ||
| Diamond (HA) |
47/93 209/417 | ||
| Diamond (HA) |
52/103 230/459 | ||
| Diamond (HA) |
35/69 155/309 | ||
| Diamond (HA) |
46/92 206/411 | ||
| # | Formation | Air Defense Node | AD/AP AS/AS+ |
| # | Formation | Normal Battle Node | AD/AP AS/AS+ |
|---|---|---|---|
| P | Echelon Line Abreast |
0/0 0/0 | |
| Echelon Line Abreast |
0/0 0/0 | ||
| Echelon Line Abreast |
0/0 0/0 | ||
| # | Formation | Normal Battle Node | AD/AP AS/AS+ |
| # | Formation | Normal Battle Node | AD/AP AS/AS+ |
|---|---|---|---|
| Q | Echelon Line Abreast |
0/0 0/0 | |
| Echelon Line Abreast |
0/0 0/0 | ||
| # | Formation | Normal Battle Node | AD/AP AS/AS+ |
| # | Formation | Normal Battle Node | AD/AP AS/AS+ |
|---|---|---|---|
| R | Line Ahead Double Line Vanguard |
0/0 0/0 | |
| # | Formation | Normal Battle Node | AD/AP AS/AS+ |
| # | Formation | Normal Battle Node | AD/AP AS/AS+ |
|---|---|---|---|
| S | Line Ahead Double Line Vanguard |
0/0 0/0 | |
| # | Formation | Normal Battle Node | AD/AP AS/AS+ |
| # | Landing Node | ||
|---|---|---|---|
| T | 輸送物資の揚陸地点に到達しました。本海域の輸送作戦は無事完了しています。 The landing point of the convoy has been reached. The transport operation here has already been completed successfully. | ||
| # | Landing Node | ||
| # | Formation | Boss Battle Node | AD/AP AS/AS+ |
|---|---|---|---|
| U | Line Ahead Double Line Echelon |
0/0 0/0 | |
| # | Formation | Boss Battle Node | AD/AP AS/AS+ |
| # | Formation | Normal Battle Node | AD/AP AS/AS+ |
|---|---|---|---|
| V | Line Ahead | 37/73 162/324 | |
| Line Ahead | 34/67 150/300 | ||
| Line Ahead | 35/69 155/309 | ||
| # | Formation | Normal Battle Node | AD/AP AS/AS+ |
| # | Empty Node | ||
|---|---|---|---|
| V1 | 気のせいだった。 Must be my imagination. | ||
| # | Empty Node | ||
| # | Empty Node | ||
|---|---|---|---|
| V2 | 敵影を見ず。 No enemy spotted. | ||
| # | Empty Node | ||
| # | Formation | Boss Battle Node | AD/AP AS/AS+ |
|---|---|---|---|
| W | Cruising Formation 1 | 0/0 0/0 | |
| Cruising Formation 1 (Final)
|
0/0 0/0 | ||
| # | Formation | Boss Battle Node | AD/AP AS/AS+ |
| Type | Ships |
|---|---|
| DE | |
| DD |
| Type | Ships |
|---|---|
| DE | |
| DD | |
| AO |
| Type | Ships |
|---|---|
| DE | |
| DD | |
| AO |
| Type | Ships |
|---|---|
| DE | |
| DD | |
| AO |
| Type | Ships |
|---|---|
| DE | |
| DD | |
| LHA | |
| AO |
| Type | Ships |
|---|---|
| DE |
| Type | Ships |
|---|---|
| DE | |
| DD | |
| AO |
| Type | Ships |
|---|---|
| DE | |
| DD | |
| AO |
| Type | Ships |
|---|---|
| DE | |
| DD | |
| LHA | |
| AO |
| Type | Ships |
|---|---|
| DE | |
| DD | |
| LHA | |
| AO |
| Type | Ships |
|---|---|
| DE | |
| DD | |
| CVL | |
| SS | |
| SSV | |
| LHA | |
| AS | |
| AO |
| # | Empty Node | ||
|---|---|---|---|
| A | 気のせいだった。 Must be my imagination. | ||
| # | Empty Node | ||
| # | Formation | Normal Battle Node | AD/AP AS/AS+ |
|---|---|---|---|
| A1 | Echelon Line Abreast |
0/0 0/0 | |
| Echelon Line Abreast |
0/0 0/0 | ||
| Echelon Line Abreast |
0/0 0/0 | ||
| # | Formation | Normal Battle Node | AD/AP AS/AS+ |
| # | Formation | Air Defense Node | AD/AP AS/AS+ |
|---|---|---|---|
| A2 | Diamond | 12/23 51/102 | |
| Diamond | 17/33 72/144 | ||
| Diamond (HA) |
36/71 158/315 | ||
| Diamond | 11/22 48/96 | ||
| Diamond | 23/45 99/198 | ||
| # | Formation | Air Defense Node | AD/AP AS/AS+ |
| # | Selection Node | ||
|---|---|---|---|
| B | 艦隊の針路を選択できます。提督、どちらの針路をとられますか? You can decide the fleet's course. Admiral, which heading should we take? | ||
| # | Selection Node | ||
| # | Formation | Normal Battle Node | AD/AP AS/AS+ |
|---|---|---|---|
| C | Line Ahead Echelon Vanguard |
0/0 0/0 | |
| # | Formation | Normal Battle Node | AD/AP AS/AS+ |
| # | Formation | Normal Battle Node | AD/AP AS/AS+ |
|---|---|---|---|
| D | Line Ahead | 0/0 0/0 | |
| Line Ahead | 0/0 0/0 | ||
| Line Ahead | 0/0 0/0 | ||
| # | Formation | Normal Battle Node | AD/AP AS/AS+ |
| # | Selection Node | ||
|---|---|---|---|
| E | 艦隊の針路を選択できます。提督、どちらの針路をとられますか? You can decide the fleet's course. Admiral, which heading should we take? | ||
| # | Selection Node | ||
| # | Formation | Air Defense Node | AD/AP AS/AS+ |
|---|---|---|---|
| F | Diamond (HA) |
24/48 107/213 | |
| Diamond (HA) |
36/71 158/315 | ||
| Diamond (HA) |
47/94 210/420 | ||
| Diamond (HA) |
36/71 158/315 | ||
| Diamond (HA) |
47/93 209/417 | ||
| Diamond (HA) |
35/69 155/309 | ||
| Diamond (HA) |
46/92 206/411 | ||
| # | Formation | Air Defense Node | AD/AP AS/AS+ |
| # | Formation | Normal Battle Node | AD/AP AS/AS+ |
|---|---|---|---|
| F1 | Line Ahead Double Line Diamond |
32/63 141/282 | |
| # | Formation | Normal Battle Node | AD/AP AS/AS+ |
| # | Formation | Normal Battle Node | AD/AP AS/AS+ |
|---|---|---|---|
| F2 | Line Ahead | 0/0 0/0 | |
| Line Ahead | 0/0 0/0 | ||
| Line Ahead | 0/0 0/0 | ||
| # | Formation | Normal Battle Node | AD/AP AS/AS+ |
| # | Formation | Air Defense Node | AD/AP AS/AS+ |
|---|---|---|---|
| G | Diamond | 12/23 51/102 | |
| Diamond | 17/33 72/144 | ||
| Diamond (HA) |
36/71 158/315 | ||
| Diamond | 11/22 48/96 | ||
| Diamond | 23/45 99/198 | ||
| # | Formation | Air Defense Node | AD/AP AS/AS+ |
| # | Formation | Normal Battle Node | AD/AP AS/AS+ |
|---|---|---|---|
| H | Echelon Line Abreast |
0/0 0/0 | |
| Echelon Line Abreast |
0/0 0/0 | ||
| Echelon Line Abreast |
0/0 0/0 | ||
| # | Formation | Normal Battle Node | AD/AP AS/AS+ |
| # | Formation | Normal Battle Node | AD/AP AS/AS+ |
|---|---|---|---|
| I | Diamond | 43/85 189/378 | |
| Diamond | 43/85 189/378 | ||
| Diamond | 43/85 189/378 | ||
| # | Formation | Normal Battle Node | AD/AP AS/AS+ |
| # | Empty Node | ||
|---|---|---|---|
| J | 敵影を見ず。 No enemy spotted. | ||
| # | Empty Node | ||
| # | Formation | Normal Battle Node | AD/AP AS/AS+ |
|---|---|---|---|
| K | Line Ahead | 0/0 0/0 | |
| Line Ahead | 0/0 0/0 | ||
| Line Ahead | 0/0 0/0 | ||
| # | Formation | Normal Battle Node | AD/AP AS/AS+ |
| # | Empty Node | ||
|---|---|---|---|
| L | 気のせいだった。 Must be my imagination. | ||
| # | Empty Node | ||
| # | Formation | Normal Battle Node | AD/AP AS/AS+ |
|---|---|---|---|
| M | Diamond | 43/85 189/378 | |
| Diamond | 43/85 189/378 | ||
| Diamond | 43/85 189/378 | ||
| # | Formation | Normal Battle Node | AD/AP AS/AS+ |
| # | Selection Node | ||
|---|---|---|---|
| N | 艦隊の針路を選択できます。提督、どちらの針路をとられますか? You can decide the fleet's course. Admiral, which heading should we take? | ||
| # | Selection Node | ||
| # | Formation | Air Defense Node | AD/AP AS/AS+ |
|---|---|---|---|
| O | Diamond (HA) |
24/48 107/213 | |
| Diamond (HA) |
36/71 158/315 | ||
| Diamond (HA) |
47/94 210/420 | ||
| Diamond (HA) |
36/71 158/315 | ||
| Diamond (HA) |
47/93 209/417 | ||
| Diamond (HA) |
35/69 155/309 | ||
| Diamond (HA) |
46/92 206/411 | ||
| # | Formation | Air Defense Node | AD/AP AS/AS+ |
| # | Formation | Normal Battle Node | AD/AP AS/AS+ |
|---|---|---|---|
| P | Echelon Line Abreast |
0/0 0/0 | |
| Echelon Line Abreast |
0/0 0/0 | ||
| Echelon Line Abreast |
0/0 0/0 | ||
| # | Formation | Normal Battle Node | AD/AP AS/AS+ |
| # | Formation | Normal Battle Node | AD/AP AS/AS+ |
|---|---|---|---|
| Q | Echelon Line Abreast |
0/0 0/0 | |
| Echelon Line Abreast |
0/0 0/0 | ||
| # | Formation | Normal Battle Node | AD/AP AS/AS+ |
| # | Formation | Normal Battle Node | AD/AP AS/AS+ |
|---|---|---|---|
| R | Line Ahead Double Line Vanguard |
0/0 0/0 | |
| # | Formation | Normal Battle Node | AD/AP AS/AS+ |
| # | Formation | Normal Battle Node | AD/AP AS/AS+ |
|---|---|---|---|
| S | Line Ahead Double Line Vanguard |
0/0 0/0 | |
| # | Formation | Normal Battle Node | AD/AP AS/AS+ |
| # | Landing Node | ||
|---|---|---|---|
| T | 輸送物資の揚陸地点に到達しました。本海域の輸送作戦は無事完了しています。 The landing point of the convoy has been reached. The transport operation here has already been completed successfully. | ||
| # | Landing Node | ||
| # | Formation | Boss Battle Node | AD/AP AS/AS+ |
|---|---|---|---|
| U | Line Ahead Double Line Echelon |
0/0 0/0 | |
| # | Formation | Boss Battle Node | AD/AP AS/AS+ |
| # | Formation | Normal Battle Node | AD/AP AS/AS+ |
|---|---|---|---|
| V | Line Ahead | 35/69 155/309 | |
| Line Ahead | 10/19 42/84 | ||
| Line Ahead | 34/67 150/300 | ||
| # | Formation | Normal Battle Node | AD/AP AS/AS+ |
| # | Empty Node | ||
|---|---|---|---|
| V1 | 気のせいだった。 Must be my imagination. | ||
| # | Empty Node | ||
| # | Empty Node | ||
|---|---|---|---|
| V2 | 敵影を見ず。 No enemy spotted. | ||
| # | Empty Node | ||
| # | Formation | Boss Battle Node | AD/AP AS/AS+ |
|---|---|---|---|
| W | Cruising Formation 1 | 0/0 0/0 | |
| Cruising Formation 1 (Final)
|
0/0 0/0 | ||
| # | Formation | Boss Battle Node | AD/AP AS/AS+ |
| Type | Ships |
|---|---|
| DE | |
| AO |
| Type | Ships |
|---|---|
| DE | |
| DD | |
| AO |
| Type | Ships |
|---|---|
| DE | |
| DD | |
| AO |
| Type | Ships |
|---|---|
| DE | |
| DD | |
| AO |
| Type | Ships |
|---|---|
| DE | |
| DD | |
| AO |
| Type | Ships |
|---|---|
| DE | |
| DD | |
| AO |
| Type | Ships |
|---|---|
| DE | |
| DD | |
| LHA | |
| AO |
| Type | Ships |
|---|---|
| DE | |
| DD | |
| AO |
| Type | Ships |
|---|---|
| DE | |
| DD | |
| CVL | |
| SS | |
| SSV | |
| LHA | |
| AS | |
| AO |
| # | Empty Node | ||
|---|---|---|---|
| A | 気のせいだった。 Must be my imagination. | ||
| # | Empty Node | ||
| # | Formation | Normal Battle Node | AD/AP AS/AS+ |
|---|---|---|---|
| A1 | Echelon Line Abreast |
0/0 0/0 | |
| Echelon Line Abreast |
0/0 0/0 | ||
| # | Formation | Normal Battle Node | AD/AP AS/AS+ |
| # | Formation | Air Defense Node | AD/AP AS/AS+ |
|---|---|---|---|
| A2 | Diamond | 12/23 51/102 | |
| Diamond (HA) |
24/48 107/213 | ||
| Diamond | 11/22 48/96 | ||
| # | Formation | Air Defense Node | AD/AP AS/AS+ |
| # | Selection Node | ||
|---|---|---|---|
| B | 艦隊の針路を選択できます。提督、どちらの針路をとられますか? You can decide the fleet's course. Admiral, which heading should we take? | ||
| # | Selection Node | ||
| # | Formation | Normal Battle Node | AD/AP AS/AS+ |
|---|---|---|---|
| C | Line Ahead Echelon Vanguard |
0/0 0/0 | |
| # | Formation | Normal Battle Node | AD/AP AS/AS+ |
| # | Formation | Normal Battle Node | AD/AP AS/AS+ |
|---|---|---|---|
| D | Line Ahead | 0/0 0/0 | |
| Line Ahead | 0/0 0/0 | ||
| Line Ahead | 0/0 0/0 | ||
| # | Formation | Normal Battle Node | AD/AP AS/AS+ |
| # | Selection Node | ||
|---|---|---|---|
| E | 艦隊の針路を選択できます。提督、どちらの針路をとられますか? You can decide the fleet's course. Admiral, which heading should we take? | ||
| # | Selection Node | ||
| # | Formation | Air Defense Node | AD/AP AS/AS+ |
|---|---|---|---|
| F | Diamond (HA) |
24/48 107/213 | |
| Diamond (HA) |
36/71 158/315 | ||
| Diamond (HA) |
36/71 158/315 | ||
| Diamond (HA) |
35/69 155/309 | ||
| # | Formation | Air Defense Node | AD/AP AS/AS+ |
| # | Formation | Normal Battle Node | AD/AP AS/AS+ |
|---|---|---|---|
| F1 | Line Ahead Double Line Diamond |
32/63 141/282 | |
| # | Formation | Normal Battle Node | AD/AP AS/AS+ |
| # | Formation | Normal Battle Node | AD/AP AS/AS+ |
|---|---|---|---|
| F2 | Line Ahead | 0/0 0/0 | |
| Line Ahead | 0/0 0/0 | ||
| Line Ahead | 0/0 0/0 | ||
| Line Ahead | 0/0 0/0 | ||
| # | Formation | Normal Battle Node | AD/AP AS/AS+ |
| # | Formation | Air Defense Node | AD/AP AS/AS+ |
|---|---|---|---|
| G | Diamond | 12/23 51/102 | |
| Diamond (HA) |
24/48 107/213 | ||
| Diamond | 11/22 48/96 | ||
| # | Formation | Air Defense Node | AD/AP AS/AS+ |
| # | Formation | Normal Battle Node | AD/AP AS/AS+ |
|---|---|---|---|
| H | Echelon Line Abreast |
0/0 0/0 | |
| Echelon Line Abreast |
0/0 0/0 | ||
| # | Formation | Normal Battle Node | AD/AP AS/AS+ |
| # | Formation | Normal Battle Node | AD/AP AS/AS+ |
|---|---|---|---|
| I | Diamond | 3/6 12/24 | |
| Diamond | 9/17 36/72 | ||
| Diamond | 43/85 189/378 | ||
| # | Formation | Normal Battle Node | AD/AP AS/AS+ |
| # | Empty Node | ||
|---|---|---|---|
| J | 敵影を見ず。 No enemy spotted. | ||
| # | Empty Node | ||
| # | Formation | Normal Battle Node | AD/AP AS/AS+ |
|---|---|---|---|
| K | Line Ahead | 0/0 0/0 | |
| Line Ahead | 0/0 0/0 | ||
| Line Ahead | 0/0 0/0 | ||
| Line Ahead | 0/0 0/0 | ||
| # | Formation | Normal Battle Node | AD/AP AS/AS+ |
| # | Empty Node | ||
|---|---|---|---|
| L | 気のせいだった。 Must be my imagination. | ||
| # | Empty Node | ||
| # | Formation | Normal Battle Node | AD/AP AS/AS+ |
|---|---|---|---|
| M | Diamond | 3/6 12/24 | |
| Diamond | 9/17 36/72 | ||
| Diamond | 43/85 189/378 | ||
| # | Formation | Normal Battle Node | AD/AP AS/AS+ |
| # | Selection Node | ||
|---|---|---|---|
| N | 艦隊の針路を選択できます。提督、どちらの針路をとられますか? You can decide the fleet's course. Admiral, which heading should we take? | ||
| # | Selection Node | ||
| # | Formation | Air Defense Node | AD/AP AS/AS+ |
|---|---|---|---|
| O | Diamond (HA) |
24/48 107/213 | |
| Diamond (HA) |
36/71 158/315 | ||
| Diamond (HA) |
36/71 158/315 | ||
| Diamond (HA) |
35/69 155/309 | ||
| # | Formation | Air Defense Node | AD/AP AS/AS+ |
| # | Formation | Normal Battle Node | AD/AP AS/AS+ |
|---|---|---|---|
| P | Echelon Line Abreast |
0/0 0/0 | |
| Echelon Line Abreast |
0/0 0/0 | ||
| # | Formation | Normal Battle Node | AD/AP AS/AS+ |
| # | Formation | Normal Battle Node | AD/AP AS/AS+ |
|---|---|---|---|
| Q | Echelon Line Abreast |
0/0 0/0 | |
| Echelon Line Abreast |
0/0 0/0 | ||
| # | Formation | Normal Battle Node | AD/AP AS/AS+ |
| # | Formation | Normal Battle Node | AD/AP AS/AS+ |
|---|---|---|---|
| R | Line Ahead Double Line Vanguard |
0/0 0/0 | |
| # | Formation | Normal Battle Node | AD/AP AS/AS+ |
| # | Formation | Normal Battle Node | AD/AP AS/AS+ |
|---|---|---|---|
| S | Line Ahead Double Line Vanguard |
0/0 0/0 | |
| # | Formation | Normal Battle Node | AD/AP AS/AS+ |
| # | Landing Node | ||
|---|---|---|---|
| T | 輸送物資の揚陸地点に到達しました。本海域の輸送作戦は無事完了しています。 The landing point of the convoy has been reached. The transport operation here has already been completed successfully. | ||
| # | Landing Node | ||
| # | Formation | Boss Battle Node | AD/AP AS/AS+ |
|---|---|---|---|
| U | Line Ahead Double Line Echelon |
0/0 0/0 | |
| # | Formation | Boss Battle Node | AD/AP AS/AS+ |
| # | Formation | Normal Battle Node | AD/AP AS/AS+ |
|---|---|---|---|
| V | Line Ahead | 4/7 15/30 | |
| Line Ahead | 10/19 41/81 | ||
| Line Ahead | 10/19 42/84 | ||
| # | Formation | Normal Battle Node | AD/AP AS/AS+ |
| # | Empty Node | ||
|---|---|---|---|
| V1 | 気のせいだった。 Must be my imagination. | ||
| # | Empty Node | ||
| # | Empty Node | ||
|---|---|---|---|
| V2 | 敵影を見ず。 No enemy spotted. | ||
| # | Empty Node | ||
| # | Formation | Boss Battle Node | AD/AP AS/AS+ |
|---|---|---|---|
| W | Cruising Formation 1 | 0/0 0/0 | |
| Cruising Formation 1 (Final)
|
0/0 0/0 | ||
| # | Formation | Boss Battle Node | AD/AP AS/AS+ |
Ship Drops
| Ship drops | |||||||||||||||||||||||||||||||||||||||||||||||||||||||||||||||||||||||||||||||||||||||||||||||||||
|---|---|---|---|---|---|---|---|---|---|---|---|---|---|---|---|---|---|---|---|---|---|---|---|---|---|---|---|---|---|---|---|---|---|---|---|---|---|---|---|---|---|---|---|---|---|---|---|---|---|---|---|---|---|---|---|---|---|---|---|---|---|---|---|---|---|---|---|---|---|---|---|---|---|---|---|---|---|---|---|---|---|---|---|---|---|---|---|---|---|---|---|---|---|---|---|---|---|---|---|
| Type | Ship? | C | D | F1 | F2 | I | K | M | R | S | U | V | W | ||||||||||||||||||||||||||||||||||||||||||||||||||||||||||||||||||||||||||||||||||||||
| DE | Kaiboukan No.22 | Medium+ | Easy+ | Casual+ | Casual+ | Casual+ | Casual+ | Easy+ | Casual+ | Casual+ | Casual+ | Casual+ | Casual+ | ||||||||||||||||||||||||||||||||||||||||||||||||||||||||||||||||||||||||||||||||||||||
| DE | Kunashiri | Medium+ | Casual+ | Casual+ | Casual+ | Casual+ | Casual+ | Casual+ | Casual+ | Casual+ | Casual+ | ||||||||||||||||||||||||||||||||||||||||||||||||||||||||||||||||||||||||||||||||||||||||
| DE | Etorofu | Easy+ | Casual+ | Easy+ | Casual+ | Casual+ | Casual+ | Casual+ | Casual+ | Casual+ | Casual+ | ||||||||||||||||||||||||||||||||||||||||||||||||||||||||||||||||||||||||||||||||||||||||
| DD | Kaya | Easy+ | |||||||||||||||||||||||||||||||||||||||||||||||||||||||||||||||||||||||||||||||||||||||||||||||||
| DD | Ume | Hard+ | Easy+ | Easy+ | Casual+ | Casual+ | Casual+ | Medium+ | Casual+ | Casual+ | Casual+ | Casual+ | |||||||||||||||||||||||||||||||||||||||||||||||||||||||||||||||||||||||||||||||||||||||
| DD | Fuyutsuki | Medium+ | Casual+ | ||||||||||||||||||||||||||||||||||||||||||||||||||||||||||||||||||||||||||||||||||||||||||||||||
| DD | Shirakumo | Easy+ | |||||||||||||||||||||||||||||||||||||||||||||||||||||||||||||||||||||||||||||||||||||||||||||||||
| DD | Uzuki | Casual+ | |||||||||||||||||||||||||||||||||||||||||||||||||||||||||||||||||||||||||||||||||||||||||||||||||
| DD | Usugumo | Casual+ | Casual+ | Casual+ | Casual+ | ||||||||||||||||||||||||||||||||||||||||||||||||||||||||||||||||||||||||||||||||||||||||||||||
| DD | Uranami | Easy+ | Easy+ | Casual+ | Hard+ | Hard+ | Casual+ | Casual+ | Casual+ | ||||||||||||||||||||||||||||||||||||||||||||||||||||||||||||||||||||||||||||||||||||||||||
| DD | Kishinami | Medium+ | Medium+ | Casual+ | Casual+ | Casual+ | |||||||||||||||||||||||||||||||||||||||||||||||||||||||||||||||||||||||||||||||||||||||||||||
| DD | Asashimo | Easy+ | Easy+ | Medium+ | Casual+ | Hard+ | Hard+ | Casual+ | Casual+ | Casual+ | |||||||||||||||||||||||||||||||||||||||||||||||||||||||||||||||||||||||||||||||||||||||||
| DD | Kiyoshimo | Casual+ | |||||||||||||||||||||||||||||||||||||||||||||||||||||||||||||||||||||||||||||||||||||||||||||||||
| DD | Take | Medium+ | Easy+ | Casual+ | Casual+ | Casual+ | Casual+ | Casual+ | Casual+ | Casual+ | |||||||||||||||||||||||||||||||||||||||||||||||||||||||||||||||||||||||||||||||||||||||||
| DD | Tashkent | Casual+ | |||||||||||||||||||||||||||||||||||||||||||||||||||||||||||||||||||||||||||||||||||||||||||||||||
| CVL | Langley | Casual+ | |||||||||||||||||||||||||||||||||||||||||||||||||||||||||||||||||||||||||||||||||||||||||||||||||
| SS | Scamp | Casual+ | |||||||||||||||||||||||||||||||||||||||||||||||||||||||||||||||||||||||||||||||||||||||||||||||||
| SSV | I-36 | Casual+ | |||||||||||||||||||||||||||||||||||||||||||||||||||||||||||||||||||||||||||||||||||||||||||||||||
| LHA | No.101 Transport Ship | Easy+ | Casual+ | Easy+ | Casual+ | ||||||||||||||||||||||||||||||||||||||||||||||||||||||||||||||||||||||||||||||||||||||||||||||
| AS | Taigei | Casual+ | |||||||||||||||||||||||||||||||||||||||||||||||||||||||||||||||||||||||||||||||||||||||||||||||||
| AO | Ootomari | Hard+ | Casual+ | Casual+ | Easy+ | Casual+ | Easy+ | Easy+ | Casual+ | Casual+ | Casual+ | ||||||||||||||||||||||||||||||||||||||||||||||||||||||||||||||||||||||||||||||||||||||||
| AO | Yamashio Maru | Hard+ | Casual+ | Casual+ | Casual+ | Casual+ | Casual+ | Casual+ | Casual+ | Casual+ | Casual+ | ||||||||||||||||||||||||||||||||||||||||||||||||||||||||||||||||||||||||||||||||||||||||
| AO | Souya | Casual+ | |||||||||||||||||||||||||||||||||||||||||||||||||||||||||||||||||||||||||||||||||||||||||||||||||
| CL | Kitakami | Medium+ | Casual+ | Hard+ | Casual+ | ||||||||||||||||||||||||||||||||||||||||||||||||||||||||||||||||||||||||||||||||||||||||||||||
| CL | Ooi | Hard+ | Casual+ | Easy+ | Easy+ | Casual+ | Casual+ | Casual+ | Casual+ | Casual+ | Casual+ | ||||||||||||||||||||||||||||||||||||||||||||||||||||||||||||||||||||||||||||||||||||||||
| CL | Kinu | Hard+ | Medium+ | Casual+ | Casual+ | Casual+ | Casual+ | ||||||||||||||||||||||||||||||||||||||||||||||||||||||||||||||||||||||||||||||||||||||||||||
| CL | Abukuma | Medium+ | Medium+ | Casual+ | Casual+ | Casual+ | Casual+ | ||||||||||||||||||||||||||||||||||||||||||||||||||||||||||||||||||||||||||||||||||||||||||||
| CL | Sendai | Easy+ | Easy+ | Medium+ | Casual+ | Medium+ | Medium+ | Casual+ | Casual+ | Casual+ | |||||||||||||||||||||||||||||||||||||||||||||||||||||||||||||||||||||||||||||||||||||||||
| CA | Kinugasa | Casual+ | |||||||||||||||||||||||||||||||||||||||||||||||||||||||||||||||||||||||||||||||||||||||||||||||||
| CA | Takao | Casual+ | |||||||||||||||||||||||||||||||||||||||||||||||||||||||||||||||||||||||||||||||||||||||||||||||||
| CA | Atago | Casual+ | |||||||||||||||||||||||||||||||||||||||||||||||||||||||||||||||||||||||||||||||||||||||||||||||||
| CA | Suzuya | Casual+ | |||||||||||||||||||||||||||||||||||||||||||||||||||||||||||||||||||||||||||||||||||||||||||||||||
| CA | Kumano | Casual+ | |||||||||||||||||||||||||||||||||||||||||||||||||||||||||||||||||||||||||||||||||||||||||||||||||
| CA | Tone | Casual+ | |||||||||||||||||||||||||||||||||||||||||||||||||||||||||||||||||||||||||||||||||||||||||||||||||
| CA | Chikuma | Casual+ | |||||||||||||||||||||||||||||||||||||||||||||||||||||||||||||||||||||||||||||||||||||||||||||||||
| CVL | Zuihou | Casual+ | |||||||||||||||||||||||||||||||||||||||||||||||||||||||||||||||||||||||||||||||||||||||||||||||||
| FBB | Kongou | Casual+ | |||||||||||||||||||||||||||||||||||||||||||||||||||||||||||||||||||||||||||||||||||||||||||||||||
| FBB | Hiei | Casual+ | |||||||||||||||||||||||||||||||||||||||||||||||||||||||||||||||||||||||||||||||||||||||||||||||||
| FBB | Haruna | Casual+ | |||||||||||||||||||||||||||||||||||||||||||||||||||||||||||||||||||||||||||||||||||||||||||||||||
| FBB | Kirishima | Casual+ | |||||||||||||||||||||||||||||||||||||||||||||||||||||||||||||||||||||||||||||||||||||||||||||||||
| BB | Ise | Casual+ | |||||||||||||||||||||||||||||||||||||||||||||||||||||||||||||||||||||||||||||||||||||||||||||||||
| BB | Hyuuga | Casual+ | |||||||||||||||||||||||||||||||||||||||||||||||||||||||||||||||||||||||||||||||||||||||||||||||||
| SS | I-8 | Casual+ | |||||||||||||||||||||||||||||||||||||||||||||||||||||||||||||||||||||||||||||||||||||||||||||||||
| SS | I-19 | Casual+ | |||||||||||||||||||||||||||||||||||||||||||||||||||||||||||||||||||||||||||||||||||||||||||||||||
|
| |||||||||
|---|---|---|---|---|---|---|---|---|---|
|
Time until the end of the event:
| |||||||||