Difference between revisions of "World 4/4-4"
< World 4
| (23 intermediate revisions by 7 users not shown) | |||
| Line 1: | Line 1: | ||
| − | + | {{World/Hub}} | |
| + | =World 4-4: カスガダマ島 - Casgadama Island= | ||
{{LabSortieworld | {{LabSortieworld | ||
| − | | | + | | page = World 4/4-4 |
| difficulty = ☆ ☆ ☆ ☆ ☆ ☆ ☆ ☆ | | difficulty = ☆ ☆ ☆ ☆ ☆ ☆ ☆ ☆ | ||
| item = {{fuel}} {{steel}} | | item = {{fuel}} {{steel}} | ||
| exp = 340 | | exp = 340 | ||
| − | | code = カスガダマ沖海戦 | + | | code = カスガダマ沖海戦<br>[[wikipedia:Battle_of_Madagascar|Casgadama Island Naval Battle]] |
| − | | jptext = | + | | jptext = カレー洋西方の敵哨戒線を突破、カスガダマ島沖深く進出し、敵東方艦隊中枢部隊を捕捉撃滅せよ! |
| − | | entext = Break through | + | | entext = Break through enemy patrol line on western part of the Curry Ocean. After that, advance to the Casgadama Island deep area. Capture an enemy core unit of the Oriental fleet and annihilate it! |
| − | | aircon = {{ | + | | aircon = |
| − | + | {{AirConKai | |
| − | + | |AS=72 | |
| − | + | }} | |
| − | | AS = 72 | ||
}} | }} | ||
| + | |||
| + | {{MapUnlock | ||
| + | | unlock= [[4-3]] | ||
| + | | clear= the boss's flagship must be sunk 4 times | ||
}} | }} | ||
| + | |||
===Stage Guide=== | ===Stage Guide=== | ||
{{MapBranchingTable | {{MapBranchingTable | ||
|title = 4-4 Branching Rules | |title = 4-4 Branching Rules | ||
| − | |||
|id = 4-4 | |id = 4-4 | ||
|0 -> A, B = | |0 -> A, B = | ||
| Line 27: | Line 31: | ||
|B -> A, D/storm, F = | |B -> A, D/storm, F = | ||
| − | * Go to A if (F)BB(V)+CV(L | + | * Go to A if (F)BB(V)+CV(B/L) ≥ 4 |
* Otherwise, random between D and F | * Otherwise, random between D and F | ||
| E -> C/resource, G, I = | | E -> C/resource, G, I = | ||
| − | * Go to G if (F)BB(V)+CV( | + | * Go to G if (F)BB(V)+CV(B) ≥ 4 |
* Meet '''ANY''' of the following to go to I | * Meet '''ANY''' of the following to go to I | ||
** DD+DE ≥ 2 '''AND''' contain either of CA(V) or CL | ** DD+DE ≥ 2 '''AND''' contain either of CA(V) or CL | ||
| Line 51: | Line 55: | ||
===Tips=== | ===Tips=== | ||
| − | + | This map is relatively straight forward, being very permissive on routing and with no heavy danger. | |
| − | + | *It is suitable for some types of farming, such as Weekly World 4 quest {{Q|Bw6}}, leveling, and ranking. | |
| − | + | *The boss node can also yield a lot of rare drops such as Cranes, [[Taigei]], and most BB. | |
| − | * | ||
| − | |||
| − | |||
| − | |||
| − | |||
| − | |||
| − | + | Regarding the boss node, some compositions have a submarine present that can aggro ASW capable ships. | |
| − | + | *This submarine is relatively weak, and so should be taken out easily without the need of much ASW. | |
| − | + | *The boss can be either a [[Light Carrier Nu-Class]] Flagship or an [[Armored Carrier Princess]] (2/3 comps). | |
| − | + | **If rolling the latter one, the boss fight can become slightly more difficult. | |
| − | + | ||
| − | + | ===Recommended Fleets=== | |
| − | + | {{FleetGuide | |
| − | + | | Map = Standard Route | |
| − | + | | Fleet = '''1 (F)BB(V)/CVL/CA(V), 2 CV(B), 1 CA(V)/CL, 2 DD/DE | |
| − | + | 3 CA, 1 CL, 2 DD | |
| − | + | | Route = {{MapRoute|A|red|E|red|I|red|K|red}} | |
| − | + | | AS = 72 | |
| − | + | | Note = Bringing [[OASW]] is recommended to have a better pass rate on node {{MapRoute|E|red}}, and kill the submarine on the boss node. | |
| − | + | *DE are cheap options. | |
| − | | | + | | Quest = {{Q|Bw6}}, {{Q|By4}} |
| − | | | ||
| − | |||
| − | |||
| − | |||
| − | |||
| − | |||
| − | |||
| − | |||
| − | |||
| − | |||
| − | |||
| − | |||
| − | |||
| − | |||
| − | |||
| − | |||
| − | |||
| − | | | ||
| − | | | ||
| − | | | ||
| − | |E | ||
| − | | | ||
| − | |||
| − | |||
| − | |||
| − | |||
| − | |||
| − | |||
| − | |||
| − | |||
| − | |||
| − | |||
| − | |||
| − | |||
| − | |||
| − | |||
| − | |||
| − | |||
| − | |||
| − | |||
| − | |||
| − | |||
| − | |||
| − | |||
| − | |||
| − | |||
| − | |||
| − | |||
| − | |||
| − | |||
| − | |||
| − | |||
| − | |||
| − | |||
| − | |||
| − | |||
| − | |||
| − | |||
| − | |||
| − | |||
| − | |||
| − | |||
| − | |||
| − | |||
| − | |||
| − | |||
| − | |||
| − | |||
| − | |||
| − | |||
| − | |||
| − | |||
| − | |||
| − | |||
| − | |||
| − | |||
| − | |||
| − | |||
| − | |||
| − | |||
| − | |||
| − | |||
| − | |||
| − | |||
| − | |||
| − | |||
| − | |||
| − | |||
| − | |||
| − | |||
| − | |||
| − | |||
| − | |||
| − | |||
| − | |||
| − | |||
| − | |||
| − | |||
| − | |||
| − | |||
| − | |||
| − | |||
| − | |I | ||
| − | |||
| − | |||
| − | |||
| − | |||
| − | |||
| − | |||
| − | |||
| − | | | ||
| − | |K | ||
| − | | | ||
| − | | | ||
| − | | | ||
| − | | | ||
| − | | | ||
| − | |||
| − | | | ||
| − | | | ||
| − | |||
| − | |||
| − | | | ||
| − | |||
| − | |||
| − | |||
}} | }} | ||
| − | {{ | + | ===Resource Nodes=== |
| + | {{MapRoute|C|green|J|green}} are "Normal Resource Nodes" rewarding respectively fuel {{Fuel}} and steel {{Steel}}. | ||
| + | *''See [[Resource Node|here]] for more details. | ||
| + | |||
| + | {{Map/Footer|4-4| | ||
| + | |||
| + | |enemycompsnotes= | ||
| + | |||
| + | |shipdropnotes= | ||
| + | |||
| + | }} | ||
Latest revision as of 16:31, 22 October 2025
World 4-4: カスガダマ島 - Casgadama Island

| Strategy Name | カスガダマ沖海戦 Casgadama Island Naval Battle |
|---|---|
| Difficulty | ☆ ☆ ☆ ☆ ☆ ☆ ☆ ☆ |
| Item | |
| Strategy Content | カレー洋西方の敵哨戒線を突破、カスガダマ島沖深く進出し、敵東方艦隊中枢部隊を捕捉撃滅せよ! Break through enemy patrol line on western part of the Curry Ocean. After that, advance to the Casgadama Island deep area. Capture an enemy core unit of the Oriental fleet and annihilate it! |
| Boss Air Control | |||
|---|---|---|---|
| AD | AP | AS | AS+ |
| 22 | 32 | 72 | 144 |
| 4-4 Unlocking & Progression | ||||
|---|---|---|---|---|
| Unlock conditions | 4-4 is unlocked after clearing 4-3 | |||
| Clear conditions | To clear the map: the boss's flagship must be sunk 4 times | |||
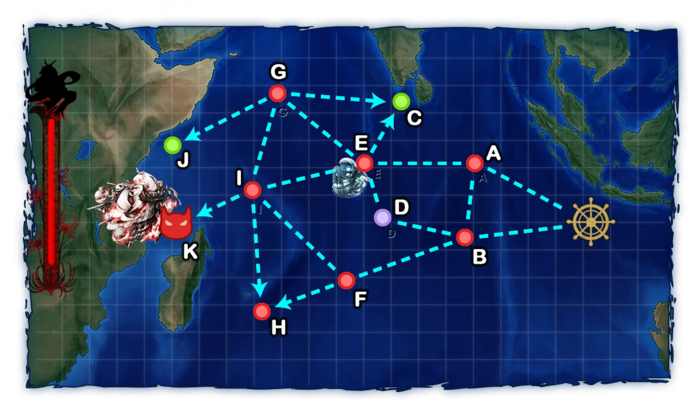
Stage Guide
| 4-4 Branching Rules | ||
|---|---|---|
| Nodes | Rules | |
| Start | A |
|
B | ||
A |
E |
|
B |
A |
|
D | ||
F | ||
E |
C |
|
G | ||
I | ||
F |
H |
|
I | ||
G |
C |
|
I | ||
J | ||
I |
H |
|
K | ||
Tips
This map is relatively straight forward, being very permissive on routing and with no heavy danger.
- It is suitable for some types of farming, such as Weekly World 4 quest Bw6, leveling, and ranking.
- The boss node can also yield a lot of rare drops such as Cranes, Taigei, and most BB.
Regarding the boss node, some compositions have a submarine present that can aggro ASW capable ships.
- This submarine is relatively weak, and so should be taken out easily without the need of much ASW.
- The boss can be either a Light Carrier Nu-Class Flagship or an Armored Carrier Princess (2/3 comps).
- If rolling the latter one, the boss fight can become slightly more difficult.
Recommended Fleets
| Standard Route | |||||||||||||||||||||||||||||||||||||
|---|---|---|---|---|---|---|---|---|---|---|---|---|---|---|---|---|---|---|---|---|---|---|---|---|---|---|---|---|---|---|---|---|---|---|---|---|---|
|
| ||||||||||||||||||||||||||||||||||||
| Fleet Notes | |||||||||||||||||||||||||||||||||||||
Bringing OASW is recommended to have a better pass rate on node E, and kill the submarine on the boss node.
| |||||||||||||||||||||||||||||||||||||
Resource Nodes
C J are "Normal Resource Nodes" rewarding respectively fuel ![]() and steel
and steel ![]() .
.
- See here for more details.
Enemy Compositions
4-4 A: 敵東方哨戒艦隊 A群 (PoiDB)
| # | Enemy Form. |
Base EXP | Normal Battle Node | AD/AP AS/AS+ |
|---|---|---|---|---|
| A | Line Ahead Double Line Echelon |
170 | 0/0 0/0 | |
| Line Ahead Double Line Echelon |
190 | 0/0 0/0 | ||
| # | Enemy Form. |
Base EXP | Normal Battle Node | AD/AP AS/AS+ |
4-4 B: 敵東方哨戒艦隊 B群 (PoiDB)
| # | Enemy Form. |
Base EXP | Normal Battle Node | AD/AP AS/AS+ |
|---|---|---|---|---|
| B | Line Ahead Echelon |
160 | 0/0 0/0 | |
| Line Ahead Echelon |
170 | 0/0 0/0 | ||
| Line Ahead Echelon |
190 | 0/0 0/0 | ||
| # | Enemy Form. |
Base EXP | Normal Battle Node | AD/AP AS/AS+ |
4-4 C
| # | Resource Node | ||
|---|---|---|---|
| C | Gained 60~150 | ||
| # | Resource Node | ||
4-4 D
| # | Maelstrom Node | ||
|---|---|---|---|
| D | Lost Normal | ||
| # | Maelstrom Node | ||
4-4 E: 敵潜水艦哨戒線 (PoiDB)
| # | Enemy Form. |
Base EXP | Normal Battle Node | AD/AP AS/AS+ |
|---|---|---|---|---|
| E | Echelon Line Abreast |
160 | 0/0 0/0 | |
| Echelon Line Abreast |
180 | 0/0 0/0 | ||
| Echelon Line Abreast |
200 | 0/0 0/0 | ||
| # | Enemy Form. |
Base EXP | Normal Battle Node | AD/AP AS/AS+ |
4-4 F: 敵東方空母機動部隊 (PoiDB)
| # | Enemy Form. |
Base EXP | Normal Battle Node | AD/AP AS/AS+ |
|---|---|---|---|---|
| F | Diamond | 260 | 16/32 71/141 | |
| Diamond | 280 | 16/32 71/141 | ||
| Diamond | 300 | 18/35 78/156 | ||
| Diamond | ? | 18/35 78/156 | ||
| Diamond | 340 | 18/35 77/153 | ||
| # | Enemy Form. |
Base EXP | Normal Battle Node | AD/AP AS/AS+ |
4-4 G: 敵東方艦隊 新鋭戦艦戦隊 (PoiDB)
| # | Enemy Form. |
Base EXP | Normal Battle Node | AD/AP AS/AS+ |
|---|---|---|---|---|
| G | Line Ahead Double Line |
320 | 0/0 0/0 | |
| Line Ahead Double Line |
320 | 9/17 36/72 | ||
| Line Ahead Double Line |
340 | 8/16 35/69 | ||
| # | Enemy Form. |
Base EXP | Normal Battle Node | AD/AP AS/AS+ |
4-4 H: 敵東方艦隊 残存部隊 (PoiDB)
| # | Enemy Form. |
Base EXP | Normal Battle Node | AD/AP AS/AS+ |
|---|---|---|---|---|
| H | Double Line | 220 | 0/0 0/0 | |
| Double Line | 280 | 0/0 0/0 | ||
| Diamond | 340 | 8/16 35/69 | ||
| Diamond | 350 | 10/19 42/84 | ||
| # | Enemy Form. |
Base EXP | Normal Battle Node | AD/AP AS/AS+ |
4-4 I: 敵東方中枢艦隊 護衛戦隊 (PoiDB)
| # | Enemy Form. |
Base EXP | Normal Battle Node | AD/AP AS/AS+ |
|---|---|---|---|---|
| I | Line Ahead Double Line |
200 | 0/0 0/0 | |
| Line Ahead | 220 | 0/0 0/0 | ||
| Line Ahead Double Line |
240 | 0/0 0/0 | ||
| # | Enemy Form. |
Base EXP | Normal Battle Node | AD/AP AS/AS+ |
4-4 J
| # | Resource Node | ||
|---|---|---|---|
| J | Gained 40~105 | ||
| # | Resource Node | ||
4-4 K: 敵東方中枢艦隊 旗艦 (PoiDB)
| # | Enemy Form. |
Base EXP | Boss Battle Node | AD/AP AS/AS+ |
|---|---|---|---|---|
| K | Line Ahead Diamond |
440 | 8/16 35/69 | |
| Line Ahead Diamond |
460 | 17/33 72/144 | ||
| Line Ahead Diamond |
480 | 17/33 72/144 | ||
| # | Enemy Form. |
Base EXP | Boss Battle Node | AD/AP AS/AS+ |
Ship Drops
This map currently has "limited-time" drops that don't appear in the table below, see Drop List for more info.
| Ship drops | |||||||||||||||||||||||||||||||||||||||||||||||||||||||||||||||||||||||||||||||||||||||||||||||||||
|---|---|---|---|---|---|---|---|---|---|---|---|---|---|---|---|---|---|---|---|---|---|---|---|---|---|---|---|---|---|---|---|---|---|---|---|---|---|---|---|---|---|---|---|---|---|---|---|---|---|---|---|---|---|---|---|---|---|---|---|---|---|---|---|---|---|---|---|---|---|---|---|---|---|---|---|---|---|---|---|---|---|---|---|---|---|---|---|---|---|---|---|---|---|---|---|---|---|---|---|
| Type | Ship? | A | B | G | H | I | K | ||||||||||||||||||||||||||||||||||||||||||||||||||||||||||||||||||||||||||||||||||||||||||||
| DD | Uzuki | ✔️ | |||||||||||||||||||||||||||||||||||||||||||||||||||||||||||||||||||||||||||||||||||||||||||||||||
| AS | Taigei | ✔️ | |||||||||||||||||||||||||||||||||||||||||||||||||||||||||||||||||||||||||||||||||||||||||||||||||
| DD | Hamakaze | ✔️ | |||||||||||||||||||||||||||||||||||||||||||||||||||||||||||||||||||||||||||||||||||||||||||||||||
| DD | Naganami | ✔️ | |||||||||||||||||||||||||||||||||||||||||||||||||||||||||||||||||||||||||||||||||||||||||||||||||
| CL | Kitakami | ✔️ | ✔️ | ✔️ | ✔️ | ✔️ | ✔️ | ||||||||||||||||||||||||||||||||||||||||||||||||||||||||||||||||||||||||||||||||||||||||||||
| CL | Ooi | ✔️ | |||||||||||||||||||||||||||||||||||||||||||||||||||||||||||||||||||||||||||||||||||||||||||||||||
| CL | Nagara | ✔️ | |||||||||||||||||||||||||||||||||||||||||||||||||||||||||||||||||||||||||||||||||||||||||||||||||
| CL | Kinu | ✔️ | |||||||||||||||||||||||||||||||||||||||||||||||||||||||||||||||||||||||||||||||||||||||||||||||||
| CL | Abukuma | ✔️ | |||||||||||||||||||||||||||||||||||||||||||||||||||||||||||||||||||||||||||||||||||||||||||||||||
| CL | Sendai | ✔️ | ✔️ | ✔️ | ✔️ | ✔️ | ✔️ | ||||||||||||||||||||||||||||||||||||||||||||||||||||||||||||||||||||||||||||||||||||||||||||
| CA | Kinugasa | ✔️ | |||||||||||||||||||||||||||||||||||||||||||||||||||||||||||||||||||||||||||||||||||||||||||||||||
| CA | Myoukou | ✔️ | ✔️ | ✔️ | ✔️ | ||||||||||||||||||||||||||||||||||||||||||||||||||||||||||||||||||||||||||||||||||||||||||||||
| CA | Takao | ✔️ | ✔️ | ✔️ | ✔️ | ✔️ | ✔️ | ||||||||||||||||||||||||||||||||||||||||||||||||||||||||||||||||||||||||||||||||||||||||||||
| CA | Atago | ✔️ | ✔️ | ✔️ | ✔️ | ✔️ | ✔️ | ||||||||||||||||||||||||||||||||||||||||||||||||||||||||||||||||||||||||||||||||||||||||||||
| CA | Mogami | ✔️ | ✔️ | ✔️ | ✔️ | ✔️ | ✔️ | ||||||||||||||||||||||||||||||||||||||||||||||||||||||||||||||||||||||||||||||||||||||||||||
| CA | Tone | ✔️ | ✔️ | ✔️ | ✔️ | ✔️ | ✔️ | ||||||||||||||||||||||||||||||||||||||||||||||||||||||||||||||||||||||||||||||||||||||||||||
| CA | Chikuma | ✔️ | ✔️ | ✔️ | ✔️ | ✔️ | ✔️ | ||||||||||||||||||||||||||||||||||||||||||||||||||||||||||||||||||||||||||||||||||||||||||||
| CVL | Ryuujou | ✔️ | ✔️ | ✔️ | ✔️ | ✔️ | ✔️ | ||||||||||||||||||||||||||||||||||||||||||||||||||||||||||||||||||||||||||||||||||||||||||||
| CVL | Shouhou | ✔️ | ✔️ | ✔️ | ✔️ | ✔️ | ✔️ | ||||||||||||||||||||||||||||||||||||||||||||||||||||||||||||||||||||||||||||||||||||||||||||
| CVL | Zuihou | ✔️ | |||||||||||||||||||||||||||||||||||||||||||||||||||||||||||||||||||||||||||||||||||||||||||||||||
| CVL | Hiyou | ✔️ | ✔️ | ✔️ | ✔️ | ✔️ | ✔️ | ||||||||||||||||||||||||||||||||||||||||||||||||||||||||||||||||||||||||||||||||||||||||||||
| CVL | Junyou | ✔️ | ✔️ | ✔️ | ✔️ | ✔️ | ✔️ | ||||||||||||||||||||||||||||||||||||||||||||||||||||||||||||||||||||||||||||||||||||||||||||
| FBB | Kongou | ✔️ | ✔️ | ||||||||||||||||||||||||||||||||||||||||||||||||||||||||||||||||||||||||||||||||||||||||||||||||
| FBB | Hiei | ✔️ | ✔️ | ✔️ | |||||||||||||||||||||||||||||||||||||||||||||||||||||||||||||||||||||||||||||||||||||||||||||||
| FBB | Haruna | ✔️ | ✔️ | ✔️ | |||||||||||||||||||||||||||||||||||||||||||||||||||||||||||||||||||||||||||||||||||||||||||||||
| FBB | Kirishima | ✔️ | ✔️ | ✔️ | |||||||||||||||||||||||||||||||||||||||||||||||||||||||||||||||||||||||||||||||||||||||||||||||
| BB | Fusou | ✔️ | ✔️ | ✔️ | ✔️ | ||||||||||||||||||||||||||||||||||||||||||||||||||||||||||||||||||||||||||||||||||||||||||||||
| BB | Yamashiro | ✔️ | ✔️ | ✔️ | ✔️ | ||||||||||||||||||||||||||||||||||||||||||||||||||||||||||||||||||||||||||||||||||||||||||||||
| BB | Ise | ✔️ | |||||||||||||||||||||||||||||||||||||||||||||||||||||||||||||||||||||||||||||||||||||||||||||||||
| BB | Hyuuga | ✔️ | |||||||||||||||||||||||||||||||||||||||||||||||||||||||||||||||||||||||||||||||||||||||||||||||||
| BB | Nagato | ✔️ | |||||||||||||||||||||||||||||||||||||||||||||||||||||||||||||||||||||||||||||||||||||||||||||||||
| BB | Mutsu | ✔️ | |||||||||||||||||||||||||||||||||||||||||||||||||||||||||||||||||||||||||||||||||||||||||||||||||
| CV | Akagi | ✔️ | |||||||||||||||||||||||||||||||||||||||||||||||||||||||||||||||||||||||||||||||||||||||||||||||||
| CV | Kaga | ✔️ | |||||||||||||||||||||||||||||||||||||||||||||||||||||||||||||||||||||||||||||||||||||||||||||||||
| CV | Shoukaku | ✔️ | |||||||||||||||||||||||||||||||||||||||||||||||||||||||||||||||||||||||||||||||||||||||||||||||||
| CV | Zuikaku | ✔️ | |||||||||||||||||||||||||||||||||||||||||||||||||||||||||||||||||||||||||||||||||||||||||||||||||
| DD | Mutsuki | ✔️ | ✔️ | ✔️ | ✔️ | ✔️ | |||||||||||||||||||||||||||||||||||||||||||||||||||||||||||||||||||||||||||||||||||||||||||||
| DD | Kisaragi | ✔️ | ✔️ | ✔️ | ✔️ | ✔️ | |||||||||||||||||||||||||||||||||||||||||||||||||||||||||||||||||||||||||||||||||||||||||||||
| DD | Hatsuyuki | ✔️ | ✔️ | ✔️ | ✔️ | ✔️ | |||||||||||||||||||||||||||||||||||||||||||||||||||||||||||||||||||||||||||||||||||||||||||||
| DD | Miyuki | ✔️ | ✔️ | ✔️ | ✔️ | ✔️ | |||||||||||||||||||||||||||||||||||||||||||||||||||||||||||||||||||||||||||||||||||||||||||||
| DD | Isonami | ✔️ | ✔️ | ✔️ | ✔️ | ✔️ | |||||||||||||||||||||||||||||||||||||||||||||||||||||||||||||||||||||||||||||||||||||||||||||
| DD | Shikinami | ✔️ | ✔️ | ✔️ | ✔️ | ✔️ | |||||||||||||||||||||||||||||||||||||||||||||||||||||||||||||||||||||||||||||||||||||||||||||
| DD | Samidare | ✔️ | ✔️ | ✔️ | ✔️ | ✔️ | |||||||||||||||||||||||||||||||||||||||||||||||||||||||||||||||||||||||||||||||||||||||||||||
| DD | Suzukaze | ✔️ | ✔️ | ✔️ | ✔️ | ✔️ | |||||||||||||||||||||||||||||||||||||||||||||||||||||||||||||||||||||||||||||||||||||||||||||
| DD | Asashio | ✔️ | ✔️ | ✔️ | ✔️ | ✔️ | |||||||||||||||||||||||||||||||||||||||||||||||||||||||||||||||||||||||||||||||||||||||||||||
| DD | Ooshio | ✔️ | ✔️ | ✔️ | ✔️ | ✔️ | |||||||||||||||||||||||||||||||||||||||||||||||||||||||||||||||||||||||||||||||||||||||||||||
| DD | Michishio | ✔️ | ✔️ | ✔️ | ✔️ | ✔️ | |||||||||||||||||||||||||||||||||||||||||||||||||||||||||||||||||||||||||||||||||||||||||||||
| DD | Arashio | ✔️ | ✔️ | ✔️ | ✔️ | ||||||||||||||||||||||||||||||||||||||||||||||||||||||||||||||||||||||||||||||||||||||||||||||
| DD | Shiranui | ✔️ | ✔️ | ✔️ | ✔️ | ✔️ | |||||||||||||||||||||||||||||||||||||||||||||||||||||||||||||||||||||||||||||||||||||||||||||
| DD | Kuroshio | ✔️ | ✔️ | ✔️ | ✔️ | ✔️ | |||||||||||||||||||||||||||||||||||||||||||||||||||||||||||||||||||||||||||||||||||||||||||||
| CL | Tenryuu | ✔️ | ✔️ | ✔️ | ✔️ | ✔️ | ✔️ | ||||||||||||||||||||||||||||||||||||||||||||||||||||||||||||||||||||||||||||||||||||||||||||
| CL | Tatsuta | ✔️ | ✔️ | ✔️ | ✔️ | ✔️ | ✔️ | ||||||||||||||||||||||||||||||||||||||||||||||||||||||||||||||||||||||||||||||||||||||||||||
| CL | Kuma | ✔️ | ✔️ | ✔️ | ✔️ | ✔️ | ✔️ | ||||||||||||||||||||||||||||||||||||||||||||||||||||||||||||||||||||||||||||||||||||||||||||
| CL | Tama | ✔️ | ✔️ | ✔️ | ✔️ | ✔️ | ✔️ | ||||||||||||||||||||||||||||||||||||||||||||||||||||||||||||||||||||||||||||||||||||||||||||
| CL | Kiso | ✔️ | ✔️ | ✔️ | ✔️ | ✔️ | ✔️ | ||||||||||||||||||||||||||||||||||||||||||||||||||||||||||||||||||||||||||||||||||||||||||||
| CL | Isuzu | ✔️ | ✔️ | ✔️ | ✔️ | ✔️ | ✔️ | ||||||||||||||||||||||||||||||||||||||||||||||||||||||||||||||||||||||||||||||||||||||||||||
| CL | Natori | ✔️ | ✔️ | ✔️ | ✔️ | ✔️ | ✔️ | ||||||||||||||||||||||||||||||||||||||||||||||||||||||||||||||||||||||||||||||||||||||||||||
| CL | Yura | ✔️ | ✔️ | ✔️ | ✔️ | ✔️ | ✔️ | ||||||||||||||||||||||||||||||||||||||||||||||||||||||||||||||||||||||||||||||||||||||||||||
| CL | Jintsuu | ✔️ | ✔️ | ✔️ | ✔️ | ✔️ | ✔️ | ||||||||||||||||||||||||||||||||||||||||||||||||||||||||||||||||||||||||||||||||||||||||||||
| CL | Naka | ✔️ | ✔️ | ✔️ | ✔️ | ✔️ | ✔️ | ||||||||||||||||||||||||||||||||||||||||||||||||||||||||||||||||||||||||||||||||||||||||||||
| CA | Furutaka | ✔️ | ✔️ | ✔️ | ✔️ | ✔️ | |||||||||||||||||||||||||||||||||||||||||||||||||||||||||||||||||||||||||||||||||||||||||||||
| CA | Kako | ✔️ | ✔️ | ✔️ | ✔️ | ✔️ | |||||||||||||||||||||||||||||||||||||||||||||||||||||||||||||||||||||||||||||||||||||||||||||
| CA | Aoba | ✔️ | ✔️ | ✔️ | ✔️ | ✔️ | |||||||||||||||||||||||||||||||||||||||||||||||||||||||||||||||||||||||||||||||||||||||||||||
| CA | Nachi | ✔️ | ✔️ | ✔️ | ✔️ | ✔️ | ✔️ | ||||||||||||||||||||||||||||||||||||||||||||||||||||||||||||||||||||||||||||||||||||||||||||
| CA | Ashigara | ✔️ | ✔️ | ✔️ | ✔️ | ✔️ | ✔️ | ||||||||||||||||||||||||||||||||||||||||||||||||||||||||||||||||||||||||||||||||||||||||||||
| CA | Haguro | ✔️ | ✔️ | ✔️ | ✔️ | ✔️ | ✔️ | ||||||||||||||||||||||||||||||||||||||||||||||||||||||||||||||||||||||||||||||||||||||||||||
| CA | Maya | ✔️ | ✔️ | ✔️ | ✔️ | ✔️ | ✔️ | ||||||||||||||||||||||||||||||||||||||||||||||||||||||||||||||||||||||||||||||||||||||||||||
| CA | Choukai | ✔️ | ✔️ | ✔️ | ✔️ | ✔️ | ✔️ | ||||||||||||||||||||||||||||||||||||||||||||||||||||||||||||||||||||||||||||||||||||||||||||
| CVL | Houshou | ✔️ | |||||||||||||||||||||||||||||||||||||||||||||||||||||||||||||||||||||||||||||||||||||||||||||||||
| AV | Chitose | ✔️ | ✔️ | ✔️ | ✔️ | ✔️ | ✔️ | ||||||||||||||||||||||||||||||||||||||||||||||||||||||||||||||||||||||||||||||||||||||||||||
| AV | Chiyoda | ✔️ | ✔️ | ✔️ | ✔️ | ✔️ | ✔️ | ||||||||||||||||||||||||||||||||||||||||||||||||||||||||||||||||||||||||||||||||||||||||||||