Difference between revisions of "World 2/2-2"
(Created page with "==World 2-2: バシー島海峡 Bashi Island Strait== {{LabSortieworld | map = 02_02.png | difficulty = ☆ ☆ ☆ ☆ | item = {{Bauxite}} {{IC}} | exp = 150 | code = 柳輸...") |
Jigaraphale (talk | contribs) |
||
| (38 intermediate revisions by 10 users not shown) | |||
| Line 1: | Line 1: | ||
| − | + | {{World/Hub}} | |
| + | =World 2-2: バシー海峡 - Bashi Channel= | ||
{{LabSortieworld | {{LabSortieworld | ||
| − | | | + | | page = World 2/2-2 |
| difficulty = ☆ ☆ ☆ ☆ | | difficulty = ☆ ☆ ☆ ☆ | ||
| item = {{Bauxite}} {{IC}} | | item = {{Bauxite}} {{IC}} | ||
| exp = 150 | | exp = 150 | ||
| − | | code = 柳輸送作戦 | + | | code = 柳輸送作戦<br>[[wikipedia:ja:柳船|Weeping Willow Transport]] Tactics |
| jptext = 艦隊をバシー海峡に展開せよ!同方面の制海権を確保し、南方からの資源輸送の安全に務め、防衛体制を強化せよ! | | jptext = 艦隊をバシー海峡に展開せよ!同方面の制海権を確保し、南方からの資源輸送の安全に務め、防衛体制を強化せよ! | ||
| − | |entext = | + | |entext = Deploy the fleet to the Bashi Channel! Secure control of the sea in this area, secure the transportation of resources from the south, and strengthen the defenses! |
| + | | aircon = | ||
| + | {{AirConKai | ||
| + | |AS=41 | ||
}} | }} | ||
| − | + | }} | |
| + | |||
| + | {{MapUnlock | ||
| + | | unlock= [[2-1]] | ||
| + | | clear= the boss's flagship must be sunk once | ||
| + | }} | ||
| + | |||
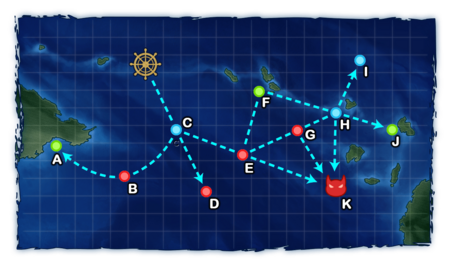
===Stage Guide=== | ===Stage Guide=== | ||
{{MapBranchingTable | {{MapBranchingTable | ||
|title = 2-2 Branching Rules | |title = 2-2 Branching Rules | ||
| − | |||
|id = 2-2 | |id = 2-2 | ||
|C/empty -> B, D, E = | |C/empty -> B, D, E = | ||
| − | * Meeting '''ANY''' of the following requirements | + | * Meeting '''ANY''' of the following requirements to '''FORCE''' B: |
** Amount of CV(L/B) ≥ 3 | ** Amount of CV(L/B) ≥ 3 | ||
** Amount of BBV ≥ 2 | ** Amount of BBV ≥ 2 | ||
| − | ** | + | ** AO ≥ 1 and SS(V) = 0 |
| − | * | + | *If fleet contains BBV |
| − | * | + | **If fleet also contains AV or AS: 70% B 30% E |
| − | * | + | **Otherwise, 70% B 30% D |
| − | * Otherwise, | + | *If fleet doesn't contain BBV |
| + | **Go to E if fleet contains AV or AS | ||
| + | **Otherwise, 50% D 50% E | ||
|E -> F/resource, G, K = | |E -> F/resource, G, K = | ||
* Go to G if amount of CV(L/B)+(F)BB(V) ≥ 4 | * Go to G if amount of CV(L/B)+(F)BB(V) ≥ 4 | ||
| − | * | + | *Meet '''ANY''' of the following to go to F |
| − | * | + | **DE ≥ 2 |
| − | * | + | **AS ≥ 1, DD+DE ≥ 3 and (F)BB(V)+CV(L/B) = 0 |
| − | * Otherwise, | + | *Go to K if fleet contains CL, DD+DE ≥ 2, (F)BB(V)+CV(L/B) = 0 and the fleet is '''fast''' |
| + | *If (F)BB(V)+CV(L/B) = 3: 70% G 30% K | ||
| + | *If (F)BB(V)+CV(L/B) = 2: 50% G 50% K | ||
| + | *If (F)BB(V)+CV(L/B) = 1: 30% G 70% K | ||
| + | *If (F)BB(V)+CV(L/B) = 0 and DD+DE ≥ 2: 30% F 70% K | ||
| + | * Otherwise, 50% G 50% K. | ||
|G -> H/empty, K = | |G -> H/empty, K = | ||
| Line 39: | Line 55: | ||
|H/empty -> I/empty, J/resource, K = | |H/empty -> I/empty, J/resource, K = | ||
| − | *Random between I and K if | + | *Random between I and K (60%-70% I) if: |
**(F)BB(V)+CV(L/B) ≥ 4 | **(F)BB(V)+CV(L/B) ≥ 4 | ||
**Fleet contains SS(V) | **Fleet contains SS(V) | ||
| − | *Go to K if fleet contains CV(L/B) or AV | + | *Go to K if fleet contains CV(L/B), CAV or AV |
| − | *Otherwise, random between J and K | + | *Otherwise, from top to bottom |
| − | + | **If DD+DE = 0, random between I and K | |
| + | **If DD+DE = 1, random between I, J and K | ||
| + | **If DD+DE ≥ 2, random between J and K | ||
| + | }} | ||
| + | |||
| + | ===Tips=== | ||
| + | This map is simple as long as an AV is used to guarantee the path to the boss. | ||
| + | |||
| + | ===Recommended Fleets=== | ||
| + | {{FleetGuide | ||
| + | | Map = Medium Fleet with AV | ||
| + | | Fleet = '''2 CA(V)/CL(T)/AV, 1 CL, 2 DD, 1 AV''' | ||
| + | | Speed = Fast | ||
| + | | Route = {{MapRoute|C|blue|E|red|K|red}} | ||
| + | | AS = 41 | ||
| + | | Note = Avoids node {{MapRoute|G|red}}, which contains Ru-class BBs | ||
| + | AV and CAV should bring enough Seaplane [[SPB|bombers]] and [[SPF|fighters]] to help overpower the boss composition's air power as there will be a {{Enemy/Link|Standard Carrier Wo-Class Elite|text=Wo-class Elite}} or {{Enemy/Link|Light Carrier Nu-Class Elite|text=Nu-class Elite}} present at the boss node in all compositions. | ||
| + | | Quest = | ||
| + | }} | ||
| + | |||
| + | {{FleetGuide | ||
| + | | Map = Medium Fleet with AS | ||
| + | | Fleet = 2 CAV, 1 AS, 3 DD | ||
| + | | Route = {{MapRoute|C|blue|E|red|F|green|H|blue|K|red}} | ||
| + | | AS = 41 | ||
| + | | Note = Avoids node {{MapRoute|G|red}}, which contains Ru-class BBs | ||
| + | CAV should bring enough Seaplane [[SPB|bombers]] and [[SPF|fighters]] to help overpower the boss composition's air power as there will be a {{Enemy/Link|Standard Carrier Wo-Class Elite|text=Wo-class Elite}} or {{Enemy/Link|Light Carrier Nu-Class Elite|text=Nu-class Elite}} present at the boss node in all compositions. | ||
| + | | Quest = | ||
| + | }} | ||
| + | |||
| + | {{FleetGuide | ||
| + | | Map = Light Fleet | ||
| + | | Fleet = '''1 CL, 4 DD, 1 AV | ||
| + | | Speed = Fast | ||
| + | | Route = {{MapRoute|C|blue|E|red|K|red}} | ||
| + | | AS = 41 | ||
| + | | Note = Avoids node {{MapRoute|G|red}}, which contains Ru-class BBs | ||
| + | AV should bring enough Seaplane [[SPB|bombers]] and [[SPF|fighters]] to help overpower the boss composition's air power as there will be a {{Enemy/Link|Standard Carrier Wo-Class Elite|text=Wo-class Elite}} or {{Enemy/Link|Light Carrier Nu-Class Elite|text=Nu-class Elite}} present at the boss node in all compositions. | ||
| + | | Quest = | ||
}} | }} | ||
| − | {{ | + | {{FleetGuide |
| − | | Map = 2 | + | | Map = Heavy Fleet |
| − | | | + | | Fleet = 2 CV(L/B), 1 CL, 2 DE, 1 AV |
| + | | Route = {{MapRoute|C|blue|E|red|F|green|H|blue|K|red}} | ||
| AS = 41 | | AS = 41 | ||
| − | | | + | | Note = Takes a fixed route with 1 surface battle and a bauxite node {{MapRoute|F|green}} before routing to the boss. |
| + | Taking [[Landing Craft]] increases the resource gains on the way. | ||
| + | | Quest = | ||
}} | }} | ||
| − | === | + | ===Resource Nodes=== |
| − | + | {{MapRoute|A|green|F|green|J|green}} are "Normal Resource Nodes" rewarding respectively bauxite {{Bauxite}}, bauxite {{Bauxite}}, and instant construction materials {{IC}}. | |
| − | + | *''See [[Resource Node|here]] for more details. | |
| − | + | ||
| − | * | + | ===Bauxite, Steel, and Transports Farming=== |
| − | + | As node {{MapRoute|B|red}} contains 2 Transports and can be reached consistently, it is ideal for farming Transport kills: | |
| − | |||
| − | |||
| − | |||
| − | |||
| − | |||
| − | |||
| − | + | {{FleetGuide | |
| − | {{ | + | | Map = Farming Route |
| − | + | | Fleet = '''3-6 BBV/CV(B/L), 0-3 XX | |
| − | + | | Route = {{MapRoute|C|blue|B|red|A|green}} | |
| − | + | | AS = 0 | |
| − | + | | Note = Using 3 CL/CAV carrying a {{Minisub}} [[Midget Submarine]] and {{Landing Craft}} [[Landing Craft]] alongside the carriers will create a strong opening, coupled with a higher resource gain. | |
| − | + | *Node {{MapRoute|A|green}} gives '''bauxite''', and even with multiple carriers in the fleet, it is possible to break even on bauxite consumption and even make a net gain. | |
| − | + | *In addition, many medium ships (mostly CA) will be dropped, that can be scrapped for a reasonable amount of '''steel'''. | |
| − | + | | Quest = {{Q|Bd5}}, {{Q|Bd6}}, {{Q|Bw3}}, {{Q|Bw4}} | |
| − | |||
| − | |||
| − | |||
| − | |||
| − | |||
| − | |||
| − | |||
| − | |||
| − | |||
| − | |||
| − | |||
| − | |||
| − | |||
| − | |||
| − | |||
| − | |||
| − | |||
| − | |||
| − | | | ||
| − | |||
| − | |||
| − | |||
| − | | | ||
| − | |||
| − | |||
| − | |||
| − | |||
| − | | | ||
| − | | | ||
| − | | | ||
| − | | | ||
| − | | | ||
| − | | | ||
| − | | | ||
| − | | | ||
| − | | | ||
| − | |||
| − | |||
| − | |||
| − | |||
| − | |||
| − | |||
| − | | | ||
| − | | | ||
| − | |||
| − | |||
| − | |||
| − | |||
| − | |||
| − | |||
| − | |||
| − | |||
| − | |||
| − | |||
| − | |||
| − | |||
| − | |||
| − | |||
| − | |||
| − | |||
| − | |||
| − | |||
| − | |||
| − | |||
| − | |||
| − | |||
| − | |||
| − | |||
| − | |||
| − | |||
| − | |||
| − | |||
| − | |||
| − | |||
| − | |||
| − | |||
| − | |||
| − | |||
| − | |||
| − | |||
| − | |||
| − | |||
| − | |||
| − | |||
| − | |||
| − | |||
| − | |||
| − | |||
| − | |||
| − | | | ||
| − | | | ||
| − | | | ||
| − | | | ||
| − | |||
| − | |||
| − | |||
| − | |||
| − | |||
| − | |||
| − | |||
| − | |||
| − | |||
| − | |||
| − | |||
| − | |||
| − | |||
| − | | | ||
| − | |||
| − | |||
| − | |||
| − | |||
| − | |||
| − | |||
| − | |||
| − | |||
}} | }} | ||
| − | |||
| − | + | {{Map/Footer|2-2| | |
| − | + | |enemycompsnotes= | |
| − | + | ||
| − | + | |shipdropnotes= | |
| − | + | ||
| − | + | }} | |
| − | |||
| − | |||
| − | |||
| − | |||
| − | |||
| − | |||
| − | |||
| − | |||
| − | |||
| − | |||
| − | |||
| − | |||
| − | |||
| − | |||
| − | |||
| − | |||
| − | |||
| − | |||
| − | |||
| − | |||
| − | |||
| − | |||
| − | |||
| − | |||
| − | |||
| − | |||
| − | |||
| − | | | ||
| − | |||
| − | |||
| − | |||
| − | |||
| − | |||
| − | |||
| − | |||
| − | |||
| − | |||
Latest revision as of 12:18, 25 October 2025
World 2-2: バシー海峡 - Bashi Channel
| Strategy Name | 柳輸送作戦 Weeping Willow Transport Tactics |
|---|---|
| Difficulty | ☆ ☆ ☆ ☆ |
| Item | |
| Strategy Content | 艦隊をバシー海峡に展開せよ!同方面の制海権を確保し、南方からの資源輸送の安全に務め、防衛体制を強化せよ! Deploy the fleet to the Bashi Channel! Secure control of the sea in this area, secure the transportation of resources from the south, and strengthen the defenses! |
| Boss Air Control | |||
|---|---|---|---|
| AD | AP | AS | AS+ |
| 13 | 19 | 41 | 82 |
| 2-2 Unlocking & Progression | ||||
|---|---|---|---|---|
| Unlock conditions | 2-2 is unlocked after clearing 2-1 | |||
| Clear conditions | To clear the map: the boss's flagship must be sunk once | |||
Stage Guide
| 2-2 Branching Rules | ||
|---|---|---|
| Nodes | Rules | |
C |
B |
|
D | ||
E | ||
E |
F |
|
G | ||
K | ||
G |
H |
|
K | ||
H |
I |
|
J | ||
K | ||
Tips
This map is simple as long as an AV is used to guarantee the path to the boss.
Recommended Fleets
| Medium Fleet with AV | |||||||||||||||||||||||||||||||||
|---|---|---|---|---|---|---|---|---|---|---|---|---|---|---|---|---|---|---|---|---|---|---|---|---|---|---|---|---|---|---|---|---|---|
|
| ||||||||||||||||||||||||||||||||
| Fleet Notes | |||||||||||||||||||||||||||||||||
| Avoids node G, which contains Ru-class BBs
AV and CAV should bring enough Seaplane bombers and fighters to help overpower the boss composition's air power as there will be a Wo-class Elite | |||||||||||||||||||||||||||||||||

| Medium Fleet with AS | |||||||||||||||||||||||||||||||||
|---|---|---|---|---|---|---|---|---|---|---|---|---|---|---|---|---|---|---|---|---|---|---|---|---|---|---|---|---|---|---|---|---|---|
|
| ||||||||||||||||||||||||||||||||
| Fleet Notes | |||||||||||||||||||||||||||||||||
| Avoids node G, which contains Ru-class BBs
CAV should bring enough Seaplane bombers and fighters to help overpower the boss composition's air power as there will be a Wo-class Elite | |||||||||||||||||||||||||||||||||
| Light Fleet | |||||||||||||||||||||||||||||||||
|---|---|---|---|---|---|---|---|---|---|---|---|---|---|---|---|---|---|---|---|---|---|---|---|---|---|---|---|---|---|---|---|---|---|
|
| ||||||||||||||||||||||||||||||||
| Fleet Notes | |||||||||||||||||||||||||||||||||
| Avoids node G, which contains Ru-class BBs
AV should bring enough Seaplane bombers and fighters to help overpower the boss composition's air power as there will be a Wo-class Elite | |||||||||||||||||||||||||||||||||
| Heavy Fleet | |||||||||||||||||||||||||||||||||
|---|---|---|---|---|---|---|---|---|---|---|---|---|---|---|---|---|---|---|---|---|---|---|---|---|---|---|---|---|---|---|---|---|---|
|
| ||||||||||||||||||||||||||||||||
| Fleet Notes | |||||||||||||||||||||||||||||||||
| Takes a fixed route with 1 surface battle and a bauxite node F before routing to the boss.
Taking Landing Craft increases the resource gains on the way. | |||||||||||||||||||||||||||||||||
Resource Nodes
A F J are "Normal Resource Nodes" rewarding respectively bauxite ![]() , bauxite
, bauxite ![]() , and instant construction materials
, and instant construction materials ![]() .
.
- See here for more details.
Bauxite, Steel, and Transports Farming
As node B contains 2 Transports and can be reached consistently, it is ideal for farming Transport kills:
| Farming Route | |||||||||||||||||||||||||||||||||||||
|---|---|---|---|---|---|---|---|---|---|---|---|---|---|---|---|---|---|---|---|---|---|---|---|---|---|---|---|---|---|---|---|---|---|---|---|---|---|
|
| ||||||||||||||||||||||||||||||||||||
| Fleet Notes | |||||||||||||||||||||||||||||||||||||
Using 3 CL/CAV carrying a
| |||||||||||||||||||||||||||||||||||||
Enemy Compositions

| # | Resource Node | ||
|---|---|---|---|
| A | Gained 10~20 | ||
| # | Resource Node | ||
| # | Enemy Form. |
Base EXP | Normal Battle Node | AD/AP AS/AS+ |
|---|---|---|---|---|
| B | Double Line | 150 | 0/0 0/0 | |
| Diamond | 150 | 0/0 0/0 | ||
| Diamond | 150 | 0/0 0/0 | ||
| Double Line | 180 | 0/0 0/0 | ||
| Double Line | 200 | 0/0 0/0 | ||
| Diamond | 200 | 0/0 0/0 | ||
| # | Enemy Form. |
Base EXP | Normal Battle Node | AD/AP AS/AS+ |
| # | Empty Node | ||
|---|---|---|---|
| C | 気のせいだった。/敵影を見ず。/穏やかな海です。/穏やかな海峡です。/警戒が必要です。/静かな海です。 Must be my imagination./No enemy spotted./Calm seas./Calm straits./Be alert./Peaceful seas. | ||
| # | Empty Node | ||
| # | Enemy Form. |
Base EXP | Normal Battle Node | AD/AP AS/AS+ |
|---|---|---|---|---|
| D | Double Line | 170 | 0/0 0/0 | |
| Diamond | 170 | 0/0 0/0 | ||
| Double Line | 200 | 0/0 0/0 | ||
| Diamond | 200 | 0/0 0/0 | ||
| Double Line | 220 | 0/0 0/0 | ||
| Diamond | 220 | 0/0 0/0 | ||
| # | Enemy Form. |
Base EXP | Normal Battle Node | AD/AP AS/AS+ |
| # | Enemy Form. |
Base EXP | Normal Battle Node | AD/AP AS/AS+ |
|---|---|---|---|---|
| E | Line Ahead Double Line |
100 | 0/0 0/0 | |
| Line Ahead Double Line |
110 | 0/0 0/0 | ||
| Line Ahead Double Line |
130 | 0/0 0/0 | ||
| # | Enemy Form. |
Base EXP | Normal Battle Node | AD/AP AS/AS+ |
| # | Resource Node | ||
|---|---|---|---|
| F | Gained 15~35 | ||
| # | Resource Node | ||
| # | Enemy Form. |
Base EXP | Normal Battle Node | AD/AP AS/AS+ |
|---|---|---|---|---|
| G | Line Ahead Double Line |
150 | 0/0 0/0 | |
| Line Ahead Double Line |
160 | 0/0 0/0 | ||
| Line Ahead Double Line |
180 | 0/0 0/0 | ||
| # | Enemy Form. |
Base EXP | Normal Battle Node | AD/AP AS/AS+ |
| # | Empty Node | ||
|---|---|---|---|
| H | 気のせいだった。/敵影を見ず。/穏やかな海です。/穏やかな海峡です。/警戒が必要です。/静かな海です。 Must be my imagination./No enemy spotted./Calm seas./Calm straits./Be alert./Peaceful seas. | ||
| # | Empty Node | ||
| # | Empty Node | ||
|---|---|---|---|
| I | 気のせいだった。/敵影を見ず。/穏やかな海です。/穏やかな海峡です。/警戒が必要です。/静かな海です。 Must be my imagination./No enemy spotted./Calm seas./Calm straits./Be alert./Peaceful seas. | ||
| # | Empty Node | ||
| # | Resource Node | ||
|---|---|---|---|
| J | Gained 1 | ||
| # | Resource Node | ||
| # | Enemy Form. |
Base EXP | Boss Battle Node | AD/AP AS/AS+ |
|---|---|---|---|---|
| K | Line Ahead | 170 | 0/0 0/0 | |
| Diamond | 160 | 9/17 36/72 | ||
| Line Ahead Diamond |
180 | 9/17 36/72 | ||
| Line Ahead Diamond |
200 | 10/19 41/81 | ||
| Line Ahead Diamond |
220 | 10/19 41/81 | ||
| # | Enemy Form. |
Base EXP | Boss Battle Node | AD/AP AS/AS+ |
Ship Drops
| Ship drops | |||||||||||||||||||||||||||||||||||||||||||||||||||||||||||||||||||||||||||||||||||||||||||||||||||
|---|---|---|---|---|---|---|---|---|---|---|---|---|---|---|---|---|---|---|---|---|---|---|---|---|---|---|---|---|---|---|---|---|---|---|---|---|---|---|---|---|---|---|---|---|---|---|---|---|---|---|---|---|---|---|---|---|---|---|---|---|---|---|---|---|---|---|---|---|---|---|---|---|---|---|---|---|---|---|---|---|---|---|---|---|---|---|---|---|---|---|---|---|---|---|---|---|---|---|---|
| Type | Ship? | B | D | E | G | K | |||||||||||||||||||||||||||||||||||||||||||||||||||||||||||||||||||||||||||||||||||||||||||||
| DD | Yayoi | ✔️ | |||||||||||||||||||||||||||||||||||||||||||||||||||||||||||||||||||||||||||||||||||||||||||||||||
| DD | Hamakaze | ✔️ | |||||||||||||||||||||||||||||||||||||||||||||||||||||||||||||||||||||||||||||||||||||||||||||||||
| CL | Kitakami | ✔️ | |||||||||||||||||||||||||||||||||||||||||||||||||||||||||||||||||||||||||||||||||||||||||||||||||
| CL | Sendai | ✔️ | ✔️ | ✔️ | ✔️ | ✔️ | |||||||||||||||||||||||||||||||||||||||||||||||||||||||||||||||||||||||||||||||||||||||||||||
| CA | Myoukou | ✔️ | ✔️ | ✔️ | ✔️ | ||||||||||||||||||||||||||||||||||||||||||||||||||||||||||||||||||||||||||||||||||||||||||||||
| CA | Takao | ✔️ | ✔️ | ✔️ | ✔️ | ✔️ | |||||||||||||||||||||||||||||||||||||||||||||||||||||||||||||||||||||||||||||||||||||||||||||
| CA | Atago | ✔️ | ✔️ | ✔️ | ✔️ | ✔️ | |||||||||||||||||||||||||||||||||||||||||||||||||||||||||||||||||||||||||||||||||||||||||||||
| CA | Mogami | ✔️ | ✔️ | ✔️ | ✔️ | ✔️ | |||||||||||||||||||||||||||||||||||||||||||||||||||||||||||||||||||||||||||||||||||||||||||||
| CA | Tone | ✔️ | ✔️ | ✔️ | ✔️ | ||||||||||||||||||||||||||||||||||||||||||||||||||||||||||||||||||||||||||||||||||||||||||||||
| CA | Chikuma | ✔️ | ✔️ | ✔️ | ✔️ | ||||||||||||||||||||||||||||||||||||||||||||||||||||||||||||||||||||||||||||||||||||||||||||||
| CVL | Ryuujou | ✔️ | ✔️ | ✔️ | ✔️ | ||||||||||||||||||||||||||||||||||||||||||||||||||||||||||||||||||||||||||||||||||||||||||||||
| CVL | Shouhou | ✔️ | ✔️ | ✔️ | ✔️ | ✔️ | |||||||||||||||||||||||||||||||||||||||||||||||||||||||||||||||||||||||||||||||||||||||||||||
| CVL | Hiyou | ✔️ | |||||||||||||||||||||||||||||||||||||||||||||||||||||||||||||||||||||||||||||||||||||||||||||||||
| CVL | Junyou | ✔️ | ✔️ | ✔️ | |||||||||||||||||||||||||||||||||||||||||||||||||||||||||||||||||||||||||||||||||||||||||||||||
| FBB | Kongou | ✔️ | |||||||||||||||||||||||||||||||||||||||||||||||||||||||||||||||||||||||||||||||||||||||||||||||||
| FBB | Hiei | ✔️ | |||||||||||||||||||||||||||||||||||||||||||||||||||||||||||||||||||||||||||||||||||||||||||||||||
| FBB | Kirishima | ✔️ | |||||||||||||||||||||||||||||||||||||||||||||||||||||||||||||||||||||||||||||||||||||||||||||||||
| BB | Fusou | ✔️ | |||||||||||||||||||||||||||||||||||||||||||||||||||||||||||||||||||||||||||||||||||||||||||||||||
| BB | Yamashiro | ✔️ | |||||||||||||||||||||||||||||||||||||||||||||||||||||||||||||||||||||||||||||||||||||||||||||||||
| BB | Ise | ✔️ | |||||||||||||||||||||||||||||||||||||||||||||||||||||||||||||||||||||||||||||||||||||||||||||||||
| CV | Kaga | ✔️ | |||||||||||||||||||||||||||||||||||||||||||||||||||||||||||||||||||||||||||||||||||||||||||||||||
| CV | Souryuu | ✔️ | |||||||||||||||||||||||||||||||||||||||||||||||||||||||||||||||||||||||||||||||||||||||||||||||||
| DD | Kisaragi | ✔️ | ✔️ | ✔️ | ✔️ | ||||||||||||||||||||||||||||||||||||||||||||||||||||||||||||||||||||||||||||||||||||||||||||||
| DD | Satsuki | ✔️ | ✔️ | ✔️ | ✔️ | ||||||||||||||||||||||||||||||||||||||||||||||||||||||||||||||||||||||||||||||||||||||||||||||
| DD | Fumizuki | ✔️ | ✔️ | ✔️ | ✔️ | ||||||||||||||||||||||||||||||||||||||||||||||||||||||||||||||||||||||||||||||||||||||||||||||
| DD | Nagatsuki | ✔️ | ✔️ | ✔️ | ✔️ | ||||||||||||||||||||||||||||||||||||||||||||||||||||||||||||||||||||||||||||||||||||||||||||||
| DD | Kikuzuki | ✔️ | ✔️ | ✔️ | ✔️ | ||||||||||||||||||||||||||||||||||||||||||||||||||||||||||||||||||||||||||||||||||||||||||||||
| DD | Mikazuki | ✔️ | ✔️ | ✔️ | ✔️ | ||||||||||||||||||||||||||||||||||||||||||||||||||||||||||||||||||||||||||||||||||||||||||||||
| DD | Mochizuki | ✔️ | ✔️ | ✔️ | ✔️ | ||||||||||||||||||||||||||||||||||||||||||||||||||||||||||||||||||||||||||||||||||||||||||||||
| DD | Fubuki | ✔️ | ✔️ | ✔️ | |||||||||||||||||||||||||||||||||||||||||||||||||||||||||||||||||||||||||||||||||||||||||||||||
| DD | Shirayuki | ✔️ | ✔️ | ✔️ | ✔️ | ||||||||||||||||||||||||||||||||||||||||||||||||||||||||||||||||||||||||||||||||||||||||||||||
| DD | Hatsuyuki | ✔️ | ✔️ | ✔️ | ✔️ | ||||||||||||||||||||||||||||||||||||||||||||||||||||||||||||||||||||||||||||||||||||||||||||||
| DD | Miyuki | ✔️ | ✔️ | ✔️ | ✔️ | ||||||||||||||||||||||||||||||||||||||||||||||||||||||||||||||||||||||||||||||||||||||||||||||
| DD | Murakumo | ✔️ | ✔️ | ✔️ | ✔️ | ||||||||||||||||||||||||||||||||||||||||||||||||||||||||||||||||||||||||||||||||||||||||||||||
| DD | Isonami | ✔️ | ✔️ | ✔️ | ✔️ | ||||||||||||||||||||||||||||||||||||||||||||||||||||||||||||||||||||||||||||||||||||||||||||||
| DD | Shikinami | ✔️ | ✔️ | ✔️ | ✔️ | ||||||||||||||||||||||||||||||||||||||||||||||||||||||||||||||||||||||||||||||||||||||||||||||
| DD | Akatsuki | ✔️ | ✔️ | ✔️ | ✔️ | ||||||||||||||||||||||||||||||||||||||||||||||||||||||||||||||||||||||||||||||||||||||||||||||
| DD | Hibiki | ✔️ | ✔️ | ✔️ | ✔️ | ||||||||||||||||||||||||||||||||||||||||||||||||||||||||||||||||||||||||||||||||||||||||||||||
| DD | Ikazuchi | ✔️ | ✔️ | ✔️ | ✔️ | ||||||||||||||||||||||||||||||||||||||||||||||||||||||||||||||||||||||||||||||||||||||||||||||
| DD | Inazuma | ✔️ | ✔️ | ✔️ | ✔️ | ||||||||||||||||||||||||||||||||||||||||||||||||||||||||||||||||||||||||||||||||||||||||||||||
| DD | Hatsuharu | ✔️ | ✔️ | ✔️ | ✔️ | ||||||||||||||||||||||||||||||||||||||||||||||||||||||||||||||||||||||||||||||||||||||||||||||
| DD | Nenohi | ✔️ | ✔️ | ✔️ | ✔️ | ||||||||||||||||||||||||||||||||||||||||||||||||||||||||||||||||||||||||||||||||||||||||||||||
| DD | Wakaba | ✔️ | ✔️ | ✔️ | ✔️ | ||||||||||||||||||||||||||||||||||||||||||||||||||||||||||||||||||||||||||||||||||||||||||||||
| DD | Hatsushimo | ✔️ | ✔️ | ✔️ | ✔️ | ||||||||||||||||||||||||||||||||||||||||||||||||||||||||||||||||||||||||||||||||||||||||||||||
| DD | Shigure | ✔️ | ✔️ | ✔️ | ✔️ | ||||||||||||||||||||||||||||||||||||||||||||||||||||||||||||||||||||||||||||||||||||||||||||||
| DD | Murasame | ✔️ | ✔️ | ✔️ | ✔️ | ||||||||||||||||||||||||||||||||||||||||||||||||||||||||||||||||||||||||||||||||||||||||||||||
| DD | Yuudachi | ✔️ | ✔️ | ✔️ | ✔️ | ||||||||||||||||||||||||||||||||||||||||||||||||||||||||||||||||||||||||||||||||||||||||||||||
| DD | Samidare | ✔️ | ✔️ | ✔️ | ✔️ | ||||||||||||||||||||||||||||||||||||||||||||||||||||||||||||||||||||||||||||||||||||||||||||||
| DD | Ooshio | ✔️ | ✔️ | ✔️ | ✔️ | ||||||||||||||||||||||||||||||||||||||||||||||||||||||||||||||||||||||||||||||||||||||||||||||
| DD | Michishio | ✔️ | ✔️ | ✔️ | ✔️ | ||||||||||||||||||||||||||||||||||||||||||||||||||||||||||||||||||||||||||||||||||||||||||||||
| DD | Arashio | ✔️ | ✔️ | ✔️ | ✔️ | ||||||||||||||||||||||||||||||||||||||||||||||||||||||||||||||||||||||||||||||||||||||||||||||
| DD | Arare | ✔️ | ✔️ | ✔️ | ✔️ | ||||||||||||||||||||||||||||||||||||||||||||||||||||||||||||||||||||||||||||||||||||||||||||||
| DD | Kasumi | ✔️ | ✔️ | ✔️ | ✔️ | ||||||||||||||||||||||||||||||||||||||||||||||||||||||||||||||||||||||||||||||||||||||||||||||
| DD | Kagerou | ✔️ | ✔️ | ✔️ | ✔️ | ||||||||||||||||||||||||||||||||||||||||||||||||||||||||||||||||||||||||||||||||||||||||||||||
| DD | Shiranui | ✔️ | ✔️ | ✔️ | ✔️ | ||||||||||||||||||||||||||||||||||||||||||||||||||||||||||||||||||||||||||||||||||||||||||||||
| DD | Kuroshio | ✔️ | ✔️ | ✔️ | ✔️ | ||||||||||||||||||||||||||||||||||||||||||||||||||||||||||||||||||||||||||||||||||||||||||||||
| CL | Tenryuu | ✔️ | ✔️ | ✔️ | ✔️ | ||||||||||||||||||||||||||||||||||||||||||||||||||||||||||||||||||||||||||||||||||||||||||||||
| CL | Tatsuta | ✔️ | ✔️ | ✔️ | ✔️ | ||||||||||||||||||||||||||||||||||||||||||||||||||||||||||||||||||||||||||||||||||||||||||||||
| CL | Kuma | ✔️ | |||||||||||||||||||||||||||||||||||||||||||||||||||||||||||||||||||||||||||||||||||||||||||||||||
| CL | Tama | ✔️ | |||||||||||||||||||||||||||||||||||||||||||||||||||||||||||||||||||||||||||||||||||||||||||||||||
| CL | Kiso | ✔️ | |||||||||||||||||||||||||||||||||||||||||||||||||||||||||||||||||||||||||||||||||||||||||||||||||
| CL | Isuzu | ✔️ | ✔️ | ✔️ | ✔️ | ✔️ | |||||||||||||||||||||||||||||||||||||||||||||||||||||||||||||||||||||||||||||||||||||||||||||
| CL | Natori | ✔️ | ✔️ | ✔️ | ✔️ | ✔️ | |||||||||||||||||||||||||||||||||||||||||||||||||||||||||||||||||||||||||||||||||||||||||||||
| CL | Yura | ✔️ | ✔️ | ✔️ | ✔️ | ✔️ | |||||||||||||||||||||||||||||||||||||||||||||||||||||||||||||||||||||||||||||||||||||||||||||
| CL | Jintsuu | ✔️ | ✔️ | ✔️ | ✔️ | ✔️ | |||||||||||||||||||||||||||||||||||||||||||||||||||||||||||||||||||||||||||||||||||||||||||||
| CL | Naka | ✔️ | ✔️ | ✔️ | ✔️ | ✔️ | |||||||||||||||||||||||||||||||||||||||||||||||||||||||||||||||||||||||||||||||||||||||||||||
| CA | Furutaka | ✔️ | ✔️ | ✔️ | ✔️ | ✔️ | |||||||||||||||||||||||||||||||||||||||||||||||||||||||||||||||||||||||||||||||||||||||||||||
| CA | Kako | ✔️ | ✔️ | ✔️ | ✔️ | ✔️ | |||||||||||||||||||||||||||||||||||||||||||||||||||||||||||||||||||||||||||||||||||||||||||||
| CA | Aoba | ✔️ | ✔️ | ✔️ | ✔️ | ✔️ | |||||||||||||||||||||||||||||||||||||||||||||||||||||||||||||||||||||||||||||||||||||||||||||
| CA | Nachi | ✔️ | ✔️ | ✔️ | ✔️ | ✔️ | |||||||||||||||||||||||||||||||||||||||||||||||||||||||||||||||||||||||||||||||||||||||||||||
| CA | Ashigara | ✔️ | ✔️ | ✔️ | ✔️ | ✔️ | |||||||||||||||||||||||||||||||||||||||||||||||||||||||||||||||||||||||||||||||||||||||||||||
| CA | Haguro | ✔️ | ✔️ | ✔️ | ✔️ | ✔️ | |||||||||||||||||||||||||||||||||||||||||||||||||||||||||||||||||||||||||||||||||||||||||||||
| CA | Maya | ✔️ | ✔️ | ✔️ | ✔️ | ✔️ | |||||||||||||||||||||||||||||||||||||||||||||||||||||||||||||||||||||||||||||||||||||||||||||
| CA | Choukai | ✔️ | ✔️ | ✔️ | ✔️ | ✔️ | |||||||||||||||||||||||||||||||||||||||||||||||||||||||||||||||||||||||||||||||||||||||||||||
| AV | Chitose | ✔️ | |||||||||||||||||||||||||||||||||||||||||||||||||||||||||||||||||||||||||||||||||||||||||||||||||
| AV | Chiyoda | ✔️ | |||||||||||||||||||||||||||||||||||||||||||||||||||||||||||||||||||||||||||||||||||||||||||||||||