Difference between revisions of "World 2/2-4"
< World 2
Minhfongboy (talk | contribs) |
m (→Stage Guide) |
||
| (36 intermediate revisions by 8 users not shown) | |||
| Line 1: | Line 1: | ||
| − | + | {{World/Hub}} | |
| + | =World 2-4: 沖ノ島海域 - Okinoshima Island= | ||
{{LabSortieworld | {{LabSortieworld | ||
| − | | | + | | page = World 2/2-4 |
| difficulty = ☆ ☆ ☆ ☆ ☆ ☆ | | difficulty = ☆ ☆ ☆ ☆ ☆ ☆ | ||
| item = {{Fuel}} {{Ammo}} {{IR}} {{DM}} | | item = {{Fuel}} {{Ammo}} {{IR}} {{DM}} | ||
| exp = 300 | | exp = 300 | ||
| − | | code = あ号艦隊決戦 | + | | code = あ号艦隊決戦<br>[[wikipedia:Battle_of_the_Philippine_Sea|Operation A-Go: The Fleet's Decisive Battle]] |
| jptext = 沖ノ島海域に襲来した有力な敵機動部隊を迎撃する。艦隊全力出撃で、これを捕捉撃滅せよ! | | jptext = 沖ノ島海域に襲来した有力な敵機動部隊を迎撃する。艦隊全力出撃で、これを捕捉撃滅せよ! | ||
| entext = A powerful enemy battlegroup is invading the waters around Okinoshima Island. Sail out in full force and annihilate them! | | entext = A powerful enemy battlegroup is invading the waters around Okinoshima Island. Sail out in full force and annihilate them! | ||
| + | | aircon = | ||
| + | {{AirConKai | ||
| + | |AS=0 | ||
| + | |ASr=84 | ||
| + | }} | ||
| + | }} | ||
| + | |||
| + | {{MapUnlock | ||
| + | | unlock= [[2-3]] | ||
| + | | clear= the boss's flagship must be sunk once | ||
}} | }} | ||
| Line 13: | Line 24: | ||
{{MapBranchingTable | {{MapBranchingTable | ||
|title = 2-4 Branching Rules | |title = 2-4 Branching Rules | ||
| − | |||
|id = 2-4 | |id = 2-4 | ||
|B -> C/storm,G/resource= | |B -> C/storm,G/resource= | ||
*Meet '''ANY''' of the following to go to C | *Meet '''ANY''' of the following to go to C | ||
| − | **(F)BB(V)+CV(L | + | **(F)BB(V)+CV(B/L) ≥ 5 |
| − | **CV(L | + | **CV(B/L) ≥ 3 '''AND''' DD ≤ 2 |
**(F)BB(V)+CV(B) ≥ 3 '''AND''' DD ≤ 2 | **(F)BB(V)+CV(B) ≥ 3 '''AND''' DD ≤ 2 | ||
*Meet '''ALL''' of the following to go to G | *Meet '''ALL''' of the following to go to G | ||
| − | **No (F)BB(V), CV(L | + | **No (F)BB(V), CV(B/L), AV, CLT or SS(V) |
**CL = 1 | **CL = 1 | ||
**DD ≥ 4 | **DD ≥ 4 | ||
**Amount of ships in fleet = 6 | **Amount of ships in fleet = 6 | ||
*Otherwise, random routing | *Otherwise, random routing | ||
| − | **20% G if (F)BB(V)+CV(B) ≥ 2 | + | **20% G if (F)BB(V)+CV(B/L) ≥ 2 |
| − | **40% G if CV(B) ≥ 1 or SS(V) ≥ 1 | + | **40% G if CV(B/L) ≥ 1 or SS(V) ≥ 1 |
**60% G otherwise | **60% G otherwise | ||
| Line 35: | Line 45: | ||
|F -> A/resource, J/empty= | |F -> A/resource, J/empty= | ||
| − | * | + | *95% J if CVL ≥ 1 and DD ≥ 2 |
| − | + | *75% J if CVL ≥ 1 or DD ≥ 2 | |
| + | *Otherwise, go to A if fleet contains no CVL '''AND''' DD ≤ 1 | ||
|H/empty -> I,L= | |H/empty -> I,L= | ||
*Meet '''ALL''' of the following requirements to go to L: | *Meet '''ALL''' of the following requirements to go to L: | ||
| − | ** | + | **Fleet must contain 6 ships. |
**DD ≥ 4 | **DD ≥ 4 | ||
**CL+CT ≤ 2 | **CL+CT ≤ 2 | ||
| − | **CA ≤ 1 | + | **CA(V) ≤ 1 |
**No other ship types are allowed. | **No other ship types are allowed. | ||
*Otherwise, go to I. | *Otherwise, go to I. | ||
| Line 49: | Line 60: | ||
|I -> E,K/empty= | |I -> E,K/empty= | ||
*Random routing | *Random routing | ||
| − | **If fleet contains CL '''AND''' CVL, | + | **If fleet contains CL '''AND''' CVL, 95% K |
**If fleet contains CVL, 80% K | **If fleet contains CVL, 80% K | ||
**If fleet contains CL, 75% K | **If fleet contains CL, 75% K | ||
| Line 56: | Line 67: | ||
|J/empty -> L,M= | |J/empty -> L,M= | ||
*Meet '''ANY''' of the following to go to L | *Meet '''ANY''' of the following to go to L | ||
| − | **(F)BB(V)+CV(L | + | **(F)BB(V)+CV(B/L) ≥ 4 |
**No CV(B) | **No CV(B) | ||
*Meet '''ANY''' of the following to go to M | *Meet '''ANY''' of the following to go to M | ||
| − | **(F)BB(V)+CV(L | + | **(F)BB(V)+CV(B/L) = 3 |
**CV(B) = 2 | **CV(B) = 2 | ||
*Otherwise, random routing | *Otherwise, random routing | ||
| Line 67: | Line 78: | ||
*Go to L if DD ≥ 2 | *Go to L if DD ≥ 2 | ||
*Otherwise, random routing between L and O | *Otherwise, random routing between L and O | ||
| − | **If fleet contains DD, | + | **If fleet contains DD, more likely to go to L |
| − | **If fleet doesn't contain DD, | + | **If fleet doesn't contain DD, more likely to go to O |
|L -> M= | |L -> M= | ||
| − | *(F)BB(V)+CV(L | + | *(F)BB(V)+CV(B/L) ≥ 4 |
| − | *Random routing if | + | *Random routing if no condition is met |
|L -> P= | |L -> P= | ||
*(F)BB(V)+CV(B) ≤ 2 | *(F)BB(V)+CV(B) ≤ 2 | ||
| − | *Random routing if | + | *Random routing if no condition is met |
}} | }} | ||
| − | {{ | + | ===Tips=== |
| − | | Map = 2 | + | This map will feature a series of fights involving mostly smaller surface ships with some carrier fights in between. |
| − | | | + | |
| + | ===Recommended Fleets=== | ||
| + | {{FleetGuide | ||
| + | | Map = Heavy Fleets | ||
| + | | Fleet = '''1 CV(B), 1 CVL, 1 CA(V)/CLT, 1 CL, 2 DD | ||
| + | '''2 (F)BB(V)/CV(B), 1 CVL, 1 CL, 2 DD | ||
| + | | Route = Random | ||
| AS = 84 | | AS = 84 | ||
| − | | | + | | Note = Random routing across the map, but it is allowed to bring a much stronger fleet to fight the boss node. |
| + | *{{MapRoute|J|blue|M|red}}, {{MapRoute|K|blue|L|red}}, and {{MapRoute|L|red|M|red}} branches should be guaranteed though. | ||
| + | *Having both CVL and CL will ensure 95% of not rolling dead-end {{MapRoute|I|red|E|red}} and {{MapRoute|F|red|A|green}} | ||
| + | *Having an AV on the fleet introduces a chance to roll the dead-end {{MapRoute|K|blue|N|green}} | ||
| + | | Quest = | ||
}} | }} | ||
| − | = | + | {{FleetGuide |
| − | + | | Map = Light Fleet | |
| − | + | | Fleet = '''1 CAV, 1 CL, 4 DD | |
| − | + | | Route = {{MapRoute|B|red|G|green|H|blue|L|red|P|red}} | |
| − | + | | AS = 84 | |
| − | + | | Note = Takes the quickest path to the boss node with only 2 battles prior to the boss node, but may present difficulties due to lack of airpower of the fleet for nodes {{MapRoute|L|red}}. | |
| − | + | Boss node can also be difficult if CL and DD are not high-leveled, therefore it is not suitable for early players. | |
| − | + | | Quest = | |
| − | + | }} | |
| − | |||
| − | |||
| − | |||
| − | |||
| − | |||
| − | |||
| − | |||
| − | ==== | + | {{FleetGuide |
| − | + | | Map = Torpedo Squadron | |
| − | * | + | | Fleet = '''{{color|red|"Torpedo Squadron"}}: 1 CL (flagship), 5 DD |
| + | | Route = {{MapRoute|B|red|G|green|H|blue|L|red|P|red}} | ||
| + | | AS = 84 | ||
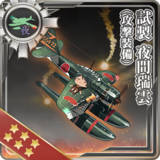
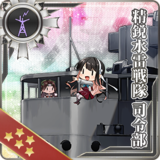
| + | | Note = This solution requires more advanced equipment, and might be out of reach of new players. {{color|red|'''It is required to bring'''}} an {{Command Facility}} FCF capable CL as flagship, preferably an {{Class|Agano|Kai+}}, equipped with: | ||
| + | *2 {{Med Gun}} [[Main Gun]]s, | ||
| + | *1 {{Night SPB}} {{EquipmentLink|Prototype Night Zuiun (Attack Equipment)}}, | ||
| + | *'''And''' the {{IconText|{{Command Facility}}|ETSCF}} {{EquipmentLink|Elite Torpedo Squadron Command Facility}} (preferably in the [[RE]]). | ||
| + | The best comp for farming boss node, having the highest pass rate thanks to the usage of [[ETSCF]] in case a ship got {{Taiha}}. | ||
| − | + | Do note that the [[Night Zuiun]] will likely be shot down completely due to fighting under AI. | |
| − | + | | Quest = | |
| − | |||
| − | |||
| − | |||
| − | |||
| − | |||
| − | |||
| − | |||
| − | |||
| − | |||
| − | |||
| − | |||
| − | |||
| − | |||
| − | |||
| − | |||
| − | |||
| − | |||
| − | |||
| − | |||
| − | |||
| − | |||
| − | |||
| − | |||
| − | |||
| − | |||
| − | |||
| − | |||
| − | |||
| − | |||
| − | |||
| − | |||
| − | |||
| − | |||
| − | |||
| − | |||
| − | |||
| − | |||
| − | |||
| − | |||
| − | |||
| − | |||
| − | |||
| − | |||
| − | |||
| − | |||
| − | |||
| − | |||
| − | |||
| − | |||
| − | |||
| − | |||
| − | |||
| − | |||
| − | |||
| − | |||
| − | |||
| − | |||
| − | |||
| − | |||
| − | |||
| − | |||
| − | |||
| − | |||
| − | |||
| − | |||
| − | |||
| − | |||
| − | |||
| − | |||
| − | |||
| − | |||
| − | |||
| − | |||
| − | |||
| − | |||
| − | |||
| − | |||
| − | |||
| − | |||
| − | |||
| − | |||
| − | |||
| − | |||
| − | |||
| − | |||
| − | |||
| − | |||
| − | |||
| − | |||
| − | |||
| − | |||
| − | |||
| − | |||
| − | |||
| − | |||
| − | |||
| − | |||
| − | |||
| − | |||
| − | |||
| − | |||
| − | |||
| − | |||
| − | |||
| − | |||
| − | |||
| − | |||
| − | |||
| − | |||
| − | |||
| − | |||
| − | |||
| − | |||
| − | |||
| − | |||
| − | |||
| − | |||
| − | |||
| − | |||
| − | |||
| − | |||
| − | |||
| − | |||
| − | |||
| − | |||
| − | |||
| − | |||
| − | |||
| − | |||
| − | |||
| − | |||
| − | |||
| − | |||
| − | |||
| − | |||
| − | |||
| − | |||
| − | |||
| − | |||
| − | |||
| − | |||
| − | |||
| − | |||
| − | |||
| − | |||
| − | |||
| − | |||
| − | |||
| − | |||
| − | |||
| − | |||
| − | |||
| − | |||
| − | |||
| − | |||
| − | |||
| − | |||
| − | |||
| − | |||
| − | |||
| − | |||
| − | |||
| − | |||
| − | |||
| − | |||
| − | |||
| − | |||
| − | |||
| − | |||
| − | |||
| − | |||
| − | |||
| − | |||
| − | |||
| − | |||
| − | |||
| − | |||
| − | |||
| − | |||
| − | |||
| − | |||
| − | |||
| − | |||
| − | |||
| − | |||
| − | |||
| − | |||
| − | |||
| − | |||
| − | |||
| − | | | ||
}} | }} | ||
| − | === | + | ===Resource Nodes=== |
| − | + | {{MapRoute|D|green|G|green|N|green}} are "Normal Resource Nodes" rewarding respectively fuel {{Fuel}}, development materials {{DM}}, and ammo {{Ammo}}. | |
| − | { | + | |
| − | + | {{MapRoute|A|green}} is a "Special Resource Node" rewarding instant repair materials {{IR}}. | |
| − | + | *''See [[Resource Node|here]] for more details. | |
| − | + | ||
| − | + | ===Bucket & DevMat Farming=== | |
| − | + | It is possible to farm buckets or/and DevMats on nodes {{MapRoute|A|green}} and {{MapRoute|G|green}} respectively. | |
| − | + | *Depending on the fleet used, it is possible to either focus the farming on both consumables, or only on DevMats. | |
| − | + | *When focussing on DevMats, it is recommended to use CVL instead of CV(B) for 60% of avoiding the maelstrom node. | |
| − | + | *When farming both, using 4+ {{Landing Craft}}/{{Amphibious Tank}} is recommended to farm buckets, and {{Radar}} to pass the maelstrom. | |
| − | + | *See [[Resource Farming]] for more details. | |
| − | + | ||
| − | + | {{Map/Footer|2-4| | |
| − | + | ||
| − | + | |enemycompsnotes= | |
| − | + | ||
| − | + | |shipdropnotes= | |
| − | + | ||
| − | + | }} | |
| − | |||
| − | |||
| − | |||
| − | |||
| − | |||
| − | |||
| − | |||
| − | |||
| − | |||
| − | |||
| − | |||
| − | |||
| − | |||
| − | |||
| − | |||
| − | |||
| − | |||
| − | |||
| − | |||
| − | |||
| − | |||
| − | |||
| − | |||
| − | |||
| − | |||
| − | |||
| − | |||
| − | |||
| − | |||
| − | | | ||
| − | |||
| − | | | ||
| − | |||
| − | |||
| − | |||
| − | |||
| − | |||
| − | |||
| − | |||
| − | |||
| − | |||
| − | |||
| − | |||
| − | |||
| − | |||
| − | |||
| − | |||
| − | |||
| − | |||
| − | |||
| − | |||
| − | |||
| − | |||
| − | |||
| − | |||
| − | |||
| − | | | ||
| − | |||
| − | |||
| − | |||
| − | |||
| − | |||
| − | |||
| − | |||
| − | |||
| − | |||
| − | |||
| − | |||
| − | |||
| − | |||
| − | |||
| − | |||
| − | |||
| − | |||
| − | |||
| − | | | ||
| − | |||
| − | |||
| − | |||
| − | |||
| − | | | ||
| − | |||
| − | | | ||
| − | |||
| − | |||
| − | |||
| − | |||
| − | |||
| − | |||
| − | |||
| − | |||
| − | |||
| − | |||
| − | |||
| − | |||
| − | |||
| − | |||
| − | |||
| − | |||
| − | |||
Latest revision as of 01:55, 10 April 2026
World 2-4: 沖ノ島海域 - Okinoshima Island

| Strategy Name | あ号艦隊決戦 Operation A-Go: The Fleet's Decisive Battle |
|---|---|
| Difficulty | ☆ ☆ ☆ ☆ ☆ ☆ |
| Item | |
| Strategy Content | 沖ノ島海域に襲来した有力な敵機動部隊を迎撃する。艦隊全力出撃で、これを捕捉撃滅せよ! A powerful enemy battlegroup is invading the waters around Okinoshima Island. Sail out in full force and annihilate them! |
| Boss Air Control | |||
|---|---|---|---|
| AD | AP | AS | AS+ |
| 0 | 0 | 0 | 0 |
| Boss Route Air Control | |||
| AD | AP | AS | AS+ |
| 25 | 38 | 84 | 168 |
| 2-4 Unlocking & Progression | ||||
|---|---|---|---|---|
| Unlock conditions | 2-4 is unlocked after clearing 2-3 | |||
| Clear conditions | To clear the map: the boss's flagship must be sunk once | |||
Stage Guide
| 2-4 Branching Rules | ||
|---|---|---|
| Nodes | Rules | |
B |
C |
|
G | ||
C |
F |
|
G | ||
F |
A |
|
J | ||
H |
I |
|
L | ||
I |
E |
|
K | ||
J |
L |
|
M | ||
K |
L |
|
N | ||
O | ||
L |
M |
|
P |
| |
Tips
This map will feature a series of fights involving mostly smaller surface ships with some carrier fights in between.
Recommended Fleets
| Heavy Fleets | |||||||||||||||||||||||||||||||||
|---|---|---|---|---|---|---|---|---|---|---|---|---|---|---|---|---|---|---|---|---|---|---|---|---|---|---|---|---|---|---|---|---|---|
|
| ||||||||||||||||||||||||||||||||
| Fleet Notes | |||||||||||||||||||||||||||||||||
Random routing across the map, but it is allowed to bring a much stronger fleet to fight the boss node.
| |||||||||||||||||||||||||||||||||
| Light Fleet | |||||||||||||||||||||||||||||||||
|---|---|---|---|---|---|---|---|---|---|---|---|---|---|---|---|---|---|---|---|---|---|---|---|---|---|---|---|---|---|---|---|---|---|
|
| ||||||||||||||||||||||||||||||||
| Fleet Notes | |||||||||||||||||||||||||||||||||
| Takes the quickest path to the boss node with only 2 battles prior to the boss node, but may present difficulties due to lack of airpower of the fleet for nodes L.
Boss node can also be difficult if CL and DD are not high-leveled, therefore it is not suitable for early players. | |||||||||||||||||||||||||||||||||
| Torpedo Squadron | |||||||||||||||||||||||||||||||||
|---|---|---|---|---|---|---|---|---|---|---|---|---|---|---|---|---|---|---|---|---|---|---|---|---|---|---|---|---|---|---|---|---|---|
|
| ||||||||||||||||||||||||||||||||
| Fleet Notes | |||||||||||||||||||||||||||||||||
This solution requires more advanced equipment, and might be out of reach of new players. It is required to bring an
The best comp for farming boss node, having the highest pass rate thanks to the usage of ETSCF in case a ship got TaihaHeavily Damaged (大破). Do note that the Night Zuiun will likely be shot down completely due to fighting under AI. | |||||||||||||||||||||||||||||||||
Resource Nodes
D G N are "Normal Resource Nodes" rewarding respectively fuel ![]() , development materials
, development materials ![]() , and ammo
, and ammo ![]() .
.
A is a "Special Resource Node" rewarding instant repair materials ![]() .
.
- See here for more details.
Bucket & DevMat Farming
It is possible to farm buckets or/and DevMats on nodes A and G respectively.
- Depending on the fleet used, it is possible to either focus the farming on both consumables, or only on DevMats.
- When focussing on DevMats, it is recommended to use CVL instead of CV(B) for 60% of avoiding the maelstrom node.
- When farming both, using 4+
 /
/ is recommended to farm buckets, and
  to pass the maelstrom.
 - See Resource Farming for more details.
Enemy Compositions
2-4 A
| # | Resource Node | ||
|---|---|---|---|
| A | Gained 1~2 | ||
| # | Resource Node | ||
2-4 B: 敵前衛巡洋艦戦隊 (PoiDB)
| # | Enemy Form. |
Base EXP | Normal Battle Node | AD/AP AS/AS+ |
|---|---|---|---|---|
| B | Line Ahead Double Line |
120 | 0/0 0/0 | |
| Line Ahead Double Line |
140 | 0/0 0/0 | ||
| Line Ahead Double Line |
160 | 0/0 0/0 | ||
| Line Ahead Double Line |
180 | 0/0 0/0 | ||
| # | Enemy Form. |
Base EXP | Normal Battle Node | AD/AP AS/AS+ |
2-4 C
| # | Maelstrom Node | ||
|---|---|---|---|
| C | Lost Normal | ||
| # | Maelstrom Node | ||
2-4 D
| # | Resource Node | ||
|---|---|---|---|
| D | Gained 25~45 | ||
| # | Resource Node | ||
2-4 E: 敵侵攻高速軽快部隊 (PoiDB)
| # | Enemy Form. |
Base EXP | Normal Battle Node | AD/AP AS/AS+ |
|---|---|---|---|---|
| E | Line Ahead Double Line |
100 | 0/0 0/0 | |
| Line Ahead Double Line |
120 | 0/0 0/0 | ||
| Line Ahead Double Line |
130 | 0/0 0/0 | ||
| Line Ahead Double Line |
140 | 0/0 0/0 | ||
| Line Ahead | 160 | 0/0 0/0 | ||
| # | Enemy Form. |
Base EXP | Normal Battle Node | AD/AP AS/AS+ |
2-4 F: 前衛機動部隊 (PoiDB)
| # | Enemy Form. |
Base EXP | Normal Battle Node | AD/AP AS/AS+ |
|---|---|---|---|---|
| F | Diamond | 130 | 11/22 48/96 | |
| Diamond | 140 | 17/33 72/144 | ||
| Diamond | 150 | 17/33 72/144 | ||
| Diamond | 160 | 17/33 72/144 | ||
| Diamond | 180 | 17/33 72/144 | ||
| Diamond | 190 | 16/32 71/141 | ||
| # | Enemy Form. |
Base EXP | Normal Battle Node | AD/AP AS/AS+ |
2-4 G
| # | Resource Node | ||
|---|---|---|---|
| G | Gained 1 | ||
| # | Resource Node | ||
2-4 H
| # | Empty Node | ||
|---|---|---|---|
| H | 気のせいだった。/敵影を見ず。/穏やかな海です。/穏やかな海峡です。/警戒が必要です。/静かな海です。 Must be my imagination./No enemy spotted./Calm seas./Calm straits./Be alert./Peaceful seas. | ||
| # | Empty Node | ||
2-4 I: 敵精鋭水雷戦隊 (PoiDB)
| # | Enemy Form. |
Base EXP | Normal Battle Node | AD/AP AS/AS+ |
|---|---|---|---|---|
| I | Line Ahead | 100 | 0/0 0/0 | |
| Line Ahead Double Line |
110 | 0/0 0/0 | ||
| Line Ahead Double Line |
120 | 0/0 0/0 | ||
| Line Ahead Double Line |
140 | 0/0 0/0 | ||
| Double Line | 140 | 0/0 0/0 | ||
| Line Ahead | 150 | 0/0 0/0 | ||
| # | Enemy Form. |
Base EXP | Normal Battle Node | AD/AP AS/AS+ |
2-4 J
| # | Empty Node | ||
|---|---|---|---|
| J | 気のせいだった。/敵影を見ず。/穏やかな海です。/穏やかな海峡です。/警戒が必要です。/静かな海です。 Must be my imagination./No enemy spotted./Calm seas./Calm straits./Be alert./Peaceful seas. | ||
| # | Empty Node | ||
2-4 K
| # | Empty Node | ||
|---|---|---|---|
| K | 気のせいだった。/敵影を見ず。/穏やかな海です。/穏やかな海峡です。/警戒が必要です。/静かな海です。 Must be my imagination./No enemy spotted./Calm seas./Calm straits./Be alert./Peaceful seas. | ||
| # | Empty Node | ||
2-4 L: 敵機動部隊 B群 (PoiDB)
| # | Enemy Form. |
Base EXP | Normal Battle Node | AD/AP AS/AS+ |
|---|---|---|---|---|
| L | Diamond | 170 | 19/37 81/162 | |
| Diamond | 190 | 19/37 83/165 | ||
| Diamond | 210 | 19/37 83/165 | ||
| Diamond | 220 | 19/38 84/168 | ||
| Diamond | 230 | 19/38 84/168 | ||
| Diamond | 250 | 19/38 84/168 | ||
| # | Enemy Form. |
Base EXP | Normal Battle Node | AD/AP AS/AS+ |
2-4 M: 敵機動部隊A群 (PoiDB)
| # | Enemy Form. |
Base EXP | Normal Battle Node | AD/AP AS/AS+ |
|---|---|---|---|---|
| M | Diamond | 180 | 19/37 81/162 | |
| Diamond | 200 | 19/37 83/165 | ||
| Diamond | 220 | 19/37 83/165 | ||
| Diamond | 240 | 19/38 84/168 | ||
| Diamond | 260 | 19/38 84/168 | ||
| Diamond | 280 | 19/38 84/168 | ||
| # | Enemy Form. |
Base EXP | Normal Battle Node | AD/AP AS/AS+ |
2-4 N
| # | Resource Node | ||
|---|---|---|---|
| N | Gained 20~60 | ||
| # | Resource Node | ||
2-4 O
| # | Empty Node | ||
|---|---|---|---|
| O | 気のせいだった。/敵影を見ず。/穏やかな海です。/穏やかな海峡です。/警戒が必要です。/静かな海です。 Must be my imagination./No enemy spotted./Calm seas./Calm straits./Be alert./Peaceful seas. | ||
| # | Empty Node | ||
2-4 P: 敵侵攻中核水上打撃部隊 (PoiDB)
| # | Enemy Form. |
Base EXP | Boss Battle Node | AD/AP AS/AS+ |
|---|---|---|---|---|
| P | Line Ahead | 360 | 0/0 0/0 | |
| Line Ahead | 370 | 0/0 0/0 | ||
| Line Ahead | 390 | 0/0 0/0 | ||
| Line Ahead | 400 | 0/0 0/0 | ||
| Line Ahead | 420 | 0/0 0/0 | ||
| # | Enemy Form. |
Base EXP | Boss Battle Node | AD/AP AS/AS+ |
Ship Drops
This map currently has "limited-time" drops that don't appear in the table below, see Drop List for more info.
| Ship drops | |||||||||||||||||||||||||||||||||||||||||||||||||||||||||||||||||||||||||||||||||||||||||||||||||||
|---|---|---|---|---|---|---|---|---|---|---|---|---|---|---|---|---|---|---|---|---|---|---|---|---|---|---|---|---|---|---|---|---|---|---|---|---|---|---|---|---|---|---|---|---|---|---|---|---|---|---|---|---|---|---|---|---|---|---|---|---|---|---|---|---|---|---|---|---|---|---|---|---|---|---|---|---|---|---|---|---|---|---|---|---|---|---|---|---|---|---|---|---|---|---|---|---|---|---|---|
| Type | Ship? | B | E | F | I | L | M | P | |||||||||||||||||||||||||||||||||||||||||||||||||||||||||||||||||||||||||||||||||||||||||||
| DD | Uranami | ✔️ | ✔️ | ||||||||||||||||||||||||||||||||||||||||||||||||||||||||||||||||||||||||||||||||||||||||||||||||
| AS | Taigei | ✔️ | |||||||||||||||||||||||||||||||||||||||||||||||||||||||||||||||||||||||||||||||||||||||||||||||||
| DD | Yayoi | ✔️ | |||||||||||||||||||||||||||||||||||||||||||||||||||||||||||||||||||||||||||||||||||||||||||||||||
| DD | Yamagumo | ✔️ | |||||||||||||||||||||||||||||||||||||||||||||||||||||||||||||||||||||||||||||||||||||||||||||||||
| DD | Yukikaze | ✔️ | |||||||||||||||||||||||||||||||||||||||||||||||||||||||||||||||||||||||||||||||||||||||||||||||||
| DD | Urakaze | ✔️ | |||||||||||||||||||||||||||||||||||||||||||||||||||||||||||||||||||||||||||||||||||||||||||||||||
| DD | Hamakaze | ✔️ | |||||||||||||||||||||||||||||||||||||||||||||||||||||||||||||||||||||||||||||||||||||||||||||||||
| DD | Shimakaze | ✔️ | ✔️ | ✔️ | ✔️ | ||||||||||||||||||||||||||||||||||||||||||||||||||||||||||||||||||||||||||||||||||||||||||||||
| CL | Kitakami | ✔️ | ✔️ | ✔️ | ✔️ | ✔️ | ✔️ | ||||||||||||||||||||||||||||||||||||||||||||||||||||||||||||||||||||||||||||||||||||||||||||
| CL | Ooi | ✔️ | ✔️ | ✔️ | ✔️ | ✔️ | ✔️ | ||||||||||||||||||||||||||||||||||||||||||||||||||||||||||||||||||||||||||||||||||||||||||||
| CL | Sendai | ✔️ | ✔️ | ✔️ | ✔️ | ✔️ | ✔️ | ✔️ | |||||||||||||||||||||||||||||||||||||||||||||||||||||||||||||||||||||||||||||||||||||||||||
| CA | Myoukou | ✔️ | ✔️ | ✔️ | ✔️ | ✔️ | ✔️ | ✔️ | |||||||||||||||||||||||||||||||||||||||||||||||||||||||||||||||||||||||||||||||||||||||||||
| CA | Takao | ✔️ | ✔️ | ✔️ | ✔️ | ✔️ | ✔️ | ✔️ | |||||||||||||||||||||||||||||||||||||||||||||||||||||||||||||||||||||||||||||||||||||||||||
| CA | Atago | ✔️ | ✔️ | ✔️ | ✔️ | ✔️ | ✔️ | ✔️ | |||||||||||||||||||||||||||||||||||||||||||||||||||||||||||||||||||||||||||||||||||||||||||
| CA | Mogami | ✔️ | ✔️ | ✔️ | ✔️ | ✔️ | ✔️ | ✔️ | |||||||||||||||||||||||||||||||||||||||||||||||||||||||||||||||||||||||||||||||||||||||||||
| CA | Tone | ✔️ | ✔️ | ✔️ | ✔️ | ✔️ | ✔️ | ✔️ | |||||||||||||||||||||||||||||||||||||||||||||||||||||||||||||||||||||||||||||||||||||||||||
| CA | Chikuma | ✔️ | ✔️ | ✔️ | ✔️ | ✔️ | ✔️ | ✔️ | |||||||||||||||||||||||||||||||||||||||||||||||||||||||||||||||||||||||||||||||||||||||||||
| CVL | Ryuujou | ✔️ | ✔️ | ✔️ | ✔️ | ✔️ | ✔️ | ✔️ | |||||||||||||||||||||||||||||||||||||||||||||||||||||||||||||||||||||||||||||||||||||||||||
| CVL | Shouhou | ✔️ | ✔️ | ✔️ | ✔️ | ✔️ | ✔️ | ✔️ | |||||||||||||||||||||||||||||||||||||||||||||||||||||||||||||||||||||||||||||||||||||||||||
| CVL | Hiyou | ✔️ | ✔️ | ✔️ | ✔️ | ✔️ | ✔️ | ✔️ | |||||||||||||||||||||||||||||||||||||||||||||||||||||||||||||||||||||||||||||||||||||||||||
| CVL | Junyou | ✔️ | ✔️ | ✔️ | ✔️ | ✔️ | ✔️ | ✔️ | |||||||||||||||||||||||||||||||||||||||||||||||||||||||||||||||||||||||||||||||||||||||||||
| FBB | Kongou | ✔️ | |||||||||||||||||||||||||||||||||||||||||||||||||||||||||||||||||||||||||||||||||||||||||||||||||
| FBB | Hiei | ✔️ | |||||||||||||||||||||||||||||||||||||||||||||||||||||||||||||||||||||||||||||||||||||||||||||||||
| FBB | Haruna | ✔️ | |||||||||||||||||||||||||||||||||||||||||||||||||||||||||||||||||||||||||||||||||||||||||||||||||
| FBB | Kirishima | ✔️ | |||||||||||||||||||||||||||||||||||||||||||||||||||||||||||||||||||||||||||||||||||||||||||||||||
| BB | Fusou | ✔️ | ✔️ | ✔️ | |||||||||||||||||||||||||||||||||||||||||||||||||||||||||||||||||||||||||||||||||||||||||||||||
| BB | Yamashiro | ✔️ | ✔️ | ✔️ | |||||||||||||||||||||||||||||||||||||||||||||||||||||||||||||||||||||||||||||||||||||||||||||||
| BB | Ise | ✔️ | ✔️ | ✔️ | |||||||||||||||||||||||||||||||||||||||||||||||||||||||||||||||||||||||||||||||||||||||||||||||
| BB | Hyuuga | ✔️ | ✔️ | ✔️ | |||||||||||||||||||||||||||||||||||||||||||||||||||||||||||||||||||||||||||||||||||||||||||||||
| BB | Mutsu | ✔️ | |||||||||||||||||||||||||||||||||||||||||||||||||||||||||||||||||||||||||||||||||||||||||||||||||
| CV | Akagi | ✔️ | |||||||||||||||||||||||||||||||||||||||||||||||||||||||||||||||||||||||||||||||||||||||||||||||||
| DD | Fubuki | ✔️ | ✔️ | ✔️ | ✔️ | ✔️ | |||||||||||||||||||||||||||||||||||||||||||||||||||||||||||||||||||||||||||||||||||||||||||||
| DD | Hatsuyuki | ✔️ | ✔️ | ✔️ | ✔️ | ✔️ | ✔️ | ||||||||||||||||||||||||||||||||||||||||||||||||||||||||||||||||||||||||||||||||||||||||||||
| DD | Miyuki | ✔️ | ✔️ | ✔️ | ✔️ | ✔️ | ✔️ | ||||||||||||||||||||||||||||||||||||||||||||||||||||||||||||||||||||||||||||||||||||||||||||
| DD | Murakumo | ✔️ | ✔️ | ✔️ | ✔️ | ✔️ | ✔️ | ||||||||||||||||||||||||||||||||||||||||||||||||||||||||||||||||||||||||||||||||||||||||||||
| DD | Isonami | ✔️ | ✔️ | ✔️ | ✔️ | ✔️ | ✔️ | ||||||||||||||||||||||||||||||||||||||||||||||||||||||||||||||||||||||||||||||||||||||||||||
| DD | Ayanami | ✔️ | ✔️ | ✔️ | ✔️ | ✔️ | ✔️ | ||||||||||||||||||||||||||||||||||||||||||||||||||||||||||||||||||||||||||||||||||||||||||||
| DD | Shikinami | ✔️ | ✔️ | ✔️ | ✔️ | ✔️ | ✔️ | ||||||||||||||||||||||||||||||||||||||||||||||||||||||||||||||||||||||||||||||||||||||||||||
| DD | Asashio | ✔️ | ✔️ | ✔️ | ✔️ | ✔️ | ✔️ | ✔️ | |||||||||||||||||||||||||||||||||||||||||||||||||||||||||||||||||||||||||||||||||||||||||||
| DD | Ooshio | ✔️ | ✔️ | ✔️ | ✔️ | ✔️ | ✔️ | ✔️ | |||||||||||||||||||||||||||||||||||||||||||||||||||||||||||||||||||||||||||||||||||||||||||
| DD | Michishio | ✔️ | ✔️ | ✔️ | ✔️ | ✔️ | ✔️ | ||||||||||||||||||||||||||||||||||||||||||||||||||||||||||||||||||||||||||||||||||||||||||||
| DD | Arashio | ✔️ | ✔️ | ✔️ | ✔️ | ✔️ | ✔️ | ||||||||||||||||||||||||||||||||||||||||||||||||||||||||||||||||||||||||||||||||||||||||||||
| DD | Arare | ✔️ | ✔️ | ✔️ | ✔️ | ✔️ | ✔️ | ||||||||||||||||||||||||||||||||||||||||||||||||||||||||||||||||||||||||||||||||||||||||||||
| DD | Kasumi | ✔️ | ✔️ | ✔️ | ✔️ | ✔️ | ✔️ | ||||||||||||||||||||||||||||||||||||||||||||||||||||||||||||||||||||||||||||||||||||||||||||
| DD | Kagerou | ✔️ | ✔️ | ✔️ | ✔️ | ✔️ | ✔️ | ||||||||||||||||||||||||||||||||||||||||||||||||||||||||||||||||||||||||||||||||||||||||||||
| DD | Shiranui | ✔️ | ✔️ | ✔️ | ✔️ | ✔️ | ✔️ | ||||||||||||||||||||||||||||||||||||||||||||||||||||||||||||||||||||||||||||||||||||||||||||
| DD | Kuroshio | ✔️ | ✔️ | ✔️ | ✔️ | ✔️ | ✔️ | ✔️ | |||||||||||||||||||||||||||||||||||||||||||||||||||||||||||||||||||||||||||||||||||||||||||
| CL | Tenryuu | ✔️ | ✔️ | ✔️ | ✔️ | ✔️ | ✔️ | ✔️ | |||||||||||||||||||||||||||||||||||||||||||||||||||||||||||||||||||||||||||||||||||||||||||
| CL | Tatsuta | ✔️ | ✔️ | ✔️ | ✔️ | ✔️ | ✔️ | ✔️ | |||||||||||||||||||||||||||||||||||||||||||||||||||||||||||||||||||||||||||||||||||||||||||
| CL | Tama | ✔️ | ✔️ | ✔️ | ✔️ | ✔️ | ✔️ | ||||||||||||||||||||||||||||||||||||||||||||||||||||||||||||||||||||||||||||||||||||||||||||
| CL | Kiso | ✔️ | ✔️ | ✔️ | ✔️ | ✔️ | ✔️ | ||||||||||||||||||||||||||||||||||||||||||||||||||||||||||||||||||||||||||||||||||||||||||||
| CL | Isuzu | ✔️ | ✔️ | ✔️ | ✔️ | ✔️ | ✔️ | ||||||||||||||||||||||||||||||||||||||||||||||||||||||||||||||||||||||||||||||||||||||||||||
| CL | Natori | ✔️ | ✔️ | ✔️ | ✔️ | ✔️ | ✔️ | ||||||||||||||||||||||||||||||||||||||||||||||||||||||||||||||||||||||||||||||||||||||||||||
| CL | Yura | ✔️ | ✔️ | ✔️ | ✔️ | ✔️ | ✔️ | ||||||||||||||||||||||||||||||||||||||||||||||||||||||||||||||||||||||||||||||||||||||||||||
| CL | Jintsuu | ✔️ | ✔️ | ✔️ | ✔️ | ✔️ | ✔️ | ||||||||||||||||||||||||||||||||||||||||||||||||||||||||||||||||||||||||||||||||||||||||||||
| CL | Naka | ✔️ | ✔️ | ✔️ | ✔️ | ✔️ | ✔️ | ||||||||||||||||||||||||||||||||||||||||||||||||||||||||||||||||||||||||||||||||||||||||||||
| CA | Kako | ✔️ | ✔️ | ✔️ | ✔️ | ✔️ | ✔️ | ||||||||||||||||||||||||||||||||||||||||||||||||||||||||||||||||||||||||||||||||||||||||||||
| CA | Nachi | ✔️ | ✔️ | ✔️ | ✔️ | ✔️ | ✔️ | ✔️ | |||||||||||||||||||||||||||||||||||||||||||||||||||||||||||||||||||||||||||||||||||||||||||
| CA | Ashigara | ✔️ | ✔️ | ✔️ | ✔️ | ✔️ | ✔️ | ✔️ | |||||||||||||||||||||||||||||||||||||||||||||||||||||||||||||||||||||||||||||||||||||||||||
| CA | Haguro | ✔️ | ✔️ | ✔️ | ✔️ | ✔️ | ✔️ | ✔️ | |||||||||||||||||||||||||||||||||||||||||||||||||||||||||||||||||||||||||||||||||||||||||||
| CA | Maya | ✔️ | ✔️ | ✔️ | ✔️ | ✔️ | ✔️ | ✔️ | |||||||||||||||||||||||||||||||||||||||||||||||||||||||||||||||||||||||||||||||||||||||||||
| CA | Choukai | ✔️ | ✔️ | ✔️ | ✔️ | ✔️ | ✔️ | ✔️ | |||||||||||||||||||||||||||||||||||||||||||||||||||||||||||||||||||||||||||||||||||||||||||
| AV | Chitose | ✔️ | ✔️ | ✔️ | ✔️ | ✔️ | ✔️ | ||||||||||||||||||||||||||||||||||||||||||||||||||||||||||||||||||||||||||||||||||||||||||||
| AV | Chiyoda | ✔️ | ✔️ | ✔️ | ✔️ | ✔️ | ✔️ | ||||||||||||||||||||||||||||||||||||||||||||||||||||||||||||||||||||||||||||||||||||||||||||