- Welcome to the Kancolle Wiki!
- If you have any questions regarding site content, account registration, etc., please visit the KanColle Wiki Discord
World 2
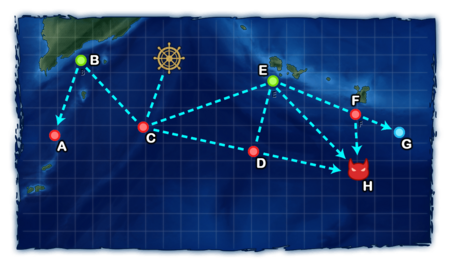
World 2-1: 南西諸島近海 - Nansei Islands Coastal Waters
| Strategy Name | 南西諸島哨戒 Nansei Islands Patrol |
|---|---|
| Difficulty | ☆ ☆ ☆ |
| Item | |
| Strategy Content | 艦隊を南西諸島方面に展開!同海域の哨戒を実施、同水域に侵入した敵を排除、南西航路の安全を確保せよ! Deploy a fleet to the Nansei Islands! Conduct a patrol of the area, eliminate any enemy that has entered the waters, and secure the southwest passage! |
| Boss Air Control | |||
|---|---|---|---|
| AD | AP | AS | AS+ |
| 24 | 36 | 81 | 162 |
| Boss Route Air Control | |||
| AD | AP | AS | AS+ |
| 24 | 36 | 81 | 162 |
| World 2 Unlocking & Progression | ||||
|---|---|---|---|---|
| Unlock conditions | World 2 is unlocked after clearing 1-4 | |||
| Clear conditions | To clear the map: the boss's flagship must be sunk once | |||
Stage Guide
| 2-1 Branching Rules | ||
|---|---|---|
| Nodes | Rules | |
C |
B |
|
D | ||
E | ||
E |
D |
|
F | ||
H | ||
F |
G |
|
H | ||
Tips
This map is simple as long as an AV is used, with only routing restrictions on the maximum number of CV(B/L), to guarantee the path to the boss.
- Using an AV guarantees routing to E.
Recommended Fleets
| Heavy Fleet | |||||||||||||||||||||||||||||||||||||
|---|---|---|---|---|---|---|---|---|---|---|---|---|---|---|---|---|---|---|---|---|---|---|---|---|---|---|---|---|---|---|---|---|---|---|---|---|---|
|
| ||||||||||||||||||||||||||||||||||||
| Fleet Notes | |||||||||||||||||||||||||||||||||||||
A strong and reliable fleet.
| |||||||||||||||||||||||||||||||||||||
| Light Fleet | |||||||||||||||||||||||||||||||||||||
|---|---|---|---|---|---|---|---|---|---|---|---|---|---|---|---|---|---|---|---|---|---|---|---|---|---|---|---|---|---|---|---|---|---|---|---|---|---|
|
| ||||||||||||||||||||||||||||||||||||
| Fleet Notes | |||||||||||||||||||||||||||||||||||||
A strong enough fleet, cheaper and passing through 1 less combat node, having the shortest route.
| |||||||||||||||||||||||||||||||||||||
| Sub Fleet | |||||||||||||||||||||||||||||||||
|---|---|---|---|---|---|---|---|---|---|---|---|---|---|---|---|---|---|---|---|---|---|---|---|---|---|---|---|---|---|---|---|---|---|
|
| ||||||||||||||||||||||||||||||||
| Fleet Notes | |||||||||||||||||||||||||||||||||
| A less effective but much cheaper fleet, ideal for farming drops.
There is no major threat on the route, but unprepared subs might have trouble dealing enough damage on the boss. | |||||||||||||||||||||||||||||||||
Resource Nodes
B E are "Normal Resource Nodes" rewarding respectively steel ![]() and instant construction materials
and instant construction materials ![]() .
.
- See here for more details.
Steel and Transport Farming
| Farming Route | |||||||||||||||||||||||||||||||||||||
|---|---|---|---|---|---|---|---|---|---|---|---|---|---|---|---|---|---|---|---|---|---|---|---|---|---|---|---|---|---|---|---|---|---|---|---|---|---|
|
| ||||||||||||||||||||||||||||||||||||
| Fleet Notes | |||||||||||||||||||||||||||||||||||||
Good for killing 2 Transports per run and gathering a small amount of steel.
Bringing additional Drums | |||||||||||||||||||||||||||||||||||||
Enemy Compositions
| # | Enemy Form. |
Base EXP | Normal Battle Node | AD/AP AS/AS+ |
|---|---|---|---|---|
| A | Double Line Diamond |
160 | 9/17 36/72 | |
| Double Line Diamond |
180 | 9/17 36/72 | ||
| Double Line Diamond |
200 | 9/17 36/72 | ||
| # | Enemy Form. |
Base EXP | Normal Battle Node | AD/AP AS/AS+ |
| # | Resource Node | ||
|---|---|---|---|
| B | Gained 10~30 | ||
| # | Resource Node | ||
| # | Enemy Form. |
Base EXP | Normal Battle Node | AD/AP AS/AS+ |
|---|---|---|---|---|
| C | Line Ahead Double Line |
100 | 0/0 0/0 | |
| Line Ahead Double Line |
110 | 0/0 0/0 | ||
| Line Ahead Double Line |
120 | 0/0 0/0 | ||
| # | Enemy Form. |
Base EXP | Normal Battle Node | AD/AP AS/AS+ |
| # | Enemy Form. |
Base EXP | Normal Battle Node | AD/AP AS/AS+ |
|---|---|---|---|---|
| D | Diamond | 100 | 6/11 24/48 | |
| Diamond | 110 | 11/22 48/96 | ||
| Diamond | 120 | 17/33 72/144 | ||
| Diamond | 130 | 17/33 72/144 | ||
| Diamond | 140 | 17/33 72/144 | ||
| Diamond | 160 | 17/33 72/144 | ||
| # | Enemy Form. |
Base EXP | Normal Battle Node | AD/AP AS/AS+ |
| # | Resource Node | ||
|---|---|---|---|
| E | Gained 1 | ||
| # | Resource Node | ||
| # | Enemy Form. |
Base EXP | Normal Battle Node | AD/AP AS/AS+ |
|---|---|---|---|---|
| F | Diamond | 110 | 7/14 30/60 | |
| Diamond | 120 | 13/25 56/111 | ||
| Diamond | 130 | 19/37 81/162 | ||
| Diamond | 140 | 19/37 81/162 | ||
| Diamond | 150 | 19/37 81/162 | ||
| Diamond | 170 | 19/37 81/162 | ||
| # | Enemy Form. |
Base EXP | Normal Battle Node | AD/AP AS/AS+ |
| # | Empty Node | ||
|---|---|---|---|
| G | 気のせいだった。/敵影を見ず。/穏やかな海です。/穏やかな海峡です。/警戒が必要です。/静かな海です。 Must be my imagination./No enemy spotted./Calm seas./Calm straits./Be alert./Peaceful seas. | ||
| # | Empty Node | ||
| # | Enemy Form. |
Base EXP | Boss Battle Node | AD/AP AS/AS+ |
|---|---|---|---|---|
| H | Diamond | 140 | 7/13 27/54 | |
| Double Line | 150 | 7/13 27/54 | ||
| Diamond | 160 | 18/35 77/153 | ||
| Double Line | 170 | 19/37 81/162 | ||
| Diamond | 180 | 19/37 81/162 | ||
| Diamond | 200 | 19/37 81/162 | ||
| # | Enemy Form. |
Base EXP | Boss Battle Node | AD/AP AS/AS+ |
Ship Drops
| Ship drops | |||||||||||||||||||||||||||||||||||||||||||||||||||||||||||||||||||||||||||||||||||||||||||||||||||
|---|---|---|---|---|---|---|---|---|---|---|---|---|---|---|---|---|---|---|---|---|---|---|---|---|---|---|---|---|---|---|---|---|---|---|---|---|---|---|---|---|---|---|---|---|---|---|---|---|---|---|---|---|---|---|---|---|---|---|---|---|---|---|---|---|---|---|---|---|---|---|---|---|---|---|---|---|---|---|---|---|---|---|---|---|---|---|---|---|---|---|---|---|---|---|---|---|---|---|---|
| Type | Ship? | A | C | D | F | H | |||||||||||||||||||||||||||||||||||||||||||||||||||||||||||||||||||||||||||||||||||||||||||||
| CL | Kitakami | ✔️ | |||||||||||||||||||||||||||||||||||||||||||||||||||||||||||||||||||||||||||||||||||||||||||||||||
| CL | Nagara | ✔️ | ✔️ | ✔️ | ✔️ | ✔️ | |||||||||||||||||||||||||||||||||||||||||||||||||||||||||||||||||||||||||||||||||||||||||||||
| CL | Sendai | ✔️ | ✔️ | ✔️ | ✔️ | ✔️ | |||||||||||||||||||||||||||||||||||||||||||||||||||||||||||||||||||||||||||||||||||||||||||||
| CA | Myoukou | ✔️ | |||||||||||||||||||||||||||||||||||||||||||||||||||||||||||||||||||||||||||||||||||||||||||||||||
| CA | Takao | ✔️ | |||||||||||||||||||||||||||||||||||||||||||||||||||||||||||||||||||||||||||||||||||||||||||||||||
| CA | Atago | ✔️ | |||||||||||||||||||||||||||||||||||||||||||||||||||||||||||||||||||||||||||||||||||||||||||||||||
| CA | Mogami | ✔️ | ✔️ | ✔️ | ✔️ | ||||||||||||||||||||||||||||||||||||||||||||||||||||||||||||||||||||||||||||||||||||||||||||||
| CA | Tone | ✔️ | |||||||||||||||||||||||||||||||||||||||||||||||||||||||||||||||||||||||||||||||||||||||||||||||||
| CA | Chikuma | ✔️ | |||||||||||||||||||||||||||||||||||||||||||||||||||||||||||||||||||||||||||||||||||||||||||||||||
| CVL | Ryuujou | ✔️ | |||||||||||||||||||||||||||||||||||||||||||||||||||||||||||||||||||||||||||||||||||||||||||||||||
| CVL | Shouhou | ✔️ | ✔️ | ✔️ | ✔️ | ✔️ | |||||||||||||||||||||||||||||||||||||||||||||||||||||||||||||||||||||||||||||||||||||||||||||
| CVL | Hiyou | ✔️ | |||||||||||||||||||||||||||||||||||||||||||||||||||||||||||||||||||||||||||||||||||||||||||||||||
| CVL | Junyou | ✔️ | |||||||||||||||||||||||||||||||||||||||||||||||||||||||||||||||||||||||||||||||||||||||||||||||||
| FBB | Haruna | ✔️ | |||||||||||||||||||||||||||||||||||||||||||||||||||||||||||||||||||||||||||||||||||||||||||||||||
| FBB | Kirishima | ✔️ | |||||||||||||||||||||||||||||||||||||||||||||||||||||||||||||||||||||||||||||||||||||||||||||||||
| BB | Fusou | ✔️ | |||||||||||||||||||||||||||||||||||||||||||||||||||||||||||||||||||||||||||||||||||||||||||||||||
| BB | Yamashiro | ✔️ | |||||||||||||||||||||||||||||||||||||||||||||||||||||||||||||||||||||||||||||||||||||||||||||||||
| DD | Mutsuki | ✔️ | |||||||||||||||||||||||||||||||||||||||||||||||||||||||||||||||||||||||||||||||||||||||||||||||||
| DD | Kisaragi | ✔️ | ✔️ | ✔️ | ✔️ | ✔️ | |||||||||||||||||||||||||||||||||||||||||||||||||||||||||||||||||||||||||||||||||||||||||||||
| DD | Satsuki | ✔️ | ✔️ | ✔️ | ✔️ | ✔️ | |||||||||||||||||||||||||||||||||||||||||||||||||||||||||||||||||||||||||||||||||||||||||||||
| DD | Fumizuki | ✔️ | ✔️ | ✔️ | ✔️ | ✔️ | |||||||||||||||||||||||||||||||||||||||||||||||||||||||||||||||||||||||||||||||||||||||||||||
| DD | Nagatsuki | ✔️ | ✔️ | ✔️ | ✔️ | ✔️ | |||||||||||||||||||||||||||||||||||||||||||||||||||||||||||||||||||||||||||||||||||||||||||||
| DD | Kikuzuki | ✔️ | ✔️ | ✔️ | ✔️ | ✔️ | |||||||||||||||||||||||||||||||||||||||||||||||||||||||||||||||||||||||||||||||||||||||||||||
| DD | Mikazuki | ✔️ | ✔️ | ✔️ | ✔️ | ✔️ | |||||||||||||||||||||||||||||||||||||||||||||||||||||||||||||||||||||||||||||||||||||||||||||
| DD | Mochizuki | ✔️ | ✔️ | ✔️ | ✔️ | ✔️ | |||||||||||||||||||||||||||||||||||||||||||||||||||||||||||||||||||||||||||||||||||||||||||||
| DD | Fubuki | ✔️ | |||||||||||||||||||||||||||||||||||||||||||||||||||||||||||||||||||||||||||||||||||||||||||||||||
| DD | Shirayuki | ✔️ | ✔️ | ✔️ | ✔️ | ✔️ | |||||||||||||||||||||||||||||||||||||||||||||||||||||||||||||||||||||||||||||||||||||||||||||
| DD | Hatsuyuki | ✔️ | ✔️ | ✔️ | ✔️ | ✔️ | |||||||||||||||||||||||||||||||||||||||||||||||||||||||||||||||||||||||||||||||||||||||||||||
| DD | Miyuki | ✔️ | ✔️ | ✔️ | ✔️ | ✔️ | |||||||||||||||||||||||||||||||||||||||||||||||||||||||||||||||||||||||||||||||||||||||||||||
| DD | Murakumo | ✔️ | ✔️ | ✔️ | ✔️ | ✔️ | |||||||||||||||||||||||||||||||||||||||||||||||||||||||||||||||||||||||||||||||||||||||||||||
| DD | Isonami | ✔️ | ✔️ | ✔️ | ✔️ | ✔️ | |||||||||||||||||||||||||||||||||||||||||||||||||||||||||||||||||||||||||||||||||||||||||||||
| DD | Ayanami | ✔️ | |||||||||||||||||||||||||||||||||||||||||||||||||||||||||||||||||||||||||||||||||||||||||||||||||
| DD | Shikinami | ✔️ | ✔️ | ✔️ | ✔️ | ✔️ | |||||||||||||||||||||||||||||||||||||||||||||||||||||||||||||||||||||||||||||||||||||||||||||
| DD | Akatsuki | ✔️ | |||||||||||||||||||||||||||||||||||||||||||||||||||||||||||||||||||||||||||||||||||||||||||||||||
| DD | Hibiki | ✔️ | ✔️ | ✔️ | ✔️ | ✔️ | |||||||||||||||||||||||||||||||||||||||||||||||||||||||||||||||||||||||||||||||||||||||||||||
| DD | Ikazuchi | ✔️ | ✔️ | ✔️ | ✔️ | ✔️ | |||||||||||||||||||||||||||||||||||||||||||||||||||||||||||||||||||||||||||||||||||||||||||||
| DD | Inazuma | ✔️ | ✔️ | ✔️ | ✔️ | ✔️ | |||||||||||||||||||||||||||||||||||||||||||||||||||||||||||||||||||||||||||||||||||||||||||||
| DD | Hatsuharu | ✔️ | |||||||||||||||||||||||||||||||||||||||||||||||||||||||||||||||||||||||||||||||||||||||||||||||||
| DD | Nenohi | ✔️ | ✔️ | ✔️ | ✔️ | ✔️ | |||||||||||||||||||||||||||||||||||||||||||||||||||||||||||||||||||||||||||||||||||||||||||||
| DD | Wakaba | ✔️ | ✔️ | ✔️ | ✔️ | ✔️ | |||||||||||||||||||||||||||||||||||||||||||||||||||||||||||||||||||||||||||||||||||||||||||||
| DD | Hatsushimo | ✔️ | ✔️ | ✔️ | ✔️ | ✔️ | |||||||||||||||||||||||||||||||||||||||||||||||||||||||||||||||||||||||||||||||||||||||||||||
| DD | Shiratsuyu | ✔️ | |||||||||||||||||||||||||||||||||||||||||||||||||||||||||||||||||||||||||||||||||||||||||||||||||
| DD | Shigure | ✔️ | ✔️ | ✔️ | ✔️ | ✔️ | |||||||||||||||||||||||||||||||||||||||||||||||||||||||||||||||||||||||||||||||||||||||||||||
| DD | Murasame | ✔️ | ✔️ | ✔️ | ✔️ | ✔️ | |||||||||||||||||||||||||||||||||||||||||||||||||||||||||||||||||||||||||||||||||||||||||||||
| DD | Yuudachi | ✔️ | ✔️ | ✔️ | ✔️ | ✔️ | |||||||||||||||||||||||||||||||||||||||||||||||||||||||||||||||||||||||||||||||||||||||||||||
| DD | Samidare | ✔️ | ✔️ | ✔️ | ✔️ | ✔️ | |||||||||||||||||||||||||||||||||||||||||||||||||||||||||||||||||||||||||||||||||||||||||||||
| DD | Suzukaze | ✔️ | |||||||||||||||||||||||||||||||||||||||||||||||||||||||||||||||||||||||||||||||||||||||||||||||||
| DD | Asashio | ✔️ | |||||||||||||||||||||||||||||||||||||||||||||||||||||||||||||||||||||||||||||||||||||||||||||||||
| DD | Ooshio | ✔️ | ✔️ | ✔️ | ✔️ | ✔️ | |||||||||||||||||||||||||||||||||||||||||||||||||||||||||||||||||||||||||||||||||||||||||||||
| DD | Michishio | ✔️ | ✔️ | ✔️ | ✔️ | ✔️ | |||||||||||||||||||||||||||||||||||||||||||||||||||||||||||||||||||||||||||||||||||||||||||||
| DD | Arashio | ✔️ | ✔️ | ✔️ | ✔️ | ✔️ | |||||||||||||||||||||||||||||||||||||||||||||||||||||||||||||||||||||||||||||||||||||||||||||
| DD | Arare | ✔️ | ✔️ | ✔️ | ✔️ | ✔️ | |||||||||||||||||||||||||||||||||||||||||||||||||||||||||||||||||||||||||||||||||||||||||||||
| DD | Kasumi | ✔️ | ✔️ | ✔️ | ✔️ | ✔️ | |||||||||||||||||||||||||||||||||||||||||||||||||||||||||||||||||||||||||||||||||||||||||||||
| DD | Kagerou | ✔️ | |||||||||||||||||||||||||||||||||||||||||||||||||||||||||||||||||||||||||||||||||||||||||||||||||
| DD | Shiranui | ✔️ | ✔️ | ✔️ | ✔️ | ✔️ | |||||||||||||||||||||||||||||||||||||||||||||||||||||||||||||||||||||||||||||||||||||||||||||
| DD | Kuroshio | ✔️ | ✔️ | ✔️ | ✔️ | ✔️ | |||||||||||||||||||||||||||||||||||||||||||||||||||||||||||||||||||||||||||||||||||||||||||||
| CL | Tenryuu | ✔️ | |||||||||||||||||||||||||||||||||||||||||||||||||||||||||||||||||||||||||||||||||||||||||||||||||
| CL | Tatsuta | ✔️ | |||||||||||||||||||||||||||||||||||||||||||||||||||||||||||||||||||||||||||||||||||||||||||||||||
| CL | Kuma | ✔️ | ✔️ | ✔️ | ✔️ | ✔️ | |||||||||||||||||||||||||||||||||||||||||||||||||||||||||||||||||||||||||||||||||||||||||||||
| CL | Tama | ✔️ | ✔️ | ✔️ | ✔️ | ✔️ | |||||||||||||||||||||||||||||||||||||||||||||||||||||||||||||||||||||||||||||||||||||||||||||
| CL | Kiso | ✔️ | ✔️ | ✔️ | ✔️ | ✔️ | |||||||||||||||||||||||||||||||||||||||||||||||||||||||||||||||||||||||||||||||||||||||||||||
| CL | Isuzu | ✔️ | ✔️ | ✔️ | ✔️ | ✔️ | |||||||||||||||||||||||||||||||||||||||||||||||||||||||||||||||||||||||||||||||||||||||||||||
| CL | Natori | ✔️ | ✔️ | ✔️ | ✔️ | ✔️ | |||||||||||||||||||||||||||||||||||||||||||||||||||||||||||||||||||||||||||||||||||||||||||||
| CL | Yura | ✔️ | ✔️ | ✔️ | ✔️ | ✔️ | |||||||||||||||||||||||||||||||||||||||||||||||||||||||||||||||||||||||||||||||||||||||||||||
| CL | Jintsuu | ✔️ | ✔️ | ✔️ | ✔️ | ✔️ | |||||||||||||||||||||||||||||||||||||||||||||||||||||||||||||||||||||||||||||||||||||||||||||
| CL | Naka | ✔️ | ✔️ | ✔️ | ✔️ | ✔️ | |||||||||||||||||||||||||||||||||||||||||||||||||||||||||||||||||||||||||||||||||||||||||||||
| CA | Furutaka | ✔️ | ✔️ | ✔️ | ✔️ | ✔️ | |||||||||||||||||||||||||||||||||||||||||||||||||||||||||||||||||||||||||||||||||||||||||||||
| CA | Kako | ✔️ | ✔️ | ✔️ | ✔️ | ✔️ | |||||||||||||||||||||||||||||||||||||||||||||||||||||||||||||||||||||||||||||||||||||||||||||
| CA | Aoba | ✔️ | ✔️ | ✔️ | ✔️ | ✔️ | |||||||||||||||||||||||||||||||||||||||||||||||||||||||||||||||||||||||||||||||||||||||||||||
| CA | Nachi | ✔️ | ✔️ | ✔️ | ✔️ | ✔️ | |||||||||||||||||||||||||||||||||||||||||||||||||||||||||||||||||||||||||||||||||||||||||||||
| CA | Ashigara | ✔️ | ✔️ | ✔️ | ✔️ | ✔️ | |||||||||||||||||||||||||||||||||||||||||||||||||||||||||||||||||||||||||||||||||||||||||||||
| CA | Haguro | ✔️ | ✔️ | ✔️ | ✔️ | ✔️ | |||||||||||||||||||||||||||||||||||||||||||||||||||||||||||||||||||||||||||||||||||||||||||||
| CA | Maya | ✔️ | ✔️ | ✔️ | ✔️ | ||||||||||||||||||||||||||||||||||||||||||||||||||||||||||||||||||||||||||||||||||||||||||||||
| CA | Choukai | ✔️ | ✔️ | ✔️ | ✔️ | ||||||||||||||||||||||||||||||||||||||||||||||||||||||||||||||||||||||||||||||||||||||||||||||
| CVL | Houshou | ✔️ | ✔️ | ✔️ | ✔️ | ✔️ | |||||||||||||||||||||||||||||||||||||||||||||||||||||||||||||||||||||||||||||||||||||||||||||
| AV | Chitose | ✔️ | ✔️ | ✔️ | ✔️ | ✔️ | |||||||||||||||||||||||||||||||||||||||||||||||||||||||||||||||||||||||||||||||||||||||||||||
| AV | Chiyoda | ✔️ | ✔️ | ✔️ | ✔️ | ✔️ | |||||||||||||||||||||||||||||||||||||||||||||||||||||||||||||||||||||||||||||||||||||||||||||

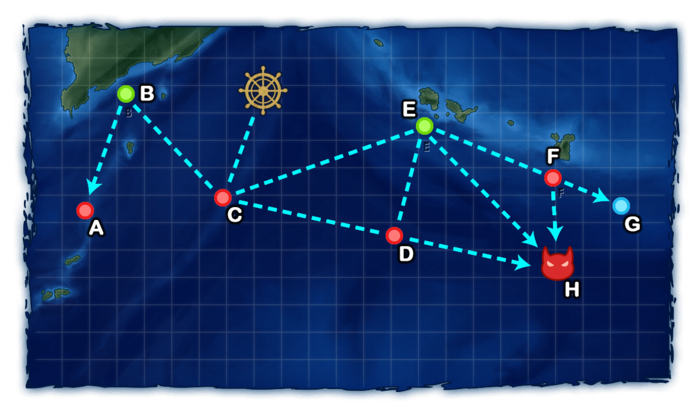
World 2-2: バシー海峡 - Bashi Channel
| Strategy Name | 柳輸送作戦 Weeping Willow Transport Tactics |
|---|---|
| Difficulty | ☆ ☆ ☆ ☆ |
| Item | |
| Strategy Content | 艦隊をバシー海峡に展開せよ!同方面の制海権を確保し、南方からの資源輸送の安全に務め、防衛体制を強化せよ! Deploy the fleet to the Bashi Channel! Secure control of the sea in this area, secure the transportation of resources from the south, and strengthen the defenses! |
| Boss Air Control | |||
|---|---|---|---|
| AD | AP | AS | AS+ |
| 13 | 19 | 41 | 82 |
| World 2 Unlocking & Progression | ||||
|---|---|---|---|---|
| Unlock conditions | World 2 is unlocked after clearing 2-1 | |||
| Clear conditions | To clear the map: the boss's flagship must be sunk once | |||
Stage Guide
| 2-2 Branching Rules | ||
|---|---|---|
| Nodes | Rules | |
C |
B |
|
D | ||
E | ||
E |
F |
|
G | ||
K | ||
G |
H |
|
K | ||
H |
I |
|
J | ||
K | ||
Tips
This map is simple as long as an AV is used to guarantee the path to the boss.
Recommended Fleets
| Medium Fleet with AV | |||||||||||||||||||||||||||||||||
|---|---|---|---|---|---|---|---|---|---|---|---|---|---|---|---|---|---|---|---|---|---|---|---|---|---|---|---|---|---|---|---|---|---|
|
| ||||||||||||||||||||||||||||||||
| Fleet Notes | |||||||||||||||||||||||||||||||||
| Avoids node G, which contains Ru-class BBs
AV and CAV should bring enough Seaplane bombers and fighters to help overpower the boss composition's air power as there will be a Wo-class Elite | |||||||||||||||||||||||||||||||||
| Medium Fleet with AS | |||||||||||||||||||||||||||||||||
|---|---|---|---|---|---|---|---|---|---|---|---|---|---|---|---|---|---|---|---|---|---|---|---|---|---|---|---|---|---|---|---|---|---|
|
| ||||||||||||||||||||||||||||||||
| Fleet Notes | |||||||||||||||||||||||||||||||||
| Avoids node G, which contains Ru-class BBs
CAV should bring enough Seaplane bombers and fighters to help overpower the boss composition's air power as there will be a Wo-class Elite | |||||||||||||||||||||||||||||||||
| Light Fleet | |||||||||||||||||||||||||||||||||
|---|---|---|---|---|---|---|---|---|---|---|---|---|---|---|---|---|---|---|---|---|---|---|---|---|---|---|---|---|---|---|---|---|---|
|
| ||||||||||||||||||||||||||||||||
| Fleet Notes | |||||||||||||||||||||||||||||||||
| Avoids node G, which contains Ru-class BBs
AV should bring enough Seaplane bombers and fighters to help overpower the boss composition's air power as there will be a Wo-class Elite | |||||||||||||||||||||||||||||||||
| Heavy Fleet | |||||||||||||||||||||||||||||||||
|---|---|---|---|---|---|---|---|---|---|---|---|---|---|---|---|---|---|---|---|---|---|---|---|---|---|---|---|---|---|---|---|---|---|
|
| ||||||||||||||||||||||||||||||||
| Fleet Notes | |||||||||||||||||||||||||||||||||
| Takes a fixed route with 1 surface battle and a bauxite node F before routing to the boss.
Taking Landing Craft increases the resource gains on the way. | |||||||||||||||||||||||||||||||||
Resource Nodes
A F J are "Normal Resource Nodes" rewarding respectively bauxite ![]() , bauxite
, bauxite ![]() , and instant construction materials
, and instant construction materials ![]() .
.
- See here for more details.
Bauxite, Steel, and Transports Farming
As node B contains 2 Transports and can be reached consistently, it is ideal for farming Transport kills:
| Farming Route | |||||||||||||||||||||||||||||||||||||
|---|---|---|---|---|---|---|---|---|---|---|---|---|---|---|---|---|---|---|---|---|---|---|---|---|---|---|---|---|---|---|---|---|---|---|---|---|---|
|
| ||||||||||||||||||||||||||||||||||||
| Fleet Notes | |||||||||||||||||||||||||||||||||||||
Using 3 CL/CAV carrying a
| |||||||||||||||||||||||||||||||||||||
Enemy Compositions

| # | Resource Node | ||
|---|---|---|---|
| A | Gained 10~20 | ||
| # | Resource Node | ||
| # | Enemy Form. |
Base EXP | Normal Battle Node | AD/AP AS/AS+ |
|---|---|---|---|---|
| B | Double Line | 150 | 0/0 0/0 | |
| Diamond | 150 | 0/0 0/0 | ||
| Diamond | 150 | 0/0 0/0 | ||
| Double Line | 180 | 0/0 0/0 | ||
| Double Line | 200 | 0/0 0/0 | ||
| Diamond | 200 | 0/0 0/0 | ||
| # | Enemy Form. |
Base EXP | Normal Battle Node | AD/AP AS/AS+ |
| # | Empty Node | ||
|---|---|---|---|
| C | 気のせいだった。/敵影を見ず。/穏やかな海です。/穏やかな海峡です。/警戒が必要です。/静かな海です。 Must be my imagination./No enemy spotted./Calm seas./Calm straits./Be alert./Peaceful seas. | ||
| # | Empty Node | ||
| # | Enemy Form. |
Base EXP | Normal Battle Node | AD/AP AS/AS+ |
|---|---|---|---|---|
| D | Double Line | 170 | 0/0 0/0 | |
| Diamond | 170 | 0/0 0/0 | ||
| Double Line | 200 | 0/0 0/0 | ||
| Diamond | 200 | 0/0 0/0 | ||
| Double Line | 220 | 0/0 0/0 | ||
| Diamond | 220 | 0/0 0/0 | ||
| # | Enemy Form. |
Base EXP | Normal Battle Node | AD/AP AS/AS+ |
| # | Enemy Form. |
Base EXP | Normal Battle Node | AD/AP AS/AS+ |
|---|---|---|---|---|
| E | Line Ahead Double Line |
100 | 0/0 0/0 | |
| Line Ahead Double Line |
110 | 0/0 0/0 | ||
| Line Ahead Double Line |
130 | 0/0 0/0 | ||
| # | Enemy Form. |
Base EXP | Normal Battle Node | AD/AP AS/AS+ |
| # | Resource Node | ||
|---|---|---|---|
| F | Gained 15~35 | ||
| # | Resource Node | ||
| # | Enemy Form. |
Base EXP | Normal Battle Node | AD/AP AS/AS+ |
|---|---|---|---|---|
| G | Line Ahead Double Line |
150 | 0/0 0/0 | |
| Line Ahead Double Line |
160 | 0/0 0/0 | ||
| Line Ahead Double Line |
180 | 0/0 0/0 | ||
| # | Enemy Form. |
Base EXP | Normal Battle Node | AD/AP AS/AS+ |
| # | Empty Node | ||
|---|---|---|---|
| H | 気のせいだった。/敵影を見ず。/穏やかな海です。/穏やかな海峡です。/警戒が必要です。/静かな海です。 Must be my imagination./No enemy spotted./Calm seas./Calm straits./Be alert./Peaceful seas. | ||
| # | Empty Node | ||
| # | Empty Node | ||
|---|---|---|---|
| I | 気のせいだった。/敵影を見ず。/穏やかな海です。/穏やかな海峡です。/警戒が必要です。/静かな海です。 Must be my imagination./No enemy spotted./Calm seas./Calm straits./Be alert./Peaceful seas. | ||
| # | Empty Node | ||
| # | Resource Node | ||
|---|---|---|---|
| J | Gained 1 | ||
| # | Resource Node | ||
| # | Enemy Form. |
Base EXP | Boss Battle Node | AD/AP AS/AS+ |
|---|---|---|---|---|
| K | Line Ahead | 170 | 0/0 0/0 | |
| Diamond | 160 | 9/17 36/72 | ||
| Line Ahead Diamond |
180 | 9/17 36/72 | ||
| Line Ahead Diamond |
200 | 10/19 41/81 | ||
| Line Ahead Diamond |
220 | 10/19 41/81 | ||
| # | Enemy Form. |
Base EXP | Boss Battle Node | AD/AP AS/AS+ |
Ship Drops
| Ship drops | |||||||||||||||||||||||||||||||||||||||||||||||||||||||||||||||||||||||||||||||||||||||||||||||||||
|---|---|---|---|---|---|---|---|---|---|---|---|---|---|---|---|---|---|---|---|---|---|---|---|---|---|---|---|---|---|---|---|---|---|---|---|---|---|---|---|---|---|---|---|---|---|---|---|---|---|---|---|---|---|---|---|---|---|---|---|---|---|---|---|---|---|---|---|---|---|---|---|---|---|---|---|---|---|---|---|---|---|---|---|---|---|---|---|---|---|---|---|---|---|---|---|---|---|---|---|
| Type | Ship? | B | D | E | G | K | |||||||||||||||||||||||||||||||||||||||||||||||||||||||||||||||||||||||||||||||||||||||||||||
| DD | Yayoi | ✔️ | |||||||||||||||||||||||||||||||||||||||||||||||||||||||||||||||||||||||||||||||||||||||||||||||||
| DD | Hamakaze | ✔️ | |||||||||||||||||||||||||||||||||||||||||||||||||||||||||||||||||||||||||||||||||||||||||||||||||
| CL | Kitakami | ✔️ | |||||||||||||||||||||||||||||||||||||||||||||||||||||||||||||||||||||||||||||||||||||||||||||||||
| CL | Sendai | ✔️ | ✔️ | ✔️ | ✔️ | ✔️ | |||||||||||||||||||||||||||||||||||||||||||||||||||||||||||||||||||||||||||||||||||||||||||||
| CA | Myoukou | ✔️ | ✔️ | ✔️ | ✔️ | ||||||||||||||||||||||||||||||||||||||||||||||||||||||||||||||||||||||||||||||||||||||||||||||
| CA | Takao | ✔️ | ✔️ | ✔️ | ✔️ | ✔️ | |||||||||||||||||||||||||||||||||||||||||||||||||||||||||||||||||||||||||||||||||||||||||||||
| CA | Atago | ✔️ | ✔️ | ✔️ | ✔️ | ✔️ | |||||||||||||||||||||||||||||||||||||||||||||||||||||||||||||||||||||||||||||||||||||||||||||
| CA | Mogami | ✔️ | ✔️ | ✔️ | ✔️ | ✔️ | |||||||||||||||||||||||||||||||||||||||||||||||||||||||||||||||||||||||||||||||||||||||||||||
| CA | Tone | ✔️ | ✔️ | ✔️ | ✔️ | ||||||||||||||||||||||||||||||||||||||||||||||||||||||||||||||||||||||||||||||||||||||||||||||
| CA | Chikuma | ✔️ | ✔️ | ✔️ | ✔️ | ||||||||||||||||||||||||||||||||||||||||||||||||||||||||||||||||||||||||||||||||||||||||||||||
| CVL | Ryuujou | ✔️ | ✔️ | ✔️ | ✔️ | ||||||||||||||||||||||||||||||||||||||||||||||||||||||||||||||||||||||||||||||||||||||||||||||
| CVL | Shouhou | ✔️ | ✔️ | ✔️ | ✔️ | ✔️ | |||||||||||||||||||||||||||||||||||||||||||||||||||||||||||||||||||||||||||||||||||||||||||||
| CVL | Hiyou | ✔️ | |||||||||||||||||||||||||||||||||||||||||||||||||||||||||||||||||||||||||||||||||||||||||||||||||
| CVL | Junyou | ✔️ | ✔️ | ✔️ | |||||||||||||||||||||||||||||||||||||||||||||||||||||||||||||||||||||||||||||||||||||||||||||||
| FBB | Kongou | ✔️ | |||||||||||||||||||||||||||||||||||||||||||||||||||||||||||||||||||||||||||||||||||||||||||||||||
| FBB | Hiei | ✔️ | |||||||||||||||||||||||||||||||||||||||||||||||||||||||||||||||||||||||||||||||||||||||||||||||||
| FBB | Kirishima | ✔️ | |||||||||||||||||||||||||||||||||||||||||||||||||||||||||||||||||||||||||||||||||||||||||||||||||
| BB | Fusou | ✔️ | |||||||||||||||||||||||||||||||||||||||||||||||||||||||||||||||||||||||||||||||||||||||||||||||||
| BB | Yamashiro | ✔️ | |||||||||||||||||||||||||||||||||||||||||||||||||||||||||||||||||||||||||||||||||||||||||||||||||
| BB | Ise | ✔️ | |||||||||||||||||||||||||||||||||||||||||||||||||||||||||||||||||||||||||||||||||||||||||||||||||
| CV | Kaga | ✔️ | |||||||||||||||||||||||||||||||||||||||||||||||||||||||||||||||||||||||||||||||||||||||||||||||||
| CV | Souryuu | ✔️ | |||||||||||||||||||||||||||||||||||||||||||||||||||||||||||||||||||||||||||||||||||||||||||||||||
| DD | Kisaragi | ✔️ | ✔️ | ✔️ | ✔️ | ||||||||||||||||||||||||||||||||||||||||||||||||||||||||||||||||||||||||||||||||||||||||||||||
| DD | Satsuki | ✔️ | ✔️ | ✔️ | ✔️ | ||||||||||||||||||||||||||||||||||||||||||||||||||||||||||||||||||||||||||||||||||||||||||||||
| DD | Fumizuki | ✔️ | ✔️ | ✔️ | ✔️ | ||||||||||||||||||||||||||||||||||||||||||||||||||||||||||||||||||||||||||||||||||||||||||||||
| DD | Nagatsuki | ✔️ | ✔️ | ✔️ | ✔️ | ||||||||||||||||||||||||||||||||||||||||||||||||||||||||||||||||||||||||||||||||||||||||||||||
| DD | Kikuzuki | ✔️ | ✔️ | ✔️ | ✔️ | ||||||||||||||||||||||||||||||||||||||||||||||||||||||||||||||||||||||||||||||||||||||||||||||
| DD | Mikazuki | ✔️ | ✔️ | ✔️ | ✔️ | ||||||||||||||||||||||||||||||||||||||||||||||||||||||||||||||||||||||||||||||||||||||||||||||
| DD | Mochizuki | ✔️ | ✔️ | ✔️ | ✔️ | ||||||||||||||||||||||||||||||||||||||||||||||||||||||||||||||||||||||||||||||||||||||||||||||
| DD | Fubuki | ✔️ | ✔️ | ✔️ | |||||||||||||||||||||||||||||||||||||||||||||||||||||||||||||||||||||||||||||||||||||||||||||||
| DD | Shirayuki | ✔️ | ✔️ | ✔️ | ✔️ | ||||||||||||||||||||||||||||||||||||||||||||||||||||||||||||||||||||||||||||||||||||||||||||||
| DD | Hatsuyuki | ✔️ | ✔️ | ✔️ | ✔️ | ||||||||||||||||||||||||||||||||||||||||||||||||||||||||||||||||||||||||||||||||||||||||||||||
| DD | Miyuki | ✔️ | ✔️ | ✔️ | ✔️ | ||||||||||||||||||||||||||||||||||||||||||||||||||||||||||||||||||||||||||||||||||||||||||||||
| DD | Murakumo | ✔️ | ✔️ | ✔️ | ✔️ | ||||||||||||||||||||||||||||||||||||||||||||||||||||||||||||||||||||||||||||||||||||||||||||||
| DD | Isonami | ✔️ | ✔️ | ✔️ | ✔️ | ||||||||||||||||||||||||||||||||||||||||||||||||||||||||||||||||||||||||||||||||||||||||||||||
| DD | Shikinami | ✔️ | ✔️ | ✔️ | ✔️ | ||||||||||||||||||||||||||||||||||||||||||||||||||||||||||||||||||||||||||||||||||||||||||||||
| DD | Akatsuki | ✔️ | ✔️ | ✔️ | ✔️ | ||||||||||||||||||||||||||||||||||||||||||||||||||||||||||||||||||||||||||||||||||||||||||||||
| DD | Hibiki | ✔️ | ✔️ | ✔️ | ✔️ | ||||||||||||||||||||||||||||||||||||||||||||||||||||||||||||||||||||||||||||||||||||||||||||||
| DD | Ikazuchi | ✔️ | ✔️ | ✔️ | ✔️ | ||||||||||||||||||||||||||||||||||||||||||||||||||||||||||||||||||||||||||||||||||||||||||||||
| DD | Inazuma | ✔️ | ✔️ | ✔️ | ✔️ | ||||||||||||||||||||||||||||||||||||||||||||||||||||||||||||||||||||||||||||||||||||||||||||||
| DD | Hatsuharu | ✔️ | ✔️ | ✔️ | ✔️ | ||||||||||||||||||||||||||||||||||||||||||||||||||||||||||||||||||||||||||||||||||||||||||||||
| DD | Nenohi | ✔️ | ✔️ | ✔️ | ✔️ | ||||||||||||||||||||||||||||||||||||||||||||||||||||||||||||||||||||||||||||||||||||||||||||||
| DD | Wakaba | ✔️ | ✔️ | ✔️ | ✔️ | ||||||||||||||||||||||||||||||||||||||||||||||||||||||||||||||||||||||||||||||||||||||||||||||
| DD | Hatsushimo | ✔️ | ✔️ | ✔️ | ✔️ | ||||||||||||||||||||||||||||||||||||||||||||||||||||||||||||||||||||||||||||||||||||||||||||||
| DD | Shigure | ✔️ | ✔️ | ✔️ | ✔️ | ||||||||||||||||||||||||||||||||||||||||||||||||||||||||||||||||||||||||||||||||||||||||||||||
| DD | Murasame | ✔️ | ✔️ | ✔️ | ✔️ | ||||||||||||||||||||||||||||||||||||||||||||||||||||||||||||||||||||||||||||||||||||||||||||||
| DD | Yuudachi | ✔️ | ✔️ | ✔️ | ✔️ | ||||||||||||||||||||||||||||||||||||||||||||||||||||||||||||||||||||||||||||||||||||||||||||||
| DD | Samidare | ✔️ | ✔️ | ✔️ | ✔️ | ||||||||||||||||||||||||||||||||||||||||||||||||||||||||||||||||||||||||||||||||||||||||||||||
| DD | Ooshio | ✔️ | ✔️ | ✔️ | ✔️ | ||||||||||||||||||||||||||||||||||||||||||||||||||||||||||||||||||||||||||||||||||||||||||||||
| DD | Michishio | ✔️ | ✔️ | ✔️ | ✔️ | ||||||||||||||||||||||||||||||||||||||||||||||||||||||||||||||||||||||||||||||||||||||||||||||
| DD | Arashio | ✔️ | ✔️ | ✔️ | ✔️ | ||||||||||||||||||||||||||||||||||||||||||||||||||||||||||||||||||||||||||||||||||||||||||||||
| DD | Arare | ✔️ | ✔️ | ✔️ | ✔️ | ||||||||||||||||||||||||||||||||||||||||||||||||||||||||||||||||||||||||||||||||||||||||||||||
| DD | Kasumi | ✔️ | ✔️ | ✔️ | ✔️ | ||||||||||||||||||||||||||||||||||||||||||||||||||||||||||||||||||||||||||||||||||||||||||||||
| DD | Kagerou | ✔️ | ✔️ | ✔️ | ✔️ | ||||||||||||||||||||||||||||||||||||||||||||||||||||||||||||||||||||||||||||||||||||||||||||||
| DD | Shiranui | ✔️ | ✔️ | ✔️ | ✔️ | ||||||||||||||||||||||||||||||||||||||||||||||||||||||||||||||||||||||||||||||||||||||||||||||
| DD | Kuroshio | ✔️ | ✔️ | ✔️ | ✔️ | ||||||||||||||||||||||||||||||||||||||||||||||||||||||||||||||||||||||||||||||||||||||||||||||
| CL | Tenryuu | ✔️ | ✔️ | ✔️ | ✔️ | ||||||||||||||||||||||||||||||||||||||||||||||||||||||||||||||||||||||||||||||||||||||||||||||
| CL | Tatsuta | ✔️ | ✔️ | ✔️ | ✔️ | ||||||||||||||||||||||||||||||||||||||||||||||||||||||||||||||||||||||||||||||||||||||||||||||
| CL | Kuma | ✔️ | |||||||||||||||||||||||||||||||||||||||||||||||||||||||||||||||||||||||||||||||||||||||||||||||||
| CL | Tama | ✔️ | |||||||||||||||||||||||||||||||||||||||||||||||||||||||||||||||||||||||||||||||||||||||||||||||||
| CL | Kiso | ✔️ | |||||||||||||||||||||||||||||||||||||||||||||||||||||||||||||||||||||||||||||||||||||||||||||||||
| CL | Isuzu | ✔️ | ✔️ | ✔️ | ✔️ | ✔️ | |||||||||||||||||||||||||||||||||||||||||||||||||||||||||||||||||||||||||||||||||||||||||||||
| CL | Natori | ✔️ | ✔️ | ✔️ | ✔️ | ✔️ | |||||||||||||||||||||||||||||||||||||||||||||||||||||||||||||||||||||||||||||||||||||||||||||
| CL | Yura | ✔️ | ✔️ | ✔️ | ✔️ | ✔️ | |||||||||||||||||||||||||||||||||||||||||||||||||||||||||||||||||||||||||||||||||||||||||||||
| CL | Jintsuu | ✔️ | ✔️ | ✔️ | ✔️ | ✔️ | |||||||||||||||||||||||||||||||||||||||||||||||||||||||||||||||||||||||||||||||||||||||||||||
| CL | Naka | ✔️ | ✔️ | ✔️ | ✔️ | ✔️ | |||||||||||||||||||||||||||||||||||||||||||||||||||||||||||||||||||||||||||||||||||||||||||||
| CA | Furutaka | ✔️ | ✔️ | ✔️ | ✔️ | ✔️ | |||||||||||||||||||||||||||||||||||||||||||||||||||||||||||||||||||||||||||||||||||||||||||||
| CA | Kako | ✔️ | ✔️ | ✔️ | ✔️ | ✔️ | |||||||||||||||||||||||||||||||||||||||||||||||||||||||||||||||||||||||||||||||||||||||||||||
| CA | Aoba | ✔️ | ✔️ | ✔️ | ✔️ | ✔️ | |||||||||||||||||||||||||||||||||||||||||||||||||||||||||||||||||||||||||||||||||||||||||||||
| CA | Nachi | ✔️ | ✔️ | ✔️ | ✔️ | ✔️ | |||||||||||||||||||||||||||||||||||||||||||||||||||||||||||||||||||||||||||||||||||||||||||||
| CA | Ashigara | ✔️ | ✔️ | ✔️ | ✔️ | ✔️ | |||||||||||||||||||||||||||||||||||||||||||||||||||||||||||||||||||||||||||||||||||||||||||||
| CA | Haguro | ✔️ | ✔️ | ✔️ | ✔️ | ✔️ | |||||||||||||||||||||||||||||||||||||||||||||||||||||||||||||||||||||||||||||||||||||||||||||
| CA | Maya | ✔️ | ✔️ | ✔️ | ✔️ | ✔️ | |||||||||||||||||||||||||||||||||||||||||||||||||||||||||||||||||||||||||||||||||||||||||||||
| CA | Choukai | ✔️ | ✔️ | ✔️ | ✔️ | ✔️ | |||||||||||||||||||||||||||||||||||||||||||||||||||||||||||||||||||||||||||||||||||||||||||||
| AV | Chitose | ✔️ | |||||||||||||||||||||||||||||||||||||||||||||||||||||||||||||||||||||||||||||||||||||||||||||||||
| AV | Chiyoda | ✔️ | |||||||||||||||||||||||||||||||||||||||||||||||||||||||||||||||||||||||||||||||||||||||||||||||||
| ||||||||||||||||||||||||||||||||||||||||||||||||||||||||||||||||||||||||||||||||||||||||||||||||||||||||||||||||||||||||||||||||||||||||||||||||||||||||||||||||||||||||||||||||||||||||||||||||||||||||||||||||||||||||||||||||||||||||||||||||||||||||||||||||||||||||||||||||||||||||||||||||||||||||||||||||||||||||||||||||||||||||||||||||||
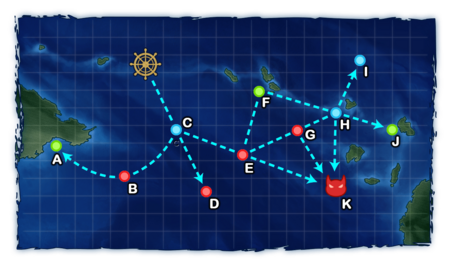
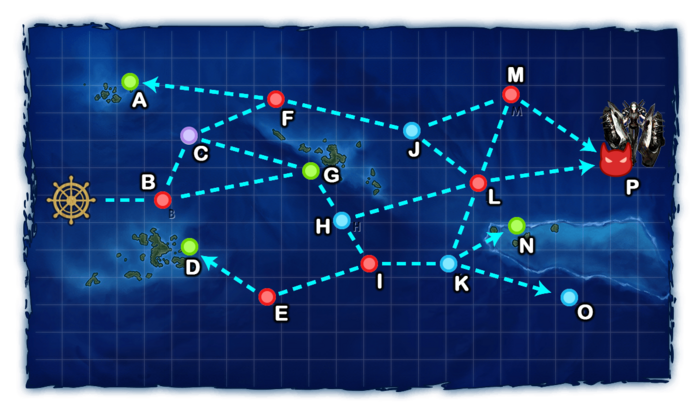
World 2-3: 東部オリョール海 - Eastern Orel Bay

| Strategy Name | オリョール哨戒 Orel Patrol |
|---|---|
| Difficulty | ☆ ☆ ☆ ☆ ☆ |
| Item | |
| Strategy Content | オリョール海に進出、同海域を哨戒。敵通商破壊艦隊を排除、我が方り海上輸送ラインの防衛に努めよ! Enter Orel Bay and conduct a patrol. Destroy the enemy transport fleet while protecting our own supply lines! |
| Boss Air Control | |||
|---|---|---|---|
| AD | AP | AS | AS+ |
| 24 | 36 | 81 | 162 |
| World 2 Unlocking & Progression | ||||
|---|---|---|---|---|
| Unlock conditions | World 2 is unlocked after clearing 2-2 | |||
| Clear conditions | To clear the map: the boss's flagship must be sunk once | |||
Stage Guide
| 2-3 Branching Rules | ||
|---|---|---|
| Nodes | Rules | |
| Start | A |
|
B | ||
C | ||
C |
D |
|
F | ||
D |
F |
|
G | ||
F |
H |
|
J | ||
G | ||
G |
I |
|
K | ||
J |
L |
|
M | ||
N | ||
Tips
This map utilizes the most random routing across all normal maps.
Regarding the branching rules, the light fleets listed below are the only two comps that guarantee the boss routing. Otherwise, any other fleets have a chance of off-routing, but should still be able to reach the boss node most of the time as long as there are at least 3 DD and 1 AV in the fleet.
- Using a fleet that meets one of the following requirements will avoid the chance of off-routing from F to H:
- AV + CL + CV(B/L) ≥ 1
- AS ≥ 1 and SS(V) ≥ 2
- AO ≥ 1 and DD+DE ≥ 2
- Bringing at least 1 AV/AO and 2DD/DE avoids off-routing entirely when rolling the southern route.
- Fleet that contains only SS(V) has a chance of reaching dead-end nodes H M.
- This comp has around 70-75% chance of reaching the boss node, which can be a cheap comp to clear World 2 daily quest.
Recommended Fleets
| Heavy Fleet | |||||||||||||||||||||||||||||||||
|---|---|---|---|---|---|---|---|---|---|---|---|---|---|---|---|---|---|---|---|---|---|---|---|---|---|---|---|---|---|---|---|---|---|
|
| ||||||||||||||||||||||||||||||||
| Fleet Notes | |||||||||||||||||||||||||||||||||
| Standard comp used for quests and farming. | |||||||||||||||||||||||||||||||||
| Light Fleets | |||||||||||||||||||||||||||||||||
|---|---|---|---|---|---|---|---|---|---|---|---|---|---|---|---|---|---|---|---|---|---|---|---|---|---|---|---|---|---|---|---|---|---|
|
| ||||||||||||||||||||||||||||||||
| Fleet Notes | |||||||||||||||||||||||||||||||||
| Weaker fleets with guaranteed boss routing, but may have some issues reaching it. | |||||||||||||||||||||||||||||||||
Resource Nodes
D G H I are "Normal Resource Nodes" rewarding respectively fuel ![]() , ammo
, ammo ![]() , ammo
, ammo ![]() , and fuel
, and fuel ![]() .
.
- See here for more details.
Enemy Compositions

| # | Enemy Form. |
Base EXP | Normal Battle Node | AD/AP AS/AS+ |
|---|---|---|---|---|
| A | Line Ahead | 70 | 0/0 0/0 | |
| Line Ahead Double Line |
80 | 0/0 0/0 | ||
| Line Ahead Double Line |
90 | 0/0 0/0 | ||
| Line Ahead Double Line |
110 | 0/0 0/0 | ||
| Line Ahead Double Line |
120 | 0/0 0/0 | ||
| # | Enemy Form. |
Base EXP | Normal Battle Node | AD/AP AS/AS+ |
| # | Empty Node | ||
|---|---|---|---|
| B | 気のせいだった。/敵影を見ず。/穏やかな海です。/穏やかな海峡です。/警戒が必要です。/静かな海です。 Must be my imagination./No enemy spotted./Calm seas./Calm straits./Be alert./Peaceful seas. | ||
| # | Empty Node | ||
| # | Empty Node | ||
|---|---|---|---|
| C | 気のせいだった。/敵影を見ず。/穏やかな海です。/穏やかな海峡です。/警戒が必要です。/静かな海です。 Must be my imagination./No enemy spotted./Calm seas./Calm straits./Be alert./Peaceful seas. | ||
| # | Empty Node | ||
| # | Resource Node | ||
|---|---|---|---|
| D | Gained 15~45 | ||
| # | Resource Node | ||
| # | Enemy Form. |
Base EXP | Normal Battle Node | AD/AP AS/AS+ |
|---|---|---|---|---|
| E | Line Ahead | 70 | 0/0 0/0 | |
| Line Ahead Double Line |
80 | 0/0 0/0 | ||
| Line Ahead Double Line |
90 | 0/0 0/0 | ||
| Line Ahead Double Line |
110 | 0/0 0/0 | ||
| Line Ahead Double Line |
120 | 0/0 0/0 | ||
| # | Enemy Form. |
Base EXP | Normal Battle Node | AD/AP AS/AS+ |
| # | Enemy Form. |
Base EXP | Normal Battle Node | AD/AP AS/AS+ |
|---|---|---|---|---|
| F | Line Ahead Double Line |
100 | 0/0 0/0 | |
| Line Ahead Double Line |
110 | 0/0 0/0 | ||
| Line Ahead Double Line |
130 | 0/0 0/0 | ||
| # | Enemy Form. |
Base EXP | Normal Battle Node | AD/AP AS/AS+ |
| # | Resource Node | ||
|---|---|---|---|
| G | Gained 15~45 | ||
| # | Resource Node | ||
| # | Resource Node | ||
|---|---|---|---|
| H | Gained 20~40 | ||
| # | Resource Node | ||
| # | Resource Node | ||
|---|---|---|---|
| I | Gained 15~45 | ||
| # | Resource Node | ||
| # | Enemy Form. |
Base EXP | Normal Battle Node | AD/AP AS/AS+ |
|---|---|---|---|---|
| J | Line Ahead | 100 | 0/0 0/0 | |
| Line Ahead Double Line |
100 | 0/0 0/0 | ||
| Line Ahead Double Line |
110 | 0/0 0/0 | ||
| Line Ahead Double Line |
120 | 0/0 0/0 | ||
| Line Ahead Double Line |
140 | 0/0 0/0 | ||
| # | Enemy Form. |
Base EXP | Normal Battle Node | AD/AP AS/AS+ |
| # | Enemy Form. |
Base EXP | Normal Battle Node | AD/AP AS/AS+ |
|---|---|---|---|---|
| K | Line Ahead | 100 | 0/0 0/0 | |
| Line Ahead Double Line |
100 | 0/0 0/0 | ||
| Line Ahead Double Line |
110 | 0/0 0/0 | ||
| Line Ahead Diamond |
120 | 0/0 0/0 | ||
| Line Ahead Double Line |
140 | 0/0 0/0 | ||
| # | Enemy Form. |
Base EXP | Normal Battle Node | AD/AP AS/AS+ |
| # | Empty Node | ||
|---|---|---|---|
| L | 気のせいだった。/敵影を見ず。/穏やかな海です。/穏やかな海峡です。/警戒が必要です。/静かな海です。 Must be my imagination./No enemy spotted./Calm seas./Calm straits./Be alert./Peaceful seas. | ||
| # | Empty Node | ||
| # | Enemy Form. |
Base EXP | Normal Battle Node | AD/AP AS/AS+ |
|---|---|---|---|---|
| M | Double Line | 200 | 0/0 0/0 | |
| Double Line | 210 | 0/0 0/0 | ||
| Double Line | 220 | 0/0 0/0 | ||
| Double Line | 230 | 0/0 0/0 | ||
| # | Enemy Form. |
Base EXP | Normal Battle Node | AD/AP AS/AS+ |
| # | Enemy Form. |
Base EXP | Boss Battle Node | AD/AP AS/AS+ |
|---|---|---|---|---|
| N | Line Ahead | 220 | 7/13 27/54 | |
| Line Ahead | 230 | 12/24 53/105 | ||
| Line Ahead | 240 | 18/35 77/153 | ||
| Line Ahead | 250 | 18/35 77/153 | ||
| Line Ahead | 260 | 18/35 77/153 | ||
| Line Ahead | 270 | 18/35 77/153 | ||
| Line Ahead | 280 | 18/35 77/153 | ||
| Line Ahead | 290 | 19/37 81/162 | ||
| # | Enemy Form. |
Base EXP | Boss Battle Node | AD/AP AS/AS+ |
Ship Drops
| Ship drops | |||||||||||||||||||||||||||||||||||||||||||||||||||||||||||||||||||||||||||||||||||||||||||||||||||
|---|---|---|---|---|---|---|---|---|---|---|---|---|---|---|---|---|---|---|---|---|---|---|---|---|---|---|---|---|---|---|---|---|---|---|---|---|---|---|---|---|---|---|---|---|---|---|---|---|---|---|---|---|---|---|---|---|---|---|---|---|---|---|---|---|---|---|---|---|---|---|---|---|---|---|---|---|---|---|---|---|---|---|---|---|---|---|---|---|---|---|---|---|---|---|---|---|---|---|---|
| Type | Ship? | A | E | F | J | K | M | N | |||||||||||||||||||||||||||||||||||||||||||||||||||||||||||||||||||||||||||||||||||||||||||
| DD | Makigumo | ✔️ | |||||||||||||||||||||||||||||||||||||||||||||||||||||||||||||||||||||||||||||||||||||||||||||||||
| CL | Kitakami | ✔️ | |||||||||||||||||||||||||||||||||||||||||||||||||||||||||||||||||||||||||||||||||||||||||||||||||
| CL | Ooi | ✔️ | |||||||||||||||||||||||||||||||||||||||||||||||||||||||||||||||||||||||||||||||||||||||||||||||||
| CL | Nagara | ✔️ | |||||||||||||||||||||||||||||||||||||||||||||||||||||||||||||||||||||||||||||||||||||||||||||||||
| CL | Sendai | ✔️ | ✔️ | ✔️ | ✔️ | ||||||||||||||||||||||||||||||||||||||||||||||||||||||||||||||||||||||||||||||||||||||||||||||
| CA | Myoukou | ✔️ | ✔️ | ✔️ | ✔️ | ✔️ | |||||||||||||||||||||||||||||||||||||||||||||||||||||||||||||||||||||||||||||||||||||||||||||
| CA | Takao | ✔️ | ✔️ | ✔️ | ✔️ | ✔️ | ✔️ | ✔️ | |||||||||||||||||||||||||||||||||||||||||||||||||||||||||||||||||||||||||||||||||||||||||||
| CA | Atago | ✔️ | ✔️ | ✔️ | ✔️ | ✔️ | ✔️ | ✔️ | |||||||||||||||||||||||||||||||||||||||||||||||||||||||||||||||||||||||||||||||||||||||||||
| CA | Mogami | ✔️ | ✔️ | ✔️ | ✔️ | ✔️ | ✔️ | ✔️ | |||||||||||||||||||||||||||||||||||||||||||||||||||||||||||||||||||||||||||||||||||||||||||
| CA | Tone | ✔️ | ✔️ | ✔️ | ✔️ | ✔️ | ✔️ | ||||||||||||||||||||||||||||||||||||||||||||||||||||||||||||||||||||||||||||||||||||||||||||
| CA | Chikuma | ✔️ | ✔️ | ✔️ | ✔️ | ✔️ | |||||||||||||||||||||||||||||||||||||||||||||||||||||||||||||||||||||||||||||||||||||||||||||
| CVL | Ryuujou | ✔️ | ✔️ | ✔️ | ✔️ | ✔️ | ✔️ | ✔️ | |||||||||||||||||||||||||||||||||||||||||||||||||||||||||||||||||||||||||||||||||||||||||||
| CVL | Shouhou | ✔️ | ✔️ | ✔️ | ✔️ | ✔️ | ✔️ | ✔️ | |||||||||||||||||||||||||||||||||||||||||||||||||||||||||||||||||||||||||||||||||||||||||||
| CVL | Hiyou | ✔️ | ✔️ | ✔️ | ✔️ | ✔️ | ✔️ | ✔️ | |||||||||||||||||||||||||||||||||||||||||||||||||||||||||||||||||||||||||||||||||||||||||||
| CVL | Junyou | ✔️ | ✔️ | ✔️ | ✔️ | ✔️ | ✔️ | ✔️ | |||||||||||||||||||||||||||||||||||||||||||||||||||||||||||||||||||||||||||||||||||||||||||
| FBB | Kongou | ✔️ | |||||||||||||||||||||||||||||||||||||||||||||||||||||||||||||||||||||||||||||||||||||||||||||||||
| FBB | Hiei | ✔️ | |||||||||||||||||||||||||||||||||||||||||||||||||||||||||||||||||||||||||||||||||||||||||||||||||
| FBB | Haruna | ✔️ | |||||||||||||||||||||||||||||||||||||||||||||||||||||||||||||||||||||||||||||||||||||||||||||||||
| FBB | Kirishima | ✔️ | |||||||||||||||||||||||||||||||||||||||||||||||||||||||||||||||||||||||||||||||||||||||||||||||||
| BB | Fusou | ✔️ | ✔️ | ✔️ | |||||||||||||||||||||||||||||||||||||||||||||||||||||||||||||||||||||||||||||||||||||||||||||||
| BB | Yamashiro | ✔️ | ✔️ | ✔️ | |||||||||||||||||||||||||||||||||||||||||||||||||||||||||||||||||||||||||||||||||||||||||||||||
| CV | Akagi | ✔️ | |||||||||||||||||||||||||||||||||||||||||||||||||||||||||||||||||||||||||||||||||||||||||||||||||
| CV | Kaga | ✔️ | |||||||||||||||||||||||||||||||||||||||||||||||||||||||||||||||||||||||||||||||||||||||||||||||||
| CV | Souryuu | ✔️ | |||||||||||||||||||||||||||||||||||||||||||||||||||||||||||||||||||||||||||||||||||||||||||||||||
| CV | Hiryuu | ✔️ | |||||||||||||||||||||||||||||||||||||||||||||||||||||||||||||||||||||||||||||||||||||||||||||||||
| DD | Mutsuki | ✔️ | ✔️ | ✔️ | ✔️ | ✔️ | ✔️ | ||||||||||||||||||||||||||||||||||||||||||||||||||||||||||||||||||||||||||||||||||||||||||||
| DD | Kisaragi | ✔️ | ✔️ | ✔️ | ✔️ | ✔️ | ✔️ | ||||||||||||||||||||||||||||||||||||||||||||||||||||||||||||||||||||||||||||||||||||||||||||
| DD | Satsuki | ✔️ | ✔️ | ✔️ | ✔️ | ✔️ | ✔️ | ||||||||||||||||||||||||||||||||||||||||||||||||||||||||||||||||||||||||||||||||||||||||||||
| DD | Fumizuki | ✔️ | ✔️ | ✔️ | ✔️ | ✔️ | ✔️ | ||||||||||||||||||||||||||||||||||||||||||||||||||||||||||||||||||||||||||||||||||||||||||||
| DD | Shirayuki | ✔️ | ✔️ | ✔️ | ✔️ | ✔️ | ✔️ | ||||||||||||||||||||||||||||||||||||||||||||||||||||||||||||||||||||||||||||||||||||||||||||
| DD | Hatsuyuki | ✔️ | ✔️ | ✔️ | ✔️ | ✔️ | ✔️ | ||||||||||||||||||||||||||||||||||||||||||||||||||||||||||||||||||||||||||||||||||||||||||||
| DD | Miyuki | ✔️ | ✔️ | ✔️ | ✔️ | ✔️ | ✔️ | ||||||||||||||||||||||||||||||||||||||||||||||||||||||||||||||||||||||||||||||||||||||||||||
| DD | Murakumo | ✔️ | ✔️ | ✔️ | ✔️ | ✔️ | ✔️ | ||||||||||||||||||||||||||||||||||||||||||||||||||||||||||||||||||||||||||||||||||||||||||||
| DD | Isonami | ✔️ | ✔️ | ✔️ | ✔️ | ✔️ | ✔️ | ||||||||||||||||||||||||||||||||||||||||||||||||||||||||||||||||||||||||||||||||||||||||||||
| DD | Ayanami | ✔️ | ✔️ | ✔️ | ✔️ | ✔️ | ✔️ | ||||||||||||||||||||||||||||||||||||||||||||||||||||||||||||||||||||||||||||||||||||||||||||
| DD | Shikinami | ✔️ | ✔️ | ✔️ | ✔️ | ✔️ | ✔️ | ✔️ | |||||||||||||||||||||||||||||||||||||||||||||||||||||||||||||||||||||||||||||||||||||||||||
| DD | Hibiki | ✔️ | ✔️ | ✔️ | ✔️ | ✔️ | ✔️ | ||||||||||||||||||||||||||||||||||||||||||||||||||||||||||||||||||||||||||||||||||||||||||||
| DD | Ikazuchi | ✔️ | ✔️ | ✔️ | ✔️ | ✔️ | ✔️ | ||||||||||||||||||||||||||||||||||||||||||||||||||||||||||||||||||||||||||||||||||||||||||||
| DD | Inazuma | ✔️ | ✔️ | ✔️ | ✔️ | ✔️ | ✔️ | ||||||||||||||||||||||||||||||||||||||||||||||||||||||||||||||||||||||||||||||||||||||||||||
| DD | Hatsuharu | ✔️ | ✔️ | ✔️ | ✔️ | ✔️ | ✔️ | ||||||||||||||||||||||||||||||||||||||||||||||||||||||||||||||||||||||||||||||||||||||||||||
| DD | Nenohi | ✔️ | ✔️ | ✔️ | ✔️ | ✔️ | ✔️ | ||||||||||||||||||||||||||||||||||||||||||||||||||||||||||||||||||||||||||||||||||||||||||||
| DD | Wakaba | ✔️ | ✔️ | ✔️ | ✔️ | ✔️ | ✔️ | ||||||||||||||||||||||||||||||||||||||||||||||||||||||||||||||||||||||||||||||||||||||||||||
| DD | Hatsushimo | ✔️ | ✔️ | ✔️ | ✔️ | ✔️ | ✔️ | ||||||||||||||||||||||||||||||||||||||||||||||||||||||||||||||||||||||||||||||||||||||||||||
| DD | Shigure | ✔️ | ✔️ | ✔️ | ✔️ | ✔️ | ✔️ | ||||||||||||||||||||||||||||||||||||||||||||||||||||||||||||||||||||||||||||||||||||||||||||
| DD | Murasame | ✔️ | ✔️ | ✔️ | ✔️ | ✔️ | ✔️ | ||||||||||||||||||||||||||||||||||||||||||||||||||||||||||||||||||||||||||||||||||||||||||||
| DD | Yuudachi | ✔️ | ✔️ | ✔️ | ✔️ | ✔️ | ✔️ | ||||||||||||||||||||||||||||||||||||||||||||||||||||||||||||||||||||||||||||||||||||||||||||
| DD | Samidare | ✔️ | ✔️ | ✔️ | ✔️ | ✔️ | ✔️ | ||||||||||||||||||||||||||||||||||||||||||||||||||||||||||||||||||||||||||||||||||||||||||||
| DD | Suzukaze | ✔️ | ✔️ | ✔️ | ✔️ | ✔️ | ✔️ | ||||||||||||||||||||||||||||||||||||||||||||||||||||||||||||||||||||||||||||||||||||||||||||
| DD | Ooshio | ✔️ | ✔️ | ✔️ | ✔️ | ✔️ | ✔️ | ✔️ | |||||||||||||||||||||||||||||||||||||||||||||||||||||||||||||||||||||||||||||||||||||||||||
| DD | Michishio | ✔️ | ✔️ | ✔️ | ✔️ | ✔️ | ✔️ | ✔️ | |||||||||||||||||||||||||||||||||||||||||||||||||||||||||||||||||||||||||||||||||||||||||||
| DD | Arashio | ✔️ | ✔️ | ✔️ | ✔️ | ✔️ | ✔️ | ✔️ | |||||||||||||||||||||||||||||||||||||||||||||||||||||||||||||||||||||||||||||||||||||||||||
| DD | Arare | ✔️ | ✔️ | ✔️ | ✔️ | ✔️ | ✔️ | ✔️ | |||||||||||||||||||||||||||||||||||||||||||||||||||||||||||||||||||||||||||||||||||||||||||
| DD | Kasumi | ✔️ | ✔️ | ✔️ | ✔️ | ✔️ | ✔️ | ✔️ | |||||||||||||||||||||||||||||||||||||||||||||||||||||||||||||||||||||||||||||||||||||||||||
| DD | Kagerou | ✔️ | ✔️ | ✔️ | ✔️ | ✔️ | ✔️ | ||||||||||||||||||||||||||||||||||||||||||||||||||||||||||||||||||||||||||||||||||||||||||||
| DD | Shiranui | ✔️ | ✔️ | ✔️ | ✔️ | ✔️ | ✔️ | ||||||||||||||||||||||||||||||||||||||||||||||||||||||||||||||||||||||||||||||||||||||||||||
| DD | Kuroshio | ✔️ | ✔️ | ✔️ | ✔️ | ✔️ | ✔️ | ||||||||||||||||||||||||||||||||||||||||||||||||||||||||||||||||||||||||||||||||||||||||||||
| CL | Tenryuu | ✔️ | ✔️ | ✔️ | ✔️ | ✔️ | |||||||||||||||||||||||||||||||||||||||||||||||||||||||||||||||||||||||||||||||||||||||||||||
| CL | Tatsuta | ✔️ | |||||||||||||||||||||||||||||||||||||||||||||||||||||||||||||||||||||||||||||||||||||||||||||||||
| CL | Kuma | ✔️ | |||||||||||||||||||||||||||||||||||||||||||||||||||||||||||||||||||||||||||||||||||||||||||||||||
| CL | Tama | ✔️ | ✔️ | ✔️ | ✔️ | ✔️ | ✔️ | ✔️ | |||||||||||||||||||||||||||||||||||||||||||||||||||||||||||||||||||||||||||||||||||||||||||
| CL | Kiso | ✔️ | ✔️ | ✔️ | ✔️ | ✔️ | ✔️ | ✔️ | |||||||||||||||||||||||||||||||||||||||||||||||||||||||||||||||||||||||||||||||||||||||||||
| CL | Isuzu | ✔️ | ✔️ | ✔️ | ✔️ | ✔️ | ✔️ | ✔️ | |||||||||||||||||||||||||||||||||||||||||||||||||||||||||||||||||||||||||||||||||||||||||||
| CL | Natori | ✔️ | ✔️ | ✔️ | ✔️ | ✔️ | ✔️ | ✔️ | |||||||||||||||||||||||||||||||||||||||||||||||||||||||||||||||||||||||||||||||||||||||||||
| CL | Yura | ✔️ | ✔️ | ✔️ | ✔️ | ✔️ | ✔️ | ✔️ | |||||||||||||||||||||||||||||||||||||||||||||||||||||||||||||||||||||||||||||||||||||||||||
| CL | Jintsuu | ✔️ | ✔️ | ✔️ | ✔️ | ✔️ | ✔️ | ✔️ | |||||||||||||||||||||||||||||||||||||||||||||||||||||||||||||||||||||||||||||||||||||||||||
| CL | Naka | ✔️ | ✔️ | ✔️ | ✔️ | ✔️ | ✔️ | ✔️ | |||||||||||||||||||||||||||||||||||||||||||||||||||||||||||||||||||||||||||||||||||||||||||
| CA | Furutaka | ✔️ | |||||||||||||||||||||||||||||||||||||||||||||||||||||||||||||||||||||||||||||||||||||||||||||||||
| CA | Kako | ✔️ | |||||||||||||||||||||||||||||||||||||||||||||||||||||||||||||||||||||||||||||||||||||||||||||||||
| CA | Aoba | ✔️ | |||||||||||||||||||||||||||||||||||||||||||||||||||||||||||||||||||||||||||||||||||||||||||||||||
| CA | Nachi | ✔️ | ✔️ | ✔️ | ✔️ | ✔️ | ✔️ | ✔️ | |||||||||||||||||||||||||||||||||||||||||||||||||||||||||||||||||||||||||||||||||||||||||||
| CA | Ashigara | ✔️ | ✔️ | ✔️ | ✔️ | ✔️ | ✔️ | ✔️ | |||||||||||||||||||||||||||||||||||||||||||||||||||||||||||||||||||||||||||||||||||||||||||
| CA | Haguro | ✔️ | ✔️ | ✔️ | ✔️ | ✔️ | ✔️ | ✔️ | |||||||||||||||||||||||||||||||||||||||||||||||||||||||||||||||||||||||||||||||||||||||||||
| CA | Maya | ✔️ | ✔️ | ✔️ | ✔️ | ✔️ | ✔️ | ✔️ | |||||||||||||||||||||||||||||||||||||||||||||||||||||||||||||||||||||||||||||||||||||||||||
| CA | Choukai | ✔️ | ✔️ | ✔️ | ✔️ | ✔️ | ✔️ | ✔️ | |||||||||||||||||||||||||||||||||||||||||||||||||||||||||||||||||||||||||||||||||||||||||||
| SS | I-168 | ✔️ | |||||||||||||||||||||||||||||||||||||||||||||||||||||||||||||||||||||||||||||||||||||||||||||||||
| AV | Chitose | ✔️ | |||||||||||||||||||||||||||||||||||||||||||||||||||||||||||||||||||||||||||||||||||||||||||||||||
| AV | Chiyoda | ✔️ | |||||||||||||||||||||||||||||||||||||||||||||||||||||||||||||||||||||||||||||||||||||||||||||||||
| ||||||||||||||||||||||||||||||||||||||||||||||||||||||||||||||||||||||||||||||||||||||||||||||||||||||||||||||||||||||||||||||||||||||||||||||||||||||||||||||||||||||||||||||||||||||||||||||||||||||||||||||||||||||||||||||||||||||||||||||||||||||||||||||||||||||||||||||||||||||||||||||||||||||||||||||||||||||||||||||||||||||||||||||||||
World 2-4: 沖ノ島海域 - Okinoshima Island

| Strategy Name | あ号艦隊決戦 Operation A-Go: The Fleet's Decisive Battle |
|---|---|
| Difficulty | ☆ ☆ ☆ ☆ ☆ ☆ |
| Item | |
| Strategy Content | 沖ノ島海域に襲来した有力な敵機動部隊を迎撃する。艦隊全力出撃で、これを捕捉撃滅せよ! A powerful enemy battlegroup is invading the waters around Okinoshima Island. Sail out in full force and annihilate them! |
| Boss Air Control | |||
|---|---|---|---|
| AD | AP | AS | AS+ |
| 0 | 0 | 0 | 0 |
| Boss Route Air Control | |||
| AD | AP | AS | AS+ |
| 25 | 38 | 84 | 168 |
| World 2 Unlocking & Progression | ||||
|---|---|---|---|---|
| Unlock conditions | World 2 is unlocked after clearing 2-3 | |||
| Clear conditions | To clear the map: the boss's flagship must be sunk once | |||
Stage Guide
| 2-4 Branching Rules | ||
|---|---|---|
| Nodes | Rules | |
B |
C |
|
G | ||
C |
F |
|
G | ||
F |
A |
|
J | ||
H |
I |
|
L | ||
I |
E |
|
K | ||
J |
L |
|
M | ||
K |
L |
|
N | ||
O | ||
L |
M |
|
P |
| |
Tips
This map will feature a series of fights involving mostly smaller surface ships with some carrier fights in between.
Recommended Fleets
| Heavy Fleets | |||||||||||||||||||||||||||||||||
|---|---|---|---|---|---|---|---|---|---|---|---|---|---|---|---|---|---|---|---|---|---|---|---|---|---|---|---|---|---|---|---|---|---|
|
| ||||||||||||||||||||||||||||||||
| Fleet Notes | |||||||||||||||||||||||||||||||||
Random routing across the map, but it is allowed to bring a much stronger fleet to fight the boss node.
| |||||||||||||||||||||||||||||||||
| Light Fleet | |||||||||||||||||||||||||||||||||
|---|---|---|---|---|---|---|---|---|---|---|---|---|---|---|---|---|---|---|---|---|---|---|---|---|---|---|---|---|---|---|---|---|---|
|
| ||||||||||||||||||||||||||||||||
| Fleet Notes | |||||||||||||||||||||||||||||||||
| Takes the quickest path to the boss node with only 2 battles prior to the boss node, but may present difficulties due to lack of airpower of the fleet for nodes L.
Boss node can also be difficult if CL and DD are not high-leveled, therefore it is not suitable for early players. | |||||||||||||||||||||||||||||||||
| Torpedo Squadron | |||||||||||||||||||||||||||||||||
|---|---|---|---|---|---|---|---|---|---|---|---|---|---|---|---|---|---|---|---|---|---|---|---|---|---|---|---|---|---|---|---|---|---|
|
| ||||||||||||||||||||||||||||||||
| Fleet Notes | |||||||||||||||||||||||||||||||||
This solution requires more advanced equipment, and might be out of reach of new players. It is required to bring an
The best comp for farming boss node, having the highest pass rate thanks to the usage of ETSCF in case a ship got TaihaHeavily Damaged (大破). Do note that the Night Zuiun will likely be shot down completely due to fighting under AI. | |||||||||||||||||||||||||||||||||
Resource Nodes
D G N are "Normal Resource Nodes" rewarding respectively fuel ![]() , development materials
, development materials ![]() , and ammo
, and ammo ![]() .
.
A is a "Special Resource Node" rewarding instant repair materials ![]() .
.
- See here for more details.
Bucket & DevMat Farming
It is possible to farm buckets or/and DevMats on nodes A and G respectively.
- Depending on the fleet used, it is possible to either focus the farming on both consumables, or only on DevMats.
- When focussing on DevMats, it is recommended to use CVL instead of CV(B) for 60% of avoiding the maelstrom node.
- When farming both, using 4+
 /
/ is recommended to farm buckets, and
  to pass the maelstrom.
 - See Resource Farming for more details.
Enemy Compositions
| # | Resource Node | ||
|---|---|---|---|
| A | Gained 1~2 | ||
| # | Resource Node | ||
| # | Enemy Form. |
Base EXP | Normal Battle Node | AD/AP AS/AS+ |
|---|---|---|---|---|
| B | Line Ahead Double Line |
120 | 0/0 0/0 | |
| Line Ahead Double Line |
140 | 0/0 0/0 | ||
| Line Ahead Double Line |
160 | 0/0 0/0 | ||
| Line Ahead Double Line |
180 | 0/0 0/0 | ||
| # | Enemy Form. |
Base EXP | Normal Battle Node | AD/AP AS/AS+ |
| # | Maelstrom Node | ||
|---|---|---|---|
| C | Lost Normal | ||
| # | Maelstrom Node | ||
| # | Resource Node | ||
|---|---|---|---|
| D | Gained 25~45 | ||
| # | Resource Node | ||
| # | Enemy Form. |
Base EXP | Normal Battle Node | AD/AP AS/AS+ |
|---|---|---|---|---|
| E | Line Ahead Double Line |
100 | 0/0 0/0 | |
| Line Ahead Double Line |
120 | 0/0 0/0 | ||
| Line Ahead Double Line |
130 | 0/0 0/0 | ||
| Line Ahead Double Line |
140 | 0/0 0/0 | ||
| Line Ahead | 160 | 0/0 0/0 | ||
| # | Enemy Form. |
Base EXP | Normal Battle Node | AD/AP AS/AS+ |
| # | Enemy Form. |
Base EXP | Normal Battle Node | AD/AP AS/AS+ |
|---|---|---|---|---|
| F | Diamond | 130 | 11/22 48/96 | |
| Diamond | 140 | 17/33 72/144 | ||
| Diamond | 150 | 17/33 72/144 | ||
| Diamond | 160 | 17/33 72/144 | ||
| Diamond | 180 | 17/33 72/144 | ||
| Diamond | 190 | 16/32 71/141 | ||
| # | Enemy Form. |
Base EXP | Normal Battle Node | AD/AP AS/AS+ |
| # | Resource Node | ||
|---|---|---|---|
| G | Gained 1 | ||
| # | Resource Node | ||
| # | Empty Node | ||
|---|---|---|---|
| H | 気のせいだった。/敵影を見ず。/穏やかな海です。/穏やかな海峡です。/警戒が必要です。/静かな海です。 Must be my imagination./No enemy spotted./Calm seas./Calm straits./Be alert./Peaceful seas. | ||
| # | Empty Node | ||
| # | Enemy Form. |
Base EXP | Normal Battle Node | AD/AP AS/AS+ |
|---|---|---|---|---|
| I | Line Ahead | 100 | 0/0 0/0 | |
| Line Ahead Double Line |
110 | 0/0 0/0 | ||
| Line Ahead Double Line |
120 | 0/0 0/0 | ||
| Line Ahead Double Line |
140 | 0/0 0/0 | ||
| Double Line | 140 | 0/0 0/0 | ||
| Line Ahead | 150 | 0/0 0/0 | ||
| # | Enemy Form. |
Base EXP | Normal Battle Node | AD/AP AS/AS+ |
| # | Empty Node | ||
|---|---|---|---|
| J | 気のせいだった。/敵影を見ず。/穏やかな海です。/穏やかな海峡です。/警戒が必要です。/静かな海です。 Must be my imagination./No enemy spotted./Calm seas./Calm straits./Be alert./Peaceful seas. | ||
| # | Empty Node | ||
| # | Empty Node | ||
|---|---|---|---|
| K | 気のせいだった。/敵影を見ず。/穏やかな海です。/穏やかな海峡です。/警戒が必要です。/静かな海です。 Must be my imagination./No enemy spotted./Calm seas./Calm straits./Be alert./Peaceful seas. | ||
| # | Empty Node | ||
| # | Enemy Form. |
Base EXP | Normal Battle Node | AD/AP AS/AS+ |
|---|---|---|---|---|
| L | Diamond | 170 | 19/37 81/162 | |
| Diamond | 190 | 19/37 83/165 | ||
| Diamond | 210 | 19/37 83/165 | ||
| Diamond | 220 | 19/38 84/168 | ||
| Diamond | 230 | 19/38 84/168 | ||
| Diamond | 250 | 19/38 84/168 | ||
| # | Enemy Form. |
Base EXP | Normal Battle Node | AD/AP AS/AS+ |
| # | Enemy Form. |
Base EXP | Normal Battle Node | AD/AP AS/AS+ |
|---|---|---|---|---|
| M | Diamond | 180 | 19/37 81/162 | |
| Diamond | 200 | 19/37 83/165 | ||
| Diamond | 220 | 19/37 83/165 | ||
| Diamond | 240 | 19/38 84/168 | ||
| Diamond | 260 | 19/38 84/168 | ||
| Diamond | 280 | 19/38 84/168 | ||
| # | Enemy Form. |
Base EXP | Normal Battle Node | AD/AP AS/AS+ |
| # | Resource Node | ||
|---|---|---|---|
| N | Gained 20~60 | ||
| # | Resource Node | ||
| # | Empty Node | ||
|---|---|---|---|
| O | 気のせいだった。/敵影を見ず。/穏やかな海です。/穏やかな海峡です。/警戒が必要です。/静かな海です。 Must be my imagination./No enemy spotted./Calm seas./Calm straits./Be alert./Peaceful seas. | ||
| # | Empty Node | ||
| # | Enemy Form. |
Base EXP | Boss Battle Node | AD/AP AS/AS+ |
|---|---|---|---|---|
| P | Line Ahead | 360 | 0/0 0/0 | |
| Line Ahead | 370 | 0/0 0/0 | ||
| Line Ahead | 390 | 0/0 0/0 | ||
| Line Ahead | 400 | 0/0 0/0 | ||
| Line Ahead | 420 | 0/0 0/0 | ||
| # | Enemy Form. |
Base EXP | Boss Battle Node | AD/AP AS/AS+ |
Ship Drops
| Ship drops | |||||||||||||||||||||||||||||||||||||||||||||||||||||||||||||||||||||||||||||||||||||||||||||||||||
|---|---|---|---|---|---|---|---|---|---|---|---|---|---|---|---|---|---|---|---|---|---|---|---|---|---|---|---|---|---|---|---|---|---|---|---|---|---|---|---|---|---|---|---|---|---|---|---|---|---|---|---|---|---|---|---|---|---|---|---|---|---|---|---|---|---|---|---|---|---|---|---|---|---|---|---|---|---|---|---|---|---|---|---|---|---|---|---|---|---|---|---|---|---|---|---|---|---|---|---|
| Type | Ship? | B | E | F | I | L | M | P | |||||||||||||||||||||||||||||||||||||||||||||||||||||||||||||||||||||||||||||||||||||||||||
| DD | Uranami | ✔️ | ✔️ | ||||||||||||||||||||||||||||||||||||||||||||||||||||||||||||||||||||||||||||||||||||||||||||||||
| AS | Taigei | ✔️ | |||||||||||||||||||||||||||||||||||||||||||||||||||||||||||||||||||||||||||||||||||||||||||||||||
| DD | Yayoi | ✔️ | |||||||||||||||||||||||||||||||||||||||||||||||||||||||||||||||||||||||||||||||||||||||||||||||||
| DD | Yamagumo | ✔️ | |||||||||||||||||||||||||||||||||||||||||||||||||||||||||||||||||||||||||||||||||||||||||||||||||
| DD | Yukikaze | ✔️ | |||||||||||||||||||||||||||||||||||||||||||||||||||||||||||||||||||||||||||||||||||||||||||||||||
| DD | Urakaze | ✔️ | |||||||||||||||||||||||||||||||||||||||||||||||||||||||||||||||||||||||||||||||||||||||||||||||||
| DD | Hamakaze | ✔️ | |||||||||||||||||||||||||||||||||||||||||||||||||||||||||||||||||||||||||||||||||||||||||||||||||
| DD | Shimakaze | ✔️ | ✔️ | ✔️ | ✔️ | ||||||||||||||||||||||||||||||||||||||||||||||||||||||||||||||||||||||||||||||||||||||||||||||
| CL | Kitakami | ✔️ | ✔️ | ✔️ | ✔️ | ✔️ | ✔️ | ||||||||||||||||||||||||||||||||||||||||||||||||||||||||||||||||||||||||||||||||||||||||||||
| CL | Ooi | ✔️ | ✔️ | ✔️ | ✔️ | ✔️ | ✔️ | ||||||||||||||||||||||||||||||||||||||||||||||||||||||||||||||||||||||||||||||||||||||||||||
| CL | Sendai | ✔️ | ✔️ | ✔️ | ✔️ | ✔️ | ✔️ | ✔️ | |||||||||||||||||||||||||||||||||||||||||||||||||||||||||||||||||||||||||||||||||||||||||||
| CA | Myoukou | ✔️ | ✔️ | ✔️ | ✔️ | ✔️ | ✔️ | ✔️ | |||||||||||||||||||||||||||||||||||||||||||||||||||||||||||||||||||||||||||||||||||||||||||
| CA | Takao | ✔️ | ✔️ | ✔️ | ✔️ | ✔️ | ✔️ | ✔️ | |||||||||||||||||||||||||||||||||||||||||||||||||||||||||||||||||||||||||||||||||||||||||||
| CA | Atago | ✔️ | ✔️ | ✔️ | ✔️ | ✔️ | ✔️ | ✔️ | |||||||||||||||||||||||||||||||||||||||||||||||||||||||||||||||||||||||||||||||||||||||||||
| CA | Mogami | ✔️ | ✔️ | ✔️ | ✔️ | ✔️ | ✔️ | ✔️ | |||||||||||||||||||||||||||||||||||||||||||||||||||||||||||||||||||||||||||||||||||||||||||
| CA | Tone | ✔️ | ✔️ | ✔️ | ✔️ | ✔️ | ✔️ | ✔️ | |||||||||||||||||||||||||||||||||||||||||||||||||||||||||||||||||||||||||||||||||||||||||||
| CA | Chikuma | ✔️ | ✔️ | ✔️ | ✔️ | ✔️ | ✔️ | ✔️ | |||||||||||||||||||||||||||||||||||||||||||||||||||||||||||||||||||||||||||||||||||||||||||
| CVL | Ryuujou | ✔️ | ✔️ | ✔️ | ✔️ | ✔️ | ✔️ | ✔️ | |||||||||||||||||||||||||||||||||||||||||||||||||||||||||||||||||||||||||||||||||||||||||||
| CVL | Shouhou | ✔️ | ✔️ | ✔️ | ✔️ | ✔️ | ✔️ | ✔️ | |||||||||||||||||||||||||||||||||||||||||||||||||||||||||||||||||||||||||||||||||||||||||||
| CVL | Hiyou | ✔️ | ✔️ | ✔️ | ✔️ | ✔️ | ✔️ | ✔️ | |||||||||||||||||||||||||||||||||||||||||||||||||||||||||||||||||||||||||||||||||||||||||||
| CVL | Junyou | ✔️ | ✔️ | ✔️ | ✔️ | ✔️ | ✔️ | ✔️ | |||||||||||||||||||||||||||||||||||||||||||||||||||||||||||||||||||||||||||||||||||||||||||
| FBB | Kongou | ✔️ | |||||||||||||||||||||||||||||||||||||||||||||||||||||||||||||||||||||||||||||||||||||||||||||||||
| FBB | Hiei | ✔️ | |||||||||||||||||||||||||||||||||||||||||||||||||||||||||||||||||||||||||||||||||||||||||||||||||
| FBB | Haruna | ✔️ | |||||||||||||||||||||||||||||||||||||||||||||||||||||||||||||||||||||||||||||||||||||||||||||||||
| FBB | Kirishima | ✔️ | |||||||||||||||||||||||||||||||||||||||||||||||||||||||||||||||||||||||||||||||||||||||||||||||||
| BB | Fusou | ✔️ | ✔️ | ✔️ | |||||||||||||||||||||||||||||||||||||||||||||||||||||||||||||||||||||||||||||||||||||||||||||||
| BB | Yamashiro | ✔️ | ✔️ | ✔️ | |||||||||||||||||||||||||||||||||||||||||||||||||||||||||||||||||||||||||||||||||||||||||||||||
| BB | Ise | ✔️ | ✔️ | ✔️ | |||||||||||||||||||||||||||||||||||||||||||||||||||||||||||||||||||||||||||||||||||||||||||||||
| BB | Hyuuga | ✔️ | ✔️ | ✔️ | |||||||||||||||||||||||||||||||||||||||||||||||||||||||||||||||||||||||||||||||||||||||||||||||
| BB | Mutsu | ✔️ | |||||||||||||||||||||||||||||||||||||||||||||||||||||||||||||||||||||||||||||||||||||||||||||||||
| CV | Akagi | ✔️ | |||||||||||||||||||||||||||||||||||||||||||||||||||||||||||||||||||||||||||||||||||||||||||||||||
| DD | Fubuki | ✔️ | ✔️ | ✔️ | ✔️ | ✔️ | |||||||||||||||||||||||||||||||||||||||||||||||||||||||||||||||||||||||||||||||||||||||||||||
| DD | Hatsuyuki | ✔️ | ✔️ | ✔️ | ✔️ | ✔️ | ✔️ | ||||||||||||||||||||||||||||||||||||||||||||||||||||||||||||||||||||||||||||||||||||||||||||
| DD | Miyuki | ✔️ | ✔️ | ✔️ | ✔️ | ✔️ | ✔️ | ||||||||||||||||||||||||||||||||||||||||||||||||||||||||||||||||||||||||||||||||||||||||||||
| DD | Murakumo | ✔️ | ✔️ | ✔️ | ✔️ | ✔️ | ✔️ | ||||||||||||||||||||||||||||||||||||||||||||||||||||||||||||||||||||||||||||||||||||||||||||
| DD | Isonami | ✔️ | ✔️ | ✔️ | ✔️ | ✔️ | ✔️ | ||||||||||||||||||||||||||||||||||||||||||||||||||||||||||||||||||||||||||||||||||||||||||||
| DD | Ayanami | ✔️ | ✔️ | ✔️ | ✔️ | ✔️ | ✔️ | ||||||||||||||||||||||||||||||||||||||||||||||||||||||||||||||||||||||||||||||||||||||||||||
| DD | Shikinami | ✔️ | ✔️ | ✔️ | ✔️ | ✔️ | ✔️ | ||||||||||||||||||||||||||||||||||||||||||||||||||||||||||||||||||||||||||||||||||||||||||||
| DD | Asashio | ✔️ | ✔️ | ✔️ | ✔️ | ✔️ | ✔️ | ✔️ | |||||||||||||||||||||||||||||||||||||||||||||||||||||||||||||||||||||||||||||||||||||||||||
| DD | Ooshio | ✔️ | ✔️ | ✔️ | ✔️ | ✔️ | ✔️ | ✔️ | |||||||||||||||||||||||||||||||||||||||||||||||||||||||||||||||||||||||||||||||||||||||||||
| DD | Michishio | ✔️ | ✔️ | ✔️ | ✔️ | ✔️ | ✔️ | ||||||||||||||||||||||||||||||||||||||||||||||||||||||||||||||||||||||||||||||||||||||||||||
| DD | Arashio | ✔️ | ✔️ | ✔️ | ✔️ | ✔️ | ✔️ | ||||||||||||||||||||||||||||||||||||||||||||||||||||||||||||||||||||||||||||||||||||||||||||
| DD | Arare | ✔️ | ✔️ | ✔️ | ✔️ | ✔️ | ✔️ | ||||||||||||||||||||||||||||||||||||||||||||||||||||||||||||||||||||||||||||||||||||||||||||
| DD | Kasumi | ✔️ | ✔️ | ✔️ | ✔️ | ✔️ | ✔️ | ||||||||||||||||||||||||||||||||||||||||||||||||||||||||||||||||||||||||||||||||||||||||||||
| DD | Kagerou | ✔️ | ✔️ | ✔️ | ✔️ | ✔️ | ✔️ | ||||||||||||||||||||||||||||||||||||||||||||||||||||||||||||||||||||||||||||||||||||||||||||
| DD | Shiranui | ✔️ | ✔️ | ✔️ | ✔️ | ✔️ | ✔️ | ||||||||||||||||||||||||||||||||||||||||||||||||||||||||||||||||||||||||||||||||||||||||||||
| DD | Kuroshio | ✔️ | ✔️ | ✔️ | ✔️ | ✔️ | ✔️ | ✔️ | |||||||||||||||||||||||||||||||||||||||||||||||||||||||||||||||||||||||||||||||||||||||||||
| CL | Tenryuu | ✔️ | ✔️ | ✔️ | ✔️ | ✔️ | ✔️ | ✔️ | |||||||||||||||||||||||||||||||||||||||||||||||||||||||||||||||||||||||||||||||||||||||||||
| CL | Tatsuta | ✔️ | ✔️ | ✔️ | ✔️ | ✔️ | ✔️ | ✔️ | |||||||||||||||||||||||||||||||||||||||||||||||||||||||||||||||||||||||||||||||||||||||||||
| CL | Tama | ✔️ | ✔️ | ✔️ | ✔️ | ✔️ | ✔️ | ||||||||||||||||||||||||||||||||||||||||||||||||||||||||||||||||||||||||||||||||||||||||||||
| CL | Kiso | ✔️ | ✔️ | ✔️ | ✔️ | ✔️ | ✔️ | ||||||||||||||||||||||||||||||||||||||||||||||||||||||||||||||||||||||||||||||||||||||||||||
| CL | Isuzu | ✔️ | ✔️ | ✔️ | ✔️ | ✔️ | ✔️ | ||||||||||||||||||||||||||||||||||||||||||||||||||||||||||||||||||||||||||||||||||||||||||||
| CL | Natori | ✔️ | ✔️ | ✔️ | ✔️ | ✔️ | ✔️ | ||||||||||||||||||||||||||||||||||||||||||||||||||||||||||||||||||||||||||||||||||||||||||||
| CL | Yura | ✔️ | ✔️ | ✔️ | ✔️ | ✔️ | ✔️ | ||||||||||||||||||||||||||||||||||||||||||||||||||||||||||||||||||||||||||||||||||||||||||||
| CL | Jintsuu | ✔️ | ✔️ | ✔️ | ✔️ | ✔️ | ✔️ | ||||||||||||||||||||||||||||||||||||||||||||||||||||||||||||||||||||||||||||||||||||||||||||
| CL | Naka | ✔️ | ✔️ | ✔️ | ✔️ | ✔️ | ✔️ | ||||||||||||||||||||||||||||||||||||||||||||||||||||||||||||||||||||||||||||||||||||||||||||
| CA | Kako | ✔️ | ✔️ | ✔️ | ✔️ | ✔️ | ✔️ | ||||||||||||||||||||||||||||||||||||||||||||||||||||||||||||||||||||||||||||||||||||||||||||
| CA | Nachi | ✔️ | ✔️ | ✔️ | ✔️ | ✔️ | ✔️ | ✔️ | |||||||||||||||||||||||||||||||||||||||||||||||||||||||||||||||||||||||||||||||||||||||||||
| CA | Ashigara | ✔️ | ✔️ | ✔️ | ✔️ | ✔️ | ✔️ | ✔️ | |||||||||||||||||||||||||||||||||||||||||||||||||||||||||||||||||||||||||||||||||||||||||||
| CA | Haguro | ✔️ | ✔️ | ✔️ | ✔️ | ✔️ | ✔️ | ✔️ | |||||||||||||||||||||||||||||||||||||||||||||||||||||||||||||||||||||||||||||||||||||||||||
| CA | Maya | ✔️ | ✔️ | ✔️ | ✔️ | ✔️ | ✔️ | ✔️ | |||||||||||||||||||||||||||||||||||||||||||||||||||||||||||||||||||||||||||||||||||||||||||
| CA | Choukai | ✔️ | ✔️ | ✔️ | ✔️ | ✔️ | ✔️ | ✔️ | |||||||||||||||||||||||||||||||||||||||||||||||||||||||||||||||||||||||||||||||||||||||||||
| AV | Chitose | ✔️ | ✔️ | ✔️ | ✔️ | ✔️ | ✔️ | ||||||||||||||||||||||||||||||||||||||||||||||||||||||||||||||||||||||||||||||||||||||||||||
| AV | Chiyoda | ✔️ | ✔️ | ✔️ | ✔️ | ✔️ | ✔️ | ||||||||||||||||||||||||||||||||||||||||||||||||||||||||||||||||||||||||||||||||||||||||||||
| ||||||||||||||||||||||||||||||||||||||||||||||||||||||||||||||||||||||||||||||||||||||||||||||||||||||||||||||||||||||||||||||||||||||||||||||||||||||||||||||||||||||||||||||||||||||||||||||||||||||||||||||||||||||||||||||||||||||||||||||||||||||||||||||||||||||||||||||||||||||||||||||||||||||||||||||||||||||||||||||||||||||||||||||||||
World 2-1: 南西諸島近海 Nansei Islands Coastal Waters
Stage Guide
Tips
- This map is fairly simple as long as you remember that all maps in World 2 have routing restrictions on the maximum number of CV(L)s. With a limited number of these, your path to the boss is guaranteed.
Recommended Fleet
- 1 (F)BB, 1CV, 1 AV, 1 CL, 2 DD routes C - E - D - H
- Good for ensuring you can get both an Instant Construction Template:IC while playing through and reaching the boss node each run
- 1 CL 1 AV 4 DD Route: C-E-H
- This is the shortest route possible to clear this map with only 1 battle before the boss and 1 boss battle.
- Fleet needs to be Fast.
- The comp is very light and does not have any carrier air strike power. It can be helpful to use ships such as Nisshin and Yura, as they can launch opening torpedoes as well as carry seaplane bombers.
- Replacing the AV with another DD is also possible, though this comes at the cost of air power and runs the risk of encountering an extra battle by routing C-D-H instead. It is still a viable alternative though, especially if using strong destroyers.
Steel and Transport Farming
- 3CV/CVL, 3XX routes C - B - A
- Good for collecting 2 transports per run and gathering a small amount of steel
- But 2-2 is probably better for farming transports, as the 2-2 node (see below) does not include an enemy CVL and is therefore less likely to damage your fleet during the opening air combat phase.
- Bringing additional drums and Daihatsu will help you farm additional steel.
- Good for collecting 2 transports per run and gathering a small amount of steel
Nodes and Enemy Encounters
Drops
| Node | Destroyers | Light Cruisers | Heavy Cruisers | Seaplane Tender | Aircraft Carrier | Battleship |
|---|---|---|---|---|---|---|
| A | Kisaragi, Samidare, Shirayuki, Shikinami, Mutsuki, Nenohi, Kuroshio, Ooshio, Hatsuyuki, Michishio, Murasame, Yuudachi | Nagara, Naka, Sendai, Tama, Kuma, Isuzu, Jintsuu | Aoba, Ashigara, Nachi, Kako, Maya, Furutaka, Choukai, Haguro, Atago, Myoukou, Mogami | Chitose, Chiyoda | Shouhou, Houshou, Hiyou, Jun'you | Ise, Hyuuga, Haruna, Kirishima, Fusou, Yamashiro |
| C |
Shiranui, Murasame, Mikazuki, Hatsuyuki, Shigure, Nenohi, Kuroshio, Kasumi, Isonami, Mochizuki, Shimakaze, Wakaba, Miyuki, Fumizuki |
Yura, Isuzu, Sendai | Aoba, Ashigara, Nachi, Maya, Furutaka, Mogami, Choukai, Kako, Haguro | Chitose, Chiyoda | Shouhou, Hiyou | Ise, Haruna, Fusou, Yamashiro |
| E Boss Node | Mikazuki, Satsuki | Naka, Kiso, Jintsuu, Kuma, Isuzu, Kitakami, Tatsuta, Natori, Yura | Haguro, Aoba, Ashigara, Takao, Choukai, Atago, Chikuma, Nachi, Tone, Maya | Chitose, Chiyoda | Shouhou, Jun'you, Ryuujou | Kongou, Hiei, Haruna, Kirishima, Fusou, Yamashiro |
| F | Tama, Isuzu, Natori, Yura, Sendai | Ashigara, Kako, Furutaka, Aoba, Mogami | Chitose, Chiyoda | Shouhou, Ryuujou |
World 2-2: バシー島海峡 Bashi Island Strait
Stage Guide
Tips
Recommended Fleet
- 1 AV, 2 CVL, 2 DE, 1 CL routes C-E-F-H-K
- Takes a fixed route with 1 surface battle and a bauxite node F before routing directly to the boss.
- Taking a CL that can carry DLC will allow you to maximize on resource pickup.
- 1 AV, 2 DD, 3 XX (XX being any CLT, CA(V), CL or AV) routes C-E-K or C-E-F-H-K
- Avoid Node G, which contains Ru-class BBs
- Be sure your Seaplane tenders and Aviation cruisers (If used) bring enough Zuiuns or Seaplane Fighters to help over power the boss composition's air power as there will be a Wo-class Elite or Nu-class Elite present at the boss node in all compositions
- Path C-E-K is guaranteed if your fleet contains any CL, with the fleet being Fast.
Transport Kills
- This map is ideal for farming transport kills for Bw3 and Bw4, as node B contains 2 transports per run and can be reached consistently with the fleet 3 CVL, 3 XX going C - B - A
- Having 3 or more carriers in your fleet will always route you to B allowing you to fight 2 transports and score bauxite every run. With the right carriers and/or equipment, it is possible to break even on bauxite consumption (or even make a net gain) while farming the transports.
Nodes and Enemy Encounters
Drops
| Node | Destroyers | Light Cruisers | Heavy Cruisers | Seaplane Tender | Aircraft Carrier | Battleship |
|---|---|---|---|---|---|---|
| A | Fubuki, Wakaba, Kuroshio, Hatsuharu, Kasumi, Nenohi, Shiranui, Kagerou, Yuudachi, Murasame, Hibiki | Ooi, Kitakami, Tenryuu, Tatsuta, Nagara, Isuzu, Natori, Yura, Sendai, Jintsuu, Naka | Furutaka, Kako, Aoba, Tone, Atago, Takao, Chikuma, Mogami, Ashigara, Myoukou, Nachi, Maya, Choukai | Ryuujou, Hiyou, Jun'you, Shouhou | Kirishima, Fusou, Yamashiro | |
| D | Hatsuharu, Michishio, Shigure, Mochizuki, Fubuki, Kagerou, Hatsushimo | Tenryuu, Tatsuta, Isuzu, Natori, Sendai, Naka | Ashigara, Aoba, Nachi, Kako, Takao, Myoukou, Haguro, Mogami, Maya | Ryuujou, Hiyou, Jun'you, Shouhou | Kirishima, Fusou, Yamashiro | |
| F | Hamakaze, Yayoi | Kitakami, Kuma, Tama, Kiso, Isuzu, Sendai, Jintsuu, Naka, Yura, Natori | Takao, Tone, Atago, Nachi, Maya, Kako, Choukai, Mogami, Chikuma, Myoukou, Haguro | Chitose, Chiyoda | Kaga, Ryuujou, Hiyou, Jun'you, Shouhou, Souryuu | Ise, Hyuuga, Kongou, Hiei, Kirishima, Fusou, Yamashiro |
| G |
Mikazuki, Nagatsuki, Hibiki, Ikazuchi, Hatsuharu, Arare, Kuroshio, Ooshio, Kagerou, Akatsuki, Murasame, Samidare |
Tenryuu, Tatsuta, Isuzu, Natori, Sendai, Jintsuu, Naka, Kitakami | Furutaka, Aoba, Takao, Haguro, Ashigara, Kako, Atago, Mogami | Ryuujou, Hiyou, Jun'you, Shouhou | Kirishima, Fusou, Yamashiro |
World 2-3: 東部オリョール海 Eastern Orel Bay
Stage Guide
Tips
- Due to the danger of Late Model Destroyers present in Easter Orel Sea, Orel cruising has been rendered difficult to achieve and thus, can be rendered obsolete by changes to 2-3 after the HTML5 update.
- Regarding the branching rules, 1 XX 1 CL 4 DD or 1 CL 5 CA are the only two comps that guarantees the boss routing. Otherwise, any other fleets has a chance of off-routing, but should still be able to reach the boss node most of the times as long as CL+DD ≥ 4
- Bring at least one AV, CV(B/L) or CL to avoid chance of off-routing from F to H.
- Bring at least 1 AV, 2 DD/DE to avoid chance of off-routing from F to H when rolling the north branch, and avoid off-routing entirely when rolling the south branch.
- Bringing more heavy ships ((F)BB(V)/CV(L/B)) will reduce the chances of reaching the boss.
- Fleets that contains SS/SSV have a chance of reaching dead end nodes which includes nodes H, L and M
Recommended Fleet
- 1 (F)BB(V)/CV(L/B) 1 CL 4 DD or 1 CL 5 CA(V) (Fixed boss routing)
- 1 (F)BB(V), 1 CV(L/B), 1 CA(V)/CLT, 1 AV, 2 DD (Low chance of off-routing)
- 1 (F)BB, 2 CV(L/B), 0-1 CA, 0-1 CL/CT/CLT, 2 DD
- 2 (F)BB, 1 CV, 0-1 CA, 0-1 CL/CT/CLT, 2 DD
- 2 CV(L/B), 0-2 CA, 0-2 CL/CT/CLT, 2 DD
Nodes and Enemy Encounters
Drops
| Node | Destroyers | Light Cruisers | Heavy Cruisers | Seaplane Tender | Aircraft Carrier | Battleship | Submarine |
|---|---|---|---|---|---|---|---|
| B | Miyuki, Ayanami, Mutsuki, Hibiki, Inazuma, Hatsuharu, Wakaba, Murasame, Samidare, Suzukaze, Asashio, Arare, Kasumi, Kagerou, Shiranui, Kuroshio, Ooshio, Shikinami | Tama, Kiso, Sendai, Naka, Natori, Isuzu, Tenryuu | Nachi, Ashigara, Haguro, Takao, Atago, Maya, Choukai, Tone, Chikuma | Hiyou, Jun'you, Shouhou, Ryuujou | Fusou, Yamashiro | ||
| C | Arare, Arashio, Hibiki, Ikazuchi, Miyuki, Mutsuki, Nenohi, Suzukaze, Kasumi, Kagerou, Shiranui, Isonami, Hatsuharu, Hatsuyuki | Natori, Sendai, Jintsuu, Isuzu,Tenryuu | Myoukou, Nachi, Ashigara, Takao, Atago, Maya, Choukai, Chikuma | Ryuujou, Shouhou, Jun'you | Ise, Fusou, Yamashiro | ||
| F | Michishio, Mutsuki, Hatsuharu, Suzukaze, Arashio, Arare, Shiranui, Kuroshio, Samidare, Kagerou, Ikazuchi, Inazuma, Hibiki | Tama, Kiso, Yura, Naka, Tenryuu, Sendai | Takao, Atago, Myoukou, Maya, Ashigara, Haguro, Tone, Mogami, Chikuma, Choukai | Hiyou, Shouhou, Jun'you | Ise, Kongou, Fusou, Yamashiro | ||
| G | Makigumo, Arashio, Michishio | Jintsuu, Natori, Nagara, Isuzu, Ooi, Kitakami, Kiso, Sendai | Kako, Myoukou, Nachi, Ashigara, Haguro, Takao, Atago, Maya, Choukai, Tone, Chikuma, Mogami, Furutaka | Chitose, Chiyoda | Akagi, Kaga, Souryuu, Hiryuu, Ryuujou, Jun'you, Shouhou | Ise, Hyuuga, Kongou, Hiei, Haruna, Kirishima, Fusou, Yamashiro | I-168 |
| H | Mutsuki, Kuroshio, Shigure, Arare, Hatsuyuki | Tama, Isuzu | Nachi, Atago, Tone | Hiyou, Shouhou, Ryuujou | Kirishima, Fusou, Yamashiro | ||
| K | Arashio, Nenohi, Satsuki, Miyuki, Ikazuchi | Yura, Isuzu, Jintsuu | Haguro, Mogami, Atago | Ryuujou | Fusou, Yamashiro |
World 2-4: 沖ノ島海域 Okinoshima Island
Stage Guide
Tips
- This map will feature a series of fights involving mostly smaller surface ships with some carrier fights in between.
Recommended Fleet
- 1 CAV, 1 CL, 4 DD routes B-G-H-L-P
- Takes you down the quickest path to the boss node with only 2 battles prior to boss node
- May present possible difficulty due to lack of air power your fleet will have in nodes L
- Boss node can also be difficult if your CL and DD aren't high-leveled.
- Probably not suitable much for early players
- 2 CV(B), 2 [CA(V)+CLT], 2 DD / 1 (F)BB(V), 1 CV(B), 1 CVL, 1 CA(V), 2 DD
- Random routing across the map, but you are allowed to bring a much stronger fleet to fight the boss node
- J-M, K-L and L-P branches should be guaranteed though.
- Whatever path you will take, you will fight a total of 3 battles prior to the boss node.
- The top path does have a chance of hitting the bucket node (Node A)
- Bottom path lets you gather Development Materials, and the fights are slightly easier
- Random routing across the map, but you are allowed to bring a much stronger fleet to fight the boss node
Nodes and Enemy Encounters
Drops
| Node | Destroyers | Light Cruisers | Heavy Cruisers | Seaplane Tender | Submarine Tender | Aircraft Carrier | Battleship |
|---|---|---|---|---|---|---|---|
| A | Shimakaze, Fubuki, Hatsuyuki, Miyuki, Murakumo, Isonami, Ayanami, Shikinami, Shigure, Asashio, Ooshio, Michishio, Arashio, Arare, Kasumi, Kagerou, Shiranui, Kuroshio | Ooi, Kitakami, Tenryuu, Tatsuta, Tama, Kiso, Isuzu, Natori, Yura, Sendai, Jintsuu, Naka, Yuubari | Takao, Atago, Mogami, Kako, Myoukou, Nachi, Ashigara, Haguro, Maya, Choukai, Tone, Chikuma | Chitose, Chiyoda | Souryuu, Ryuujou, Hiyou, Jun'you, Shouhou | Ise, Hyuuga, Fusou, Yamashiro, Kongou, Hiei, Kirishima | |
| C | Shimakaze, Fubuki, Miyuki, Murakumo, Ayanami, Asashio, Michishio, Arashio, Arare, Kagerou, Kuroshio | Ooi, Kitakami, Tenryuu, Tama, Kiso, Isuzu, Natori, Yura, Sendai, Jintsuu, Naka | Mogami, Myoukou, Nachi, Ashigara, Haguro, Takao, Atago, Maya, Choukai, Tone, Chikuma | Chitose, Chiyoda | Ryuujou, Hiyou, Jun'you, Shouhou | Ise, Hyuuga, Fusou, Yamashiro | |
| D | Yukikaze, Fubuki, Shirayuki, Miyuki, Hatsuyuki, Isonami, Shikinami, Kisaragi, Inazuma, Nenohi, Wakaba, Ooshio, Michishio, Arare, Kagerou, Shiranui, Kuroshio | Ooi, Kitakami, Tenryuu, Isuzu, Natori, Sendai, Jintsuu | Kako, Myoukou, Nachi, Ashigara, Haguro, Takao, Atago, Maya, Choukai, Chikuma | Chitose, Chiyoda | Ryuujou, Hiyou, Jun'you, Shouhou | Ise, Hyuuga, Fusou, Yamashiro | |
| F | Shimakaze, Hatsuyuki, Murakumo, Ayanami, Nenohi, Asashio, Michishio, Arashio, Kagerou, Shiranui, Kuroshio | Ooi, Kitakami, Tenryuu, Tatsuta, Kiso, Isuzu, Sendai, Naka | Mogami, Nachi, Ashigara, Haguro, Takao, Atago, Choukai, Tone, Chikuma | Chitose | Ryuujou, Hiyou, Shouhou | Ise, Hyuuga, Hiei, Fusou, Yamashiro | |
| G | Shimakaze, Fubuki, Miyuki, Murakumo, Shikinami, Kuroshio | Ooi, Tatsuta, Sendai, Jintsuu | Mogami, Kako, Ashigara, Haguro, Choukai | Jun'you, Shouhou | Ise, Hyuuga, Fusou | ||
| H | Shimakaze, Fubuki, Ushio, Asashio, Arashio, Arare, Kagerou, Shiranui, Uranami | Ooi, Kitakami, Kiso, Jintsuu, Kinu | Mogami, Kako, Myoukou, Nachi, Ashigara, Haguro, Takao, Atago | Chiyoda | Ryuujou, Jun'you, Shouhou | Ise, Hyuuga, Kirishima, Fusou, Yamashiro | |
| I | Shimakaze, Fubuki, Hatsuyuki, Kagerou, Shiranui, Kuroshio, Arare | Ooi, Tenryuu, Tama, Sendai, Jintsuu | Takao, Tone, Chikuma | Chiyoda | Ryuujou, Jun'you | Ise, Hyuuga, Fusou | |
| J | Yukikaze, Shimakaze, Makigumo, Asashio, Ooshio, Kagerou, Isonami, Uranami | Ooi, Kitakami, Tenryuu, Tatsuta, Jintsuu, Kinu | Mogami, Myoukou, Nachi, Ashigara, Haguro, Takao, Atago, Maya, Choukai, Tone, Chikuma | Taigei | Akagi, Kaga, Souryuu, Ryuujou, Hiyou, Shouhou | Nagato, Mutsu, Ise, Hyuuga, Kongou, Hiei, Kirishima, Haruna, Fusou, Yamashiro | |
| L | Shimakaze, Fubuki, Murakumo, Ayanami, Asashio, Ooshio, Michishio, Kagerou, Kuroshio | Ooi, Kitakami, Tenryuu, Tatsuta, Tama, Kiso, Isuzu, Natori, Yura, Sendai, Jintsuu, Naka | Mogami, Myoukou, Nachi, Ashigara, Haguro, Takao, Atago, Maya, Choukai, Tone, Chikuma | Chitose, Chiyoda | Ryuujou, Jun'you, Shouhou, Hiyou | Ise, Hyuuga, Fusou, Yamashiro | |
| N | Shimakaze, Fubuki, Hatsuyuki, Miyuki, Ayanami, Asashio, Michishio, Arashio, Arare, Kagerou | Ooi, Kitakami, Tenryuu, Tama, Yura, Sendai, Jintsuu, Naka, Kiso | Mogami, Kako, Myoukou, Nachi, Haguro, Atago, Takao, Choukai, Tone, Chikuma | Chitose, Chiyoda | Ryuujou, Hiyou, Jun'you, Shouhou | Ise, Hyuuga, Fusou, Yamashiro | |
| O | Shimakaze, Fubuki, Hatsuyuki, Shikinami, Ooshio, Arare, Kagerou, Kuroshio, Michishio | Ooi, Kitakami, Tenryuu, Tama, Yura, Sendai, Jintsuu, Naka | Nachi, Ashigara, Haguro, Atago, Choukai, Tone, Chikuma, Maya | Chitose, Chiyoda | Ryuujou, Shouhou | Ise, Hyuuga, Fusou, Yamashiro | |
| P | Shimakaze, Fubuki, Hatsuyuki, Miyuki, Isonami, Asashio, Kagerou, Kuroshio, Uranami | Ooi, Kitakami, Tenryuu, Natori, Naka | Mogami, Kako, Myoukou, Nachi, Ashigara, Takao, Atago, Maya, Tone | Chitose, Chiyoda | Ryuujou, Hiyou, Jun'you, Shouhou | Ise, Hyuuga, Fusou, Yamashiro |
World 2-5 【Extra Operation】
沖ノ島沖戦闘哨戒 Combat Patrol Off Okinoshima
Stage Guide
| Template:AirControlSystem |
Tips
- You are required to sink the flagship at boss node 4 times to clear the map. The reward for clearing the map is 100 points and a medal. Boss's HP Bar will reset at midnight at the beginning of each month.
- This map requires your fleet to have a certain amount of Line of Sight (LoS) in order to route to the boss. It uses Formula 33 (F33) to calculate the LoS of your fleet to determine if you meet the LoS check.
- Fleets routing from I-O requires Cn1 = 34
- Fleets routing from J-O require Cn1 = 49
- Akashi can drop with a small chance in 2-5, but only for Admirals who have do not have her yet in their base. If you already have her, she will not drop in this map anymore.
Recommended Fleet
- There are 3 routes you can go
- The middle route is the preferred route used for clearing since it allows for 1 CV and 1 CVL to be brought, enabling powerful opening air strikes.
- The top north route should be considered for clearing quests such as BM1, it can also be used for clearing despite the high cost
- The north-middle route should only be used for clearing quests that banned heavy ships and only allow up to 1 CA(V) such as BM7
Middle route C-E-I-O: 1 CV 1 CVL 1 CL 3 DD / 2 CVL 1 CL 3 DD (All Fast)
- Attention should be given to fleet ordering to ensure you maximize for day battle performance.
- Use CV(L) that are able to perform strong opening air strikes.
- Ensure that the fleet speed is fast.
- Ensure that you meet the required LoS to route to the boss node (>= 34 Cn1)
- Carriers should be equipped to utilize CVCI to maximize accuracy and shelling power against the enemies at the boss node.
Top north route B-F-J-O: 1 BBV 2 CAV 3 CA (each CAV carrying 1 drum canisters)
- All enemy compositions before the boss do not have any air power making it easy to secure Air Supremacy (AS+) with a minimal of 1 Seaplane Bomber (SPB) on a CAV or BBV.
- Artillery spotting should be used to increase the likelihood of reaching the boss node.
- Ensure that you meet the required LoS to route to the boss node (>= 49 Cn1)
- This composition is recommended to be used when attempting to clear the monthly quest BM1.
- The boss formation is random between 3 Ru class battleships or 2 Ru class battleships and 1 Wo class carrier. You are required to bring more seaplane bombers if you wish to secure AS at boss as well
North-middle route B-F-E-I-O: 1 CA 1 CL 4 DD
- This composition is recommended to be used when attempting to clear the monthly quest BM7.
- Ensure that you meet the required LoS to route to the boss node (>= 34 Cn1)
- This route is difficult without access to ships that are able to equip seaplane bomber or seaplane fighter to gain some air power
- Zara Due is the ideal choice due to her large first slot ensuring that the seaplane bomber can survive until the boss node and potentially securing AS+ against the triple Ru-class battleship formation. You may also wish to include a seaplane fighter (along with the seaplane bomber) to ensure that you are able to secure AS in the event that you face the boss formation that contains a Wo class carrier.
- Otherwise any single Zara or Agano class with a seaplane bomber will be sufficient to secure Artillery Spotting for the pre-boss nodes.
- Please note that as your fleet for this route is pretty light, there is a good chance you will get heavily damaged before reaching the boss node. Sparkling is recommended for boss node reaching consistency
Nodes and Enemy Encounters
Drops
| Drops | ||||||||
|---|---|---|---|---|---|---|---|---|
| Node | Destroyers | Light Cruisers | Heavy Cruisers | Seaplane Tender | Aircraft Carrier | Battleship | Submarine | Other |
| A | Ooshio, Hatsuyuki, Ushio, Miyuki, Mutsuki, Kisaragi, Akebono, Suzukaze | Tatsuta, Nagara, Sendai, Kuma | Ashigara, Haguro, Kako | Chiyoda | ||||
| B | Shirayuki, Suzukaze, Samidare, Ayanami, Isonami, Shikinami, Asashio, Ooshio, Kisaragi, Hatsuyuki, Ushio, Akebono, Satsuki | Kuma, Naka, Tama, Tatsuta, Tenryuu, Nagara, Isuzu, Yura, Kiso | Furutaka, Kako, Aoba, Haguro, Choukai, Maya, Mogami | Chitose, Chiyoda | ||||
| D | Shikinami, Hatsuyuki | Isuzu, Nagara | Aoba, Kako, Furutaka, Mogami | Chitose, Chiyoda | Ise | |||
| E | Ayanami, Satsuki, Kisaragi, Shikinami, Shirayuki, Mutsuki, Hamakaze | Isuzu, Tenryuu, Tatsuta, Natori, Jintsuu, Ooi, Naka, Tama, Yura, Sendai | Furutaka, Kako, Aoba, Kinugasa, Myoukou, Haguro, Ashigara, Maya, Chokai, Tone, Chikuma, Mogami | Chitose, Chiyoda | ||||
| I |
Ayanami, Shikinami , Mutsuki , Kisaragi, Asashio, Hatsuyuki, Satsuki , Hamakaze |
Tenryuu, Tatsuta, Isuzu, Yura, Naka, Sendai , Ooi, Kuma, Tama |
Furutaka, Kako, Aoba, Kinugasa, Takao, Atago, Choukai, Tone, Chikuma, Myoukou, Mogami |
Chitose, Chiyoda | Yamashiro, Ise | |||
| J | Satsuki, Hamakaze | Kuma, Tatsuta, Jintsu, Isuzu, Sendai, Ooi | Aoba, Mogami, Kako, Tone | Chitose | Ryuujou | Yamashiro, Fusou, Ise | ||
| L |
Fubuki, Uzuki, Yayoi, Shimakaze, Hamakaze, Urakaze, Yuugumo, Makigumo, Kawakaze |
Kuma, Kitakami, Nagara, Kinu, Sendai, Abukuma | Takao, Atago, Tone, Chikuma, Suzuya, Kumano, Mogami | Kaga, Shouhou, Zuihou, Souryuu, Hiryuu, Ryuujou | Kongou, Hiei, Haruna, Kirishima, Fusou, Yamashiro, Ise, Hyuuga | Taigei Akashi*** | ||