Enemy patterns
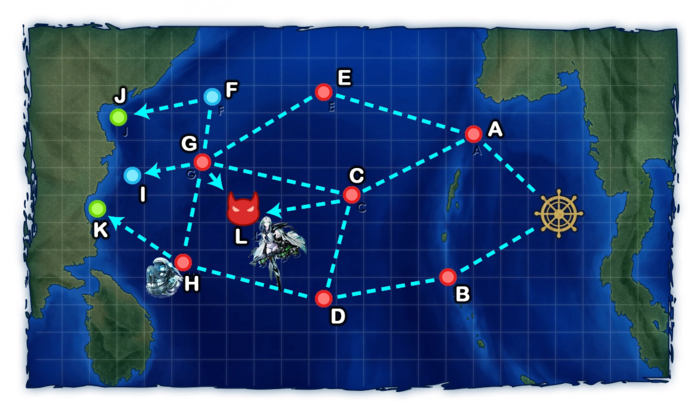
4-2 A: 敵前衛艦隊 (PoiDB)
| # | Formation | Normal Battle Node | AD/AP AS/AS+ |
|---|---|---|---|
| A | Line Ahead | 0/0 0/0 | |
| Line Ahead | 0/0 0/0 | ||
| Double Line | 0/0 0/0 | ||
| # | Formation | Normal Battle Node | AD/AP AS/AS+ |
4-2 B
| # | Maelstrom Node | ||
|---|---|---|---|
| B | Lost 20% | ||
| B | Lost 25 | ||
| # | Maelstrom Node | ||
4-2 C: 敵潜水教導艦隊 (PoiDB)
| # | Formation | Normal Battle Node | AD/AP AS/AS+ |
|---|---|---|---|
| C | Line Abreast | 0/0 0/0 | |
| Echelon | 0/0 0/0 | ||
| Echelon | 0/0 0/0 | ||
| # | Formation | Normal Battle Node | AD/AP AS/AS+ |
4-2 D: 東方主力艦隊 (PoiDB)
| # | Formation | Boss Battle Node | AD/AP AS/AS+ |
|---|---|---|---|
| D | Line Ahead | 10/19 42/84 | |
| Double Line | 10/19 41/81 | ||
| Diamond | 10/19 41/81 | ||
| # | Formation | Boss Battle Node | AD/AP AS/AS+ |
4-2 E
| # | Resource Node | ||
|---|---|---|---|
| E | Gained 40-120 | ||
| # | Resource Node | ||
4-2 F: 敵潜水教導艦隊 (PoiDB)
| # | Formation | Normal Battle Node | AD/AP AS/AS+ |
|---|---|---|---|
| F | Line Abreast | 0/0 0/0 | |
| Echelon | 0/0 0/0 | ||
| Echelon | 0/0 0/0 | ||
| # | Formation | Normal Battle Node | AD/AP AS/AS+ |
4-2 G
| # | Resource Node | ||
|---|---|---|---|
| G | Gained 20-60 | ||
| # | Resource Node | ||
4-2 H: 敵空母機動部隊 (PoiDB)
| # | Formation | Normal Battle Node | AD/AP AS/AS+ |
|---|---|---|---|
| H | Diamond | 19/37 83/165 | |
| Diamond | 26/51 113/225 | ||
| Diamond | 25/49 108/216 | ||
| # | Formation | Normal Battle Node | AD/AP AS/AS+ |
4-2 I: 敵補給船団 (PoiDB)
| # | Formation | Normal Battle Node | AD/AP AS/AS+ |
|---|---|---|---|
| I | Double Line | 0/0 0/0 | |
| Double Line | 0/0 0/0 | ||
| Diamond | 9/17 36/72 | ||
| # | Formation | Normal Battle Node | AD/AP AS/AS+ |