- Welcome to the Kancolle Wiki!
- If you have any questions regarding site content, account registration, etc., please visit the KanColle Wiki Discord
Difference between revisions of "World 1/1-2"
< World 1
Jump to navigation
Jump to search
(→Nodes and Enemy Encounters: adding missing exp values) |
Minhfongboy (talk | contribs) m (→Stage Guide) |
||
| (13 intermediate revisions by 4 users not shown) | |||
| Line 1: | Line 1: | ||
| − | + | {{World/Hub}} | |
| + | =World 1-2: 南西諸島沖 - Nansei Islands Offshore = | ||
{{LabSortieworld | {{LabSortieworld | ||
| − | | | + | | page = World 1/1-2 |
| difficulty = ☆ | | difficulty = ☆ | ||
| item = {{Ammo}} | | item = {{Ammo}} | ||
| exp = Varies | | exp = Varies | ||
| − | | code = 南西諸島沖警備 | + | | code = 南西諸島沖警備<br>[[wikipedia:Nansei_Islands|Nansei Islands]] Sea Defense |
| jptext = 南西諸島沖に接近する敵前衛艦隊を捕捉、迎撃せよ! | | jptext = 南西諸島沖に接近する敵前衛艦隊を捕捉、迎撃せよ! | ||
| entext = Intercept the enemy's vanguard fleet in the seas off the Nansei Islands! | | entext = Intercept the enemy's vanguard fleet in the seas off the Nansei Islands! | ||
| + | | aircon = | ||
| + | {{AirConKai | ||
| + | |AS=0 | ||
| + | }} | ||
| + | }} | ||
| + | |||
| + | {{MapUnlock | ||
| + | | unlock= [[1-1]] | ||
| + | | clear= the boss's flagship must be sunk once | ||
}} | }} | ||
| Line 19: | Line 29: | ||
** DD+DE = 4 | ** DD+DE = 4 | ||
* Otherwise, random between A and B | * Otherwise, random between A and B | ||
| − | ** 40% to A if fleet contains 6 ships | + | ** 40 % to A if fleet contains 6 ships |
| − | ** 50% to A if fleet contains 5 ships | + | ** 50 % to A if fleet contains 5 ships |
| − | ** 60% to A if fleet contains 4 ships | + | ** 60 % to A if fleet contains 4 ships |
| − | ** 70% to A if fleet contains ≤ 3 ships | + | ** 70 % to A if fleet contains ≤ 3 ships |
|A -> D,E = | |A -> D,E = | ||
*Go to D if fleet contains slow ships '''and''' DD+DE ≤ 3 | *Go to D if fleet contains slow ships '''and''' DD+DE ≤ 3 | ||
| Line 28: | Line 38: | ||
**Fast Fleet | **Fast Fleet | ||
**Fleet contains CL and DD ≥ 4 | **Fleet contains CL and DD ≥ 4 | ||
| − | **CL = 1 and DD+DE = 5 | + | **CL+CT = 1 and DD+DE = 5 |
| − | *Otherwise, | + | **DD+DE = 6 |
| + | *Otherwise, 65% E 35% D | ||
}} | }} | ||
===Tips=== | ===Tips=== | ||
| − | + | Sortie '''1 CL, 4 DD''' for fixed routing towards the boss node via node {{MapRoute|A|red}}. | |
| + | *Using more than 5 ships, or heavier ships will make the routing random. | ||
| + | |||
| + | ===Resource Nodes=== | ||
| + | {{MapRoute|B|green}} is a "Normal Resource Node" rewarding ammo {{Ammo}}. | ||
| + | *''See [[Resource Node|here]] for more details. | ||
| + | |||
| + | {{Map/Footer|1-2| | ||
| + | |||
| + | |enemycompsnotes= | ||
| + | |||
| + | |shipdropnotes= | ||
| − | |||
| − | |||
| − | |||
| − | |||
| − | |||
| − | |||
| − | |||
| − | |||
| − | |||
| − | |||
| − | |||
| − | |||
| − | |||
| − | |||
| − | |||
| − | |||
| − | |||
| − | |||
| − | |||
| − | |||
| − | |||
| − | |||
| − | |||
| − | |||
| − | |||
| − | |||
| − | |||
| − | |||
| − | |||
| − | |||
| − | |||
| − | |||
| − | |||
| − | |||
| − | |||
| − | |||
| − | |||
| − | |||
| − | |||
| − | |||
| − | |||
| − | |||
| − | |||
| − | |||
| − | |||
| − | |||
| − | |||
| − | |||
| − | |||
| − | |||
| − | |||
| − | |||
| − | |||
| − | |||
| − | |||
| − | |||
| − | |||
| − | |||
| − | |||
| − | |||
| − | |||
| − | |||
| − | |||
| − | |||
| − | |||
| − | |||
| − | |||
| − | |||
| − | |||
| − | |||
| − | |||
| − | |||
| − | |||
| − | |||
| − | |||
| − | |||
| − | |||
| − | |||
| − | |||
| − | |||
| − | |||
| − | |||
| − | |||
| − | |||
| − | |||
| − | |||
| − | |||
| − | |||
| − | |||
| − | |||
| − | |||
| − | |||
| − | |||
| − | |||
| − | |||
| − | |||
| − | |||
| − | |||
| − | |||
}} | }} | ||
| − | |||
| − | |||
Latest revision as of 14:41, 21 October 2025
World 1-2: 南西諸島沖 - Nansei Islands Offshore
| Strategy Name | 南西諸島沖警備 Nansei Islands Sea Defense |
|---|---|
| Difficulty | ☆ |
| Item | |
| Strategy Content | 南西諸島沖に接近する敵前衛艦隊を捕捉、迎撃せよ! Intercept the enemy's vanguard fleet in the seas off the Nansei Islands! |
| Boss Air Control | |||
|---|---|---|---|
| AD | AP | AS | AS+ |
| 0 | 0 | 0 | 0 |
| 1-2 Unlocking & Progression | ||||
|---|---|---|---|---|
| Unlock conditions | 1-2 is unlocked after clearing 1-1 | |||
| Clear conditions | To clear the map: the boss's flagship must be sunk once | |||
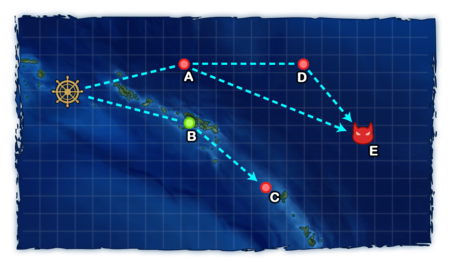
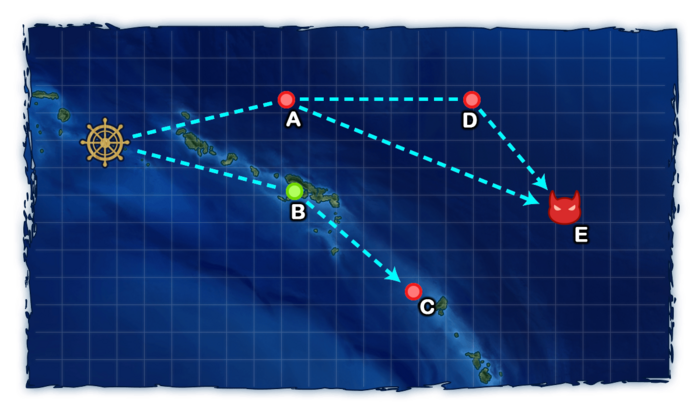
Stage Guide
| 1-2 Branching Rules | ||
|---|---|---|
| Nodes | Rules | |
| Start | A |
|
B | ||
A |
D |
|
E | ||
Tips
Sortie 1 CL, 4 DD for fixed routing towards the boss node via node A.
- Using more than 5 ships, or heavier ships will make the routing random.
Resource Nodes
B is a "Normal Resource Node" rewarding ammo ![]() .
.
- See here for more details.
Enemy Compositions
1-2 A: 敵前衛艦隊 (PoiDB)
| # | Enemy Form. |
Base EXP | Normal Battle Node | AD/AP AS/AS+ |
|---|---|---|---|---|
| A | Line Ahead | 30 | 0/0 0/0 | |
| Line Ahead | 40 | 0/0 0/0 | ||
| Line Ahead | 45 | 0/0 0/0 | ||
| Line Ahead | 55 | 0/0 0/0 | ||
| Line Ahead | 65 | 0/0 0/0 | ||
| # | Enemy Form. |
Base EXP | Normal Battle Node | AD/AP AS/AS+ |
1-2 B
| # | Resource Node | ||
|---|---|---|---|
| B | Gained 10~20 | ||
| # | Resource Node | ||
1-2 C: 敵前衛艦隊 (PoiDB)
| # | Enemy Form. |
Base EXP | Normal Battle Node | AD/AP AS/AS+ |
|---|---|---|---|---|
| C | Line Ahead | 30 | 0/0 0/0 | |
| Line Ahead | 40 | 0/0 0/0 | ||
| Line Ahead | 45 | 0/0 0/0 | ||
| Line Ahead | 55 | 0/0 0/0 | ||
| Line Ahead | 65 | 0/0 0/0 | ||
| # | Enemy Form. |
Base EXP | Normal Battle Node | AD/AP AS/AS+ |
1-2 D: 敵水雷戦隊 (PoiDB)
| # | Enemy Form. |
Base EXP | Normal Battle Node | AD/AP AS/AS+ |
|---|---|---|---|---|
| D | Line Ahead | 60 | 0/0 0/0 | |
| Line Ahead | 65 | 0/0 0/0 | ||
| Line Ahead | 70 | 0/0 0/0 | ||
| Line Ahead | 75 | 0/0 0/0 | ||
| Line Ahead | 80 | 0/0 0/0 | ||
| Line Ahead | 85 | 0/0 0/0 | ||
| # | Enemy Form. |
Base EXP | Normal Battle Node | AD/AP AS/AS+ |
1-2 E: 敵主力艦隊 (PoiDB)
| # | Enemy Form. |
Base EXP | Boss Battle Node | AD/AP AS/AS+ |
|---|---|---|---|---|
| E | Line Ahead | 60 | 0/0 0/0 | |
| Line Ahead | 70 | 0/0 0/0 | ||
| Line Ahead | 100 | 0/0 0/0 | ||
| Line Ahead | 110 | 0/0 0/0 | ||
| Line Ahead | 120 | 0/0 0/0 | ||
| # | Enemy Form. |
Base EXP | Boss Battle Node | AD/AP AS/AS+ |
Ship Drops
This map currently has "limited-time" drops that don't appear in the table below, see Drop List for more info.
| Ship drops | |||||||||||||||||||||||||||||||||||||||||||||||||||||||||||||||||||||||||||||||||||||||||||||||||||
|---|---|---|---|---|---|---|---|---|---|---|---|---|---|---|---|---|---|---|---|---|---|---|---|---|---|---|---|---|---|---|---|---|---|---|---|---|---|---|---|---|---|---|---|---|---|---|---|---|---|---|---|---|---|---|---|---|---|---|---|---|---|---|---|---|---|---|---|---|---|---|---|---|---|---|---|---|---|---|---|---|---|---|---|---|---|---|---|---|---|---|---|---|---|---|---|---|---|---|---|
| Type | Ship? | A | C | D | E | ||||||||||||||||||||||||||||||||||||||||||||||||||||||||||||||||||||||||||||||||||||||||||||||
| CL | Kitakami | ✔️ | |||||||||||||||||||||||||||||||||||||||||||||||||||||||||||||||||||||||||||||||||||||||||||||||||
| CL | Nagara | ✔️ | |||||||||||||||||||||||||||||||||||||||||||||||||||||||||||||||||||||||||||||||||||||||||||||||||
| CL | Sendai | ✔️ | ✔️ | ||||||||||||||||||||||||||||||||||||||||||||||||||||||||||||||||||||||||||||||||||||||||||||||||
| DD | Mutsuki | ✔️ | ✔️ | ✔️ | ✔️ | ||||||||||||||||||||||||||||||||||||||||||||||||||||||||||||||||||||||||||||||||||||||||||||||
| DD | Kisaragi | ✔️ | ✔️ | ✔️ | ✔️ | ||||||||||||||||||||||||||||||||||||||||||||||||||||||||||||||||||||||||||||||||||||||||||||||
| DD | Satsuki | ✔️ | ✔️ | ✔️ | ✔️ | ||||||||||||||||||||||||||||||||||||||||||||||||||||||||||||||||||||||||||||||||||||||||||||||
| DD | Fumizuki | ✔️ | ✔️ | ✔️ | ✔️ | ||||||||||||||||||||||||||||||||||||||||||||||||||||||||||||||||||||||||||||||||||||||||||||||
| DD | Nagatsuki | ✔️ | ✔️ | ✔️ | ✔️ | ||||||||||||||||||||||||||||||||||||||||||||||||||||||||||||||||||||||||||||||||||||||||||||||
| DD | Kikuzuki | ✔️ | ✔️ | ✔️ | ✔️ | ||||||||||||||||||||||||||||||||||||||||||||||||||||||||||||||||||||||||||||||||||||||||||||||
| DD | Mikazuki | ✔️ | ✔️ | ✔️ | ✔️ | ||||||||||||||||||||||||||||||||||||||||||||||||||||||||||||||||||||||||||||||||||||||||||||||
| DD | Mochizuki | ✔️ | ✔️ | ✔️ | ✔️ | ||||||||||||||||||||||||||||||||||||||||||||||||||||||||||||||||||||||||||||||||||||||||||||||
| DD | Shirayuki | ✔️ | ✔️ | ✔️ | ✔️ | ||||||||||||||||||||||||||||||||||||||||||||||||||||||||||||||||||||||||||||||||||||||||||||||
| DD | Hatsuyuki | ✔️ | ✔️ | ✔️ | ✔️ | ||||||||||||||||||||||||||||||||||||||||||||||||||||||||||||||||||||||||||||||||||||||||||||||
| DD | Miyuki | ✔️ | ✔️ | ✔️ | ✔️ | ||||||||||||||||||||||||||||||||||||||||||||||||||||||||||||||||||||||||||||||||||||||||||||||
| DD | Murakumo | ✔️ | |||||||||||||||||||||||||||||||||||||||||||||||||||||||||||||||||||||||||||||||||||||||||||||||||
| DD | Isonami | ✔️ | ✔️ | ✔️ | ✔️ | ||||||||||||||||||||||||||||||||||||||||||||||||||||||||||||||||||||||||||||||||||||||||||||||
| DD | Ayanami | ✔️ | ✔️ | ✔️ | ✔️ | ||||||||||||||||||||||||||||||||||||||||||||||||||||||||||||||||||||||||||||||||||||||||||||||
| DD | Shikinami | ✔️ | ✔️ | ✔️ | ✔️ | ||||||||||||||||||||||||||||||||||||||||||||||||||||||||||||||||||||||||||||||||||||||||||||||
| DD | Oboro | ✔️ | ✔️ | ✔️ | ✔️ | ||||||||||||||||||||||||||||||||||||||||||||||||||||||||||||||||||||||||||||||||||||||||||||||
| DD | Akebono | ✔️ | ✔️ | ✔️ | ✔️ | ||||||||||||||||||||||||||||||||||||||||||||||||||||||||||||||||||||||||||||||||||||||||||||||
| DD | Sazanami | ✔️ | ✔️ | ✔️ | ✔️ | ||||||||||||||||||||||||||||||||||||||||||||||||||||||||||||||||||||||||||||||||||||||||||||||
| DD | Ushio | ✔️ | ✔️ | ✔️ | ✔️ | ||||||||||||||||||||||||||||||||||||||||||||||||||||||||||||||||||||||||||||||||||||||||||||||
| DD | Akatsuki | ✔️ | ✔️ | ✔️ | ✔️ | ||||||||||||||||||||||||||||||||||||||||||||||||||||||||||||||||||||||||||||||||||||||||||||||
| DD | Hibiki | ✔️ | ✔️ | ✔️ | ✔️ | ||||||||||||||||||||||||||||||||||||||||||||||||||||||||||||||||||||||||||||||||||||||||||||||
| DD | Ikazuchi | ✔️ | ✔️ | ✔️ | ✔️ | ||||||||||||||||||||||||||||||||||||||||||||||||||||||||||||||||||||||||||||||||||||||||||||||
| DD | Inazuma | ✔️ | ✔️ | ✔️ | ✔️ | ||||||||||||||||||||||||||||||||||||||||||||||||||||||||||||||||||||||||||||||||||||||||||||||
| DD | Hatsuharu | ✔️ | ✔️ | ✔️ | ✔️ | ||||||||||||||||||||||||||||||||||||||||||||||||||||||||||||||||||||||||||||||||||||||||||||||
| DD | Nenohi | ✔️ | ✔️ | ✔️ | ✔️ | ||||||||||||||||||||||||||||||||||||||||||||||||||||||||||||||||||||||||||||||||||||||||||||||
| DD | Wakaba | ✔️ | ✔️ | ✔️ | ✔️ | ||||||||||||||||||||||||||||||||||||||||||||||||||||||||||||||||||||||||||||||||||||||||||||||
| DD | Hatsushimo | ✔️ | ✔️ | ✔️ | ✔️ | ||||||||||||||||||||||||||||||||||||||||||||||||||||||||||||||||||||||||||||||||||||||||||||||
| DD | Shiratsuyu | ✔️ | |||||||||||||||||||||||||||||||||||||||||||||||||||||||||||||||||||||||||||||||||||||||||||||||||
| DD | Shigure | ✔️ | ✔️ | ✔️ | ✔️ | ||||||||||||||||||||||||||||||||||||||||||||||||||||||||||||||||||||||||||||||||||||||||||||||
| DD | Murasame | ✔️ | ✔️ | ✔️ | ✔️ | ||||||||||||||||||||||||||||||||||||||||||||||||||||||||||||||||||||||||||||||||||||||||||||||
| DD | Yuudachi | ✔️ | ✔️ | ✔️ | ✔️ | ||||||||||||||||||||||||||||||||||||||||||||||||||||||||||||||||||||||||||||||||||||||||||||||
| DD | Samidare | ✔️ | ✔️ | ✔️ | ✔️ | ||||||||||||||||||||||||||||||||||||||||||||||||||||||||||||||||||||||||||||||||||||||||||||||
| DD | Suzukaze | ✔️ | |||||||||||||||||||||||||||||||||||||||||||||||||||||||||||||||||||||||||||||||||||||||||||||||||
| DD | Asashio | ✔️ | |||||||||||||||||||||||||||||||||||||||||||||||||||||||||||||||||||||||||||||||||||||||||||||||||
| DD | Ooshio | ✔️ | ✔️ | ||||||||||||||||||||||||||||||||||||||||||||||||||||||||||||||||||||||||||||||||||||||||||||||||
| DD | Michishio | ✔️ | ✔️ | ||||||||||||||||||||||||||||||||||||||||||||||||||||||||||||||||||||||||||||||||||||||||||||||||
| DD | Arashio | ✔️ | ✔️ | ||||||||||||||||||||||||||||||||||||||||||||||||||||||||||||||||||||||||||||||||||||||||||||||||
| DD | Arare | ✔️ | ✔️ | ✔️ | ✔️ | ||||||||||||||||||||||||||||||||||||||||||||||||||||||||||||||||||||||||||||||||||||||||||||||
| DD | Kasumi | ✔️ | ✔️ | ✔️ | ✔️ | ||||||||||||||||||||||||||||||||||||||||||||||||||||||||||||||||||||||||||||||||||||||||||||||
| DD | Kagerou | ✔️ | |||||||||||||||||||||||||||||||||||||||||||||||||||||||||||||||||||||||||||||||||||||||||||||||||
| DD | Shiranui | ✔️ | |||||||||||||||||||||||||||||||||||||||||||||||||||||||||||||||||||||||||||||||||||||||||||||||||
| DD | Kuroshio | ✔️ | |||||||||||||||||||||||||||||||||||||||||||||||||||||||||||||||||||||||||||||||||||||||||||||||||
| CL | Tenryuu | ✔️ | ✔️ | ✔️ | ✔️ | ||||||||||||||||||||||||||||||||||||||||||||||||||||||||||||||||||||||||||||||||||||||||||||||
| CL | Tatsuta | ✔️ | |||||||||||||||||||||||||||||||||||||||||||||||||||||||||||||||||||||||||||||||||||||||||||||||||
| CL | Kuma | ✔️ | |||||||||||||||||||||||||||||||||||||||||||||||||||||||||||||||||||||||||||||||||||||||||||||||||
| CL | Tama | ✔️ | ✔️ | ||||||||||||||||||||||||||||||||||||||||||||||||||||||||||||||||||||||||||||||||||||||||||||||||
| CL | Kiso | ✔️ | ✔️ | ||||||||||||||||||||||||||||||||||||||||||||||||||||||||||||||||||||||||||||||||||||||||||||||||
| CL | Isuzu | ✔️ | ✔️ | ||||||||||||||||||||||||||||||||||||||||||||||||||||||||||||||||||||||||||||||||||||||||||||||||
| CL | Natori | ✔️ | ✔️ | ||||||||||||||||||||||||||||||||||||||||||||||||||||||||||||||||||||||||||||||||||||||||||||||||
| CL | Yura | ✔️ | ✔️ | ||||||||||||||||||||||||||||||||||||||||||||||||||||||||||||||||||||||||||||||||||||||||||||||||
| CL | Jintsuu | ✔️ | ✔️ | ✔️ | ✔️ | ||||||||||||||||||||||||||||||||||||||||||||||||||||||||||||||||||||||||||||||||||||||||||||||
| CL | Naka | ✔️ | ✔️ | ✔️ | ✔️ | ||||||||||||||||||||||||||||||||||||||||||||||||||||||||||||||||||||||||||||||||||||||||||||||
