Difference between revisions of "World 7/7-1"
< World 7
Jigaraphale (talk | contribs) (→World 7-1: ブルネイ泊地沖 Brunei Anchorage Sea: updated guide UI) |
m |
||
| (25 intermediate revisions by 5 users not shown) | |||
| Line 1: | Line 1: | ||
| − | + | {{World/Hub}} | |
| + | =World 7-1: ブルネイ泊地沖 - Brunei Anchorage Sea= | ||
{{LabSortieworld | {{LabSortieworld | ||
| − | | | + | | page = World 7/7-1 |
| difficulty = ☆ ☆ ☆ ☆ ☆ | | difficulty = ☆ ☆ ☆ ☆ ☆ | ||
| − | | item = {{fuel}} | + | | item = {{fuel}} {{Ammo}} |
| exp = varies | | exp = varies | ||
| − | | code = ブルネイ泊地沖哨戒 | + | | code = ブルネイ泊地沖哨戒<br>Brunei Anchorage Sea Patrol |
| jptext = 燃料の豊かなブルネイ泊地近海に敵潜水艦の跳梁が見られる。これを捜索制圧し、重要拠点である同泊地周辺の安全を図れ! | | jptext = 燃料の豊かなブルネイ泊地近海に敵潜水艦の跳梁が見られる。これを捜索制圧し、重要拠点である同泊地周辺の安全を図れ! | ||
| entext = Enemy submarines have been sighted near Brunei Anchorage where fuel reserves are aplenty. Search for and suppress them in order to secure the area surrounding the anchorage, an important stronghold! | | entext = Enemy submarines have been sighted near Brunei Anchorage where fuel reserves are aplenty. Search for and suppress them in order to secure the area surrounding the anchorage, an important stronghold! | ||
| − | | aircon = | + | | aircon = |
| − | + | {{AirConKai | |
| − | + | |AS=0 | |
| − | + | |ASr=126 | |
| − | | AS = 0 | ||
| − | | | ||
}} | }} | ||
}} | }} | ||
| − | === Stage Guide === | + | {{MapUnlock |
| + | | unlock= [[2-4]] | ||
| + | | clear= the boss's flagship must be sunk 3 times | ||
| + | }} | ||
| + | |||
| + | ===Stage Guide=== | ||
{{MapBranchingTable | {{MapBranchingTable | ||
|title = 7-1 Branching Rules | |title = 7-1 Branching Rules | ||
| − | |||
|id = 7-1 | |id = 7-1 | ||
|0 -> B, D, F = | |0 -> B, D, F = | ||
* Meet '''ALL''' of the following requirements to go to F: | * Meet '''ALL''' of the following requirements to go to F: | ||
** Amount of ships in fleet ≤ 4 | ** Amount of ships in fleet ≤ 4 | ||
| − | ** No (F)BB(V) or CV(L | + | ** No (F)BB(V) or CV(B/L) |
** No SS(V) | ** No SS(V) | ||
** No AO | ** No AO | ||
| Line 31: | Line 34: | ||
** Amount of ships in fleet = 5 '''OR''' Fleet contains AO. | ** Amount of ships in fleet = 5 '''OR''' Fleet contains AO. | ||
** Amount of ships in fleet ≤ 5 | ** Amount of ships in fleet ≤ 5 | ||
| − | ** No (F)BB(V) or CV(L | + | ** No (F)BB(V) or CV(B/L) |
** No SS(V) | ** No SS(V) | ||
* Meet '''ANY''' of the following requirements to go to B: | * Meet '''ANY''' of the following requirements to go to B: | ||
** Amount of ships in fleet = 6 | ** Amount of ships in fleet = 6 | ||
| − | ** Fleet contains (F)BB(V) or CV(L | + | ** Fleet contains (F)BB(V) or CV(B/L) '''AND''' no SS(V) |
* If fleet contains '''SS(V)''': | * If fleet contains '''SS(V)''': | ||
** If amount of ships ≤ 4, random routing between B, D, and F. | ** If amount of ships ≤ 4, random routing between B, D, and F. | ||
** If amount of ships ≥ 5, random routing between B and D. | ** If amount of ships ≥ 5, random routing between B and D. | ||
| − | ** If fleet contains (F)BB(V) or CV(L | + | ** If fleet contains (F)BB(V) or CV(B/L), random routing between B and D. |
|B -> A/storm = * Do not meet the requirements to go to C. | |B -> A/storm = * Do not meet the requirements to go to C. | ||
| Line 56: | Line 59: | ||
|H -> I/resource, J/empty, K = | |H -> I/resource, J/empty, K = | ||
* Fleets that contain (F)BB(V) or CV(B) are '''FORCED''' to J. | * Fleets that contain (F)BB(V) or CV(B) are '''FORCED''' to J. | ||
| − | * | + | *Random between I and K if fleet contains AO |
| − | * Meeting '''ANY''' of the following requirements routes | + | * Meeting '''ANY''' of the following requirements routes to K: |
** Fleet contains DD '''AND''' amount of DE ≥ 3 | ** Fleet contains DD '''AND''' amount of DE ≥ 3 | ||
** Amount of CL = 1 '''AND''' amount of DD ≥ 4 | ** Amount of CL = 1 '''AND''' amount of DD ≥ 4 | ||
| Line 65: | Line 68: | ||
===Tips=== | ===Tips=== | ||
| − | + | This is an anti-submarine operation, requiring heavy [[ASW]] capabilities. | |
| − | + | *Node {{MapRoute|G|red}} however, is a surface battle against an enemy torpedo squadron. | |
| − | + | Use of CL/CLT/DD capable of [[OASW]], either from reaching high enough ASW stat or from having innate OASW capabilities, is required. | |
| − | + | *Use of DE is an option as well, but due to their poor firepower and defensive stats, they may have trouble surviving Node {{MapRoute|G|red}}. | |
| − | + | Using 6 ships will cause fleets to route to Node {{MapRoute|B|red}}. | |
| − | + | ||
| − | + | As this map is very cheap and quick to run, it is the prime location for [[Ranking]]. | |
| + | {{Clear}} | ||
| + | ===Recommended Fleets=== | ||
| + | {{FleetGuide | ||
| + | | Map = 5 Ships Fleet | ||
| + | | Fleet = '''1 CL, 1 DD, 3 DD/DE | ||
| + | | Route = {{MapRoute|D|red|E|green|G|red|H|red|K|red}} | ||
| + | | Note = Use of a CL capable of opening attacks against surface ships is advised for Node {{MapRoute|G|red}} ([[Opening Torpedo Salvo]] and [[airstrike]] via [[Seaplane Bomber]]s). | ||
| + | Bringing [[OASW]] capable DD/DE is required. | ||
| + | *DE are a cheaper option than DD, but also significantly weaker, and so are not recommended. | ||
| + | *If the ASW stat is high enough to reach OASW without three equipment, or if the ship has innate OASW, mixing surface combat equipment and ASW equipment together can help stabilize the surface battle at Node G. | ||
| + | | Quest = | ||
| + | }} | ||
| + | {{FleetGuide | ||
| + | | Map = 4 Ships Fleets | ||
| + | | Fleet = 4 XX<br>1-2 CL, 2-3 CLT<br>4 DD/DE | ||
| + | | Route = Random: | ||
| + | *{{MapRoute|F|red|G|red|H|red|K|red}} | ||
| + | *{{MapRoute|F|red|G|red|H|red|I|green}} | ||
| + | *{{MapRoute|F|red|G|red|H|red|J|blue}} | ||
| + | | Note = Can also reach the Boss Node, but have a small chance to off-route into dead-ends instead ({{MapRoute|I|green}} or {{MapRoute|J|blue}}). | ||
| + | Do not bring AO as it off-routes to node {{MapRoute|I|green}} instead of the boss node. | ||
| + | | Quest = | ||
| + | }} | ||
| + | |||
| + | ===Resource Nodes=== | ||
| + | {{MapRoute|E|green|I|green}} are "Normal Resource Nodes" rewarding both fuel {{Fuel}}. | ||
| + | *''See [[Resource Node|here]] for more details. | ||
| + | |||
| + | {{Map/Footer|7-1| | ||
| − | + | |enemycompsnotes= | |
| − | |||
| − | | | ||
| − | |||
| − | |||
| − | |||
| − | |||
| − | |||
| − | |||
| − | |||
| − | | | + | |shipdropnotes= |
| − | |||
| − | |||
| − | |||
| − | |||
| − | |||
| − | |||
| − | |||
| − | |||
| − | |||
| − | |||
| − | |||
| − | |||
| − | |||
| − | |||
| − | |||
| − | |||
| − | |||
| − | |||
| − | |||
| − | |||
| − | |||
| − | |||
| − | |||
| − | |||
| − | |||
| − | |||
| − | |||
| − | |||
| − | |||
| − | |||
| − | |||
| − | |||
| − | |||
| − | |||
| − | |||
| − | |||
| − | |||
| − | |||
| − | |||
| − | |||
| − | |||
| − | |||
| − | |||
| − | |||
| − | |||
| − | |||
| − | |||
| − | |||
| − | |||
| − | |||
| − | |||
| − | |||
| − | |||
| − | |||
| − | |||
| − | |||
| − | |||
| − | |||
| − | |||
| − | |||
| − | |||
| − | |||
| − | |||
| − | |||
| − | |||
| − | |||
| − | |||
| − | |||
| − | |||
| − | |||
| − | |||
| − | |||
| − | |||
| − | |||
| − | |||
| − | |||
| − | |||
| − | |||
| − | |||
| − | |||
| − | |||
| − | |||
| − | |||
| − | |||
| − | |||
| − | |||
| − | |||
| − | |||
| − | |||
| − | |||
| − | |||
| − | |||
| − | |||
| − | |||
| − | |||
| − | |||
| − | |||
| − | |||
| − | |||
| − | |||
| − | |||
| − | |||
| − | |||
| − | |||
| − | |||
| − | |||
| − | |||
| − | |||
| − | |||
| − | |||
| − | |||
| − | |||
| − | |||
| − | |||
| − | |||
| − | |||
| − | |||
| − | |||
| − | |||
| − | |||
| − | |||
| − | |||
| − | |||
| − | |||
| − | |||
| − | |||
| − | |||
| − | |||
| − | |||
| − | |||
| − | |||
| − | |||
| − | |||
| − | |||
| − | |||
| − | |||
| − | |||
| − | |||
| − | |||
}} | }} | ||
| − | |||
| − | |||
Latest revision as of 08:45, 18 April 2025
World 7-1: ブルネイ泊地沖 - Brunei Anchorage Sea
| Strategy Name | ブルネイ泊地沖哨戒 Brunei Anchorage Sea Patrol |
|---|---|
| Difficulty | ☆ ☆ ☆ ☆ ☆ |
| Item | |
| Strategy Content | 燃料の豊かなブルネイ泊地近海に敵潜水艦の跳梁が見られる。これを捜索制圧し、重要拠点である同泊地周辺の安全を図れ! Enemy submarines have been sighted near Brunei Anchorage where fuel reserves are aplenty. Search for and suppress them in order to secure the area surrounding the anchorage, an important stronghold! |
| Boss Air Control | |||
|---|---|---|---|
| AD | AP | AS | AS+ |
| 0 | 0 | 0 | 0 |
| Boss Route Air Control | |||
| AD | AP | AS | AS+ |
| 38 | 56 | 126 | 252 |
| 7-1 Unlocking & Progression | ||||
|---|---|---|---|---|
| Unlock conditions | 7-1 is unlocked after clearing 2-4 | |||
| Clear conditions | To clear the map: the boss's flagship must be sunk 3 times | |||
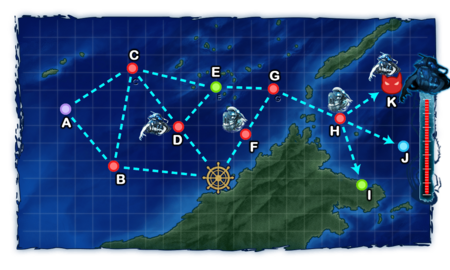
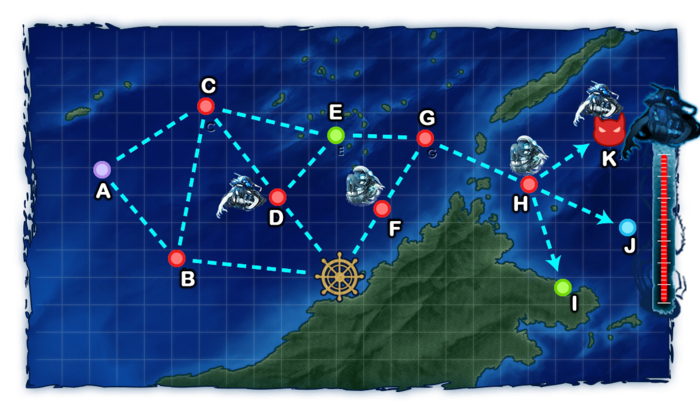
Stage Guide
| 7-1 Branching Rules | ||
|---|---|---|
| Nodes | Rules | |
| Start | B |
|
D | ||
F | ||
B |
A |
|
C |
| |
D |
C |
|
E | ||
H |
I |
|
J | ||
K | ||
Tips
This is an anti-submarine operation, requiring heavy ASW capabilities.
- Node G however, is a surface battle against an enemy torpedo squadron.
Use of CL/CLT/DD capable of OASW, either from reaching high enough ASW stat or from having innate OASW capabilities, is required.
- Use of DE is an option as well, but due to their poor firepower and defensive stats, they may have trouble surviving Node G.
Using 6 ships will cause fleets to route to Node B.
As this map is very cheap and quick to run, it is the prime location for Ranking.
Recommended Fleets
| 5 Ships Fleet | |||||||||||||||||||||||||||||||||
|---|---|---|---|---|---|---|---|---|---|---|---|---|---|---|---|---|---|---|---|---|---|---|---|---|---|---|---|---|---|---|---|---|---|
|
| ||||||||||||||||||||||||||||||||
| Fleet Notes | |||||||||||||||||||||||||||||||||
| Use of a CL capable of opening attacks against surface ships is advised for Node G (Opening Torpedo Salvo and airstrike via Seaplane Bombers).
Bringing OASW capable DD/DE is required.
| |||||||||||||||||||||||||||||||||
| 4 Ships Fleets | |||||||||||||||||||||||||||||||||
|---|---|---|---|---|---|---|---|---|---|---|---|---|---|---|---|---|---|---|---|---|---|---|---|---|---|---|---|---|---|---|---|---|---|
|
| ||||||||||||||||||||||||||||||||
| Fleet Notes | |||||||||||||||||||||||||||||||||
| Can also reach the Boss Node, but have a small chance to off-route into dead-ends instead (I or J).
Do not bring AO as it off-routes to node I instead of the boss node. | |||||||||||||||||||||||||||||||||
Resource Nodes
E I are "Normal Resource Nodes" rewarding both fuel ![]() .
.
- See here for more details.
Enemy Compositions
7-1 A
| # | Maelstrom Node | ||
|---|---|---|---|
| A | Lost Normal | ||
| # | Maelstrom Node | ||
7-1 B: 敵通商破壊侵入艦隊 (PoiDB)
| # | Enemy Form. |
Base EXP | Normal Battle Node | AD/AP AS/AS+ |
|---|---|---|---|---|
| B | Line Ahead Line Abreast |
200 | 0/0 0/0 | |
| Double Line Diamond |
200 | 8/16 35/69 | ||
| Double Line Diamond |
210 | 8/16 35/69 | ||
| # | Enemy Form. |
Base EXP | Normal Battle Node | AD/AP AS/AS+ |
7-1 C: 敵通商破壊侵入 高速機動部隊 (PoiDB)
| # | Enemy Form. |
Base EXP | Normal Battle Node | AD/AP AS/AS+ |
|---|---|---|---|---|
| C | Double Line Diamond |
230 | 29/57 126/252 | |
| Double Line Diamond |
250 | 29/57 126/252 | ||
| Double Line Diamond |
270 | 29/57 126/252 | ||
| # | Enemy Form. |
Base EXP | Normal Battle Node | AD/AP AS/AS+ |
7-1 D: 深海潜水艦隊 II群 (PoiDB)
| # | Enemy Form. |
Base EXP | Normal Battle Node | AD/AP AS/AS+ |
|---|---|---|---|---|
| D | Line Abreast Echelon |
150 | 0/0 0/0 | |
| Line Abreast Echelon |
170 | 0/0 0/0 | ||
| Line Abreast Echelon |
190 | 0/0 0/0 | ||
| Echelon | 200 | 0/0 0/0 | ||
| # | Enemy Form. |
Base EXP | Normal Battle Node | AD/AP AS/AS+ |
7-1 E
| # | Resource Node | ||
|---|---|---|---|
| E | Gained 10~20 | ||
| # | Resource Node | ||
7-1 F: 深海潜水艦隊 III群 (PoiDB)
| # | Enemy Form. |
Base EXP | Normal Battle Node | AD/AP AS/AS+ |
|---|---|---|---|---|
| F | Line Abreast Echelon |
120 | 0/0 0/0 | |
| Line Abreast Echelon |
150 | 0/0 0/0 | ||
| Line Abreast Echelon |
170 | 0/0 0/0 | ||
| Line Abreast Echelon |
180 | 0/0 0/0 | ||
| Echelon | 190 | 0/0 0/0 | ||
| # | Enemy Form. |
Base EXP | Normal Battle Node | AD/AP AS/AS+ |
7-1 G: 敵哨戒部隊 (PoiDB)
| # | Enemy Form. |
Base EXP | Normal Battle Node | AD/AP AS/AS+ |
|---|---|---|---|---|
| G | Line Ahead Line Abreast |
150 | 0/0 0/0 | |
| Line Ahead Double Line |
170 | 0/0 0/0 | ||
| Line Ahead Double Line |
190 | 0/0 0/0 | ||
| # | Enemy Form. |
Base EXP | Normal Battle Node | AD/AP AS/AS+ |
7-1 H: 深海潜水艦隊 I群 (PoiDB)
| # | Enemy Form. |
Base EXP | Normal Battle Node | AD/AP AS/AS+ |
|---|---|---|---|---|
| H | Line Abreast Echelon |
150 | 0/0 0/0 | |
| Line Abreast Echelon |
160 | 0/0 0/0 | ||
| Line Abreast Echelon |
170 | 0/0 0/0 | ||
| Line Abreast Echelon |
190 | 0/0 0/0 | ||
| Echelon | 200 | 0/0 0/0 | ||
| # | Enemy Form. |
Base EXP | Normal Battle Node | AD/AP AS/AS+ |
7-1 I
| # | Resource Node | ||
|---|---|---|---|
| I | Gained 30~50 | ||
| # | Resource Node | ||
7-1 J
| # | Empty Node | ||
|---|---|---|---|
| J | 気のせいだった。/敵影を見ず。/穏やかな海です。/穏やかな海峡です。/警戒が必要です。/静かな海です。 Must be my imagination./No enemy spotted./Calm seas./Calm straits./Be alert./Peaceful seas. | ||
| # | Empty Node | ||
7-1 K: 深海潜水艦隊集団 旗艦戦隊 (PoiDB)
| # | Enemy Form. |
Base EXP | Boss Battle Node | AD/AP AS/AS+ |
|---|---|---|---|---|
| K | Echelon | 330 | 0/0 0/0 | |
| Echelon | 360 | 0/0 0/0 | ||
| Echelon | 390 | 0/0 0/0 | ||
| # | Enemy Form. |
Base EXP | Boss Battle Node | AD/AP AS/AS+ |
Ship Drops
| Ship drops | |||||||||||||||||||||||||||||||||||||||||||||||||||||||||||||||||||||||||||||||||||||||||||||||||||
|---|---|---|---|---|---|---|---|---|---|---|---|---|---|---|---|---|---|---|---|---|---|---|---|---|---|---|---|---|---|---|---|---|---|---|---|---|---|---|---|---|---|---|---|---|---|---|---|---|---|---|---|---|---|---|---|---|---|---|---|---|---|---|---|---|---|---|---|---|---|---|---|---|---|---|---|---|---|---|---|---|---|---|---|---|---|---|---|---|---|---|---|---|---|---|---|---|---|---|---|
| Type | Ship? | B | C | G | K | ||||||||||||||||||||||||||||||||||||||||||||||||||||||||||||||||||||||||||||||||||||||||||||||
| DD | Sagiri | ✔️ | |||||||||||||||||||||||||||||||||||||||||||||||||||||||||||||||||||||||||||||||||||||||||||||||||
| DD | Oyashio | ✔️ | |||||||||||||||||||||||||||||||||||||||||||||||||||||||||||||||||||||||||||||||||||||||||||||||||
| DD | Arashi | ✔️ | |||||||||||||||||||||||||||||||||||||||||||||||||||||||||||||||||||||||||||||||||||||||||||||||||
| DD | Hagikaze | ✔️ | |||||||||||||||||||||||||||||||||||||||||||||||||||||||||||||||||||||||||||||||||||||||||||||||||
| CA | Mikuma | ✔️ | |||||||||||||||||||||||||||||||||||||||||||||||||||||||||||||||||||||||||||||||||||||||||||||||||
| AS | Taigei | ✔️ | |||||||||||||||||||||||||||||||||||||||||||||||||||||||||||||||||||||||||||||||||||||||||||||||||
| CL | Kitakami | ✔️ | ✔️ | ||||||||||||||||||||||||||||||||||||||||||||||||||||||||||||||||||||||||||||||||||||||||||||||||
| CL | Ooi | ✔️ | ✔️ | ||||||||||||||||||||||||||||||||||||||||||||||||||||||||||||||||||||||||||||||||||||||||||||||||
| CL | Nagara | ✔️ | ✔️ | ✔️ | ✔️ | ||||||||||||||||||||||||||||||||||||||||||||||||||||||||||||||||||||||||||||||||||||||||||||||
| CL | Kinu | ✔️ | ✔️ | ||||||||||||||||||||||||||||||||||||||||||||||||||||||||||||||||||||||||||||||||||||||||||||||||
| CL | Abukuma | ✔️ | ✔️ | ||||||||||||||||||||||||||||||||||||||||||||||||||||||||||||||||||||||||||||||||||||||||||||||||
| CL | Sendai | ✔️ | ✔️ | ✔️ | ✔️ | ||||||||||||||||||||||||||||||||||||||||||||||||||||||||||||||||||||||||||||||||||||||||||||||
| CL | Yuubari | ✔️ | ✔️ | ✔️ | |||||||||||||||||||||||||||||||||||||||||||||||||||||||||||||||||||||||||||||||||||||||||||||||
| CA | Kinugasa | ✔️ | |||||||||||||||||||||||||||||||||||||||||||||||||||||||||||||||||||||||||||||||||||||||||||||||||
| CA | Myoukou | ✔️ | |||||||||||||||||||||||||||||||||||||||||||||||||||||||||||||||||||||||||||||||||||||||||||||||||
| CA | Takao | ✔️ | |||||||||||||||||||||||||||||||||||||||||||||||||||||||||||||||||||||||||||||||||||||||||||||||||
| CA | Atago | ✔️ | |||||||||||||||||||||||||||||||||||||||||||||||||||||||||||||||||||||||||||||||||||||||||||||||||
| CA | Mogami | ✔️ | ✔️ | ✔️ | |||||||||||||||||||||||||||||||||||||||||||||||||||||||||||||||||||||||||||||||||||||||||||||||
| CA | Suzuya | ✔️ | |||||||||||||||||||||||||||||||||||||||||||||||||||||||||||||||||||||||||||||||||||||||||||||||||
| CA | Kumano | ✔️ | |||||||||||||||||||||||||||||||||||||||||||||||||||||||||||||||||||||||||||||||||||||||||||||||||
| CA | Tone | ✔️ | |||||||||||||||||||||||||||||||||||||||||||||||||||||||||||||||||||||||||||||||||||||||||||||||||
| CA | Chikuma | ✔️ | |||||||||||||||||||||||||||||||||||||||||||||||||||||||||||||||||||||||||||||||||||||||||||||||||
| CVL | Ryuujou | ✔️ | ✔️ | ✔️ | |||||||||||||||||||||||||||||||||||||||||||||||||||||||||||||||||||||||||||||||||||||||||||||||
| CVL | Shouhou | ✔️ | ✔️ | ✔️ | ✔️ | ||||||||||||||||||||||||||||||||||||||||||||||||||||||||||||||||||||||||||||||||||||||||||||||
| CVL | Zuihou | ✔️ | |||||||||||||||||||||||||||||||||||||||||||||||||||||||||||||||||||||||||||||||||||||||||||||||||
| FBB | Kongou | ✔️ | |||||||||||||||||||||||||||||||||||||||||||||||||||||||||||||||||||||||||||||||||||||||||||||||||
| FBB | Hiei | ✔️ | |||||||||||||||||||||||||||||||||||||||||||||||||||||||||||||||||||||||||||||||||||||||||||||||||
| FBB | Haruna | ✔️ | |||||||||||||||||||||||||||||||||||||||||||||||||||||||||||||||||||||||||||||||||||||||||||||||||
| FBB | Kirishima | ✔️ | |||||||||||||||||||||||||||||||||||||||||||||||||||||||||||||||||||||||||||||||||||||||||||||||||
| SS | I-8 | ✔️ | |||||||||||||||||||||||||||||||||||||||||||||||||||||||||||||||||||||||||||||||||||||||||||||||||
| SS | I-19 | ✔️ | ✔️ | ✔️ | |||||||||||||||||||||||||||||||||||||||||||||||||||||||||||||||||||||||||||||||||||||||||||||||
| SS | I-58 | ✔️ | ✔️ | ✔️ | |||||||||||||||||||||||||||||||||||||||||||||||||||||||||||||||||||||||||||||||||||||||||||||||
| DD | Mutsuki | ✔️ | ✔️ | ✔️ | ✔️ | ||||||||||||||||||||||||||||||||||||||||||||||||||||||||||||||||||||||||||||||||||||||||||||||
| DD | Kisaragi | ✔️ | ✔️ | ✔️ | ✔️ | ||||||||||||||||||||||||||||||||||||||||||||||||||||||||||||||||||||||||||||||||||||||||||||||
| DD | Satsuki | ✔️ | ✔️ | ✔️ | ✔️ | ||||||||||||||||||||||||||||||||||||||||||||||||||||||||||||||||||||||||||||||||||||||||||||||
| DD | Fumizuki | ✔️ | ✔️ | ✔️ | ✔️ | ||||||||||||||||||||||||||||||||||||||||||||||||||||||||||||||||||||||||||||||||||||||||||||||
| DD | Nagatsuki | ✔️ | ✔️ | ✔️ | ✔️ | ||||||||||||||||||||||||||||||||||||||||||||||||||||||||||||||||||||||||||||||||||||||||||||||
| DD | Kikuzuki | ✔️ | ✔️ | ✔️ | ✔️ | ||||||||||||||||||||||||||||||||||||||||||||||||||||||||||||||||||||||||||||||||||||||||||||||
| DD | Mikazuki | ✔️ | ✔️ | ✔️ | ✔️ | ||||||||||||||||||||||||||||||||||||||||||||||||||||||||||||||||||||||||||||||||||||||||||||||
| DD | Mochizuki | ✔️ | ✔️ | ✔️ | ✔️ | ||||||||||||||||||||||||||||||||||||||||||||||||||||||||||||||||||||||||||||||||||||||||||||||
| DD | Fubuki | ✔️ | ✔️ | ✔️ | ✔️ | ||||||||||||||||||||||||||||||||||||||||||||||||||||||||||||||||||||||||||||||||||||||||||||||
| DD | Shirayuki | ✔️ | ✔️ | ✔️ | ✔️ | ||||||||||||||||||||||||||||||||||||||||||||||||||||||||||||||||||||||||||||||||||||||||||||||
| DD | Hatsuyuki | ✔️ | ✔️ | ✔️ | ✔️ | ||||||||||||||||||||||||||||||||||||||||||||||||||||||||||||||||||||||||||||||||||||||||||||||
| DD | Miyuki | ✔️ | ✔️ | ✔️ | ✔️ | ||||||||||||||||||||||||||||||||||||||||||||||||||||||||||||||||||||||||||||||||||||||||||||||
| DD | Murakumo | ✔️ | ✔️ | ✔️ | ✔️ | ||||||||||||||||||||||||||||||||||||||||||||||||||||||||||||||||||||||||||||||||||||||||||||||
| DD | Isonami | ✔️ | ✔️ | ✔️ | ✔️ | ||||||||||||||||||||||||||||||||||||||||||||||||||||||||||||||||||||||||||||||||||||||||||||||
| DD | Ayanami | ✔️ | ✔️ | ✔️ | ✔️ | ||||||||||||||||||||||||||||||||||||||||||||||||||||||||||||||||||||||||||||||||||||||||||||||
| DD | Shikinami | ✔️ | ✔️ | ✔️ | ✔️ | ||||||||||||||||||||||||||||||||||||||||||||||||||||||||||||||||||||||||||||||||||||||||||||||
| DD | Oboro | ✔️ | ✔️ | ✔️ | ✔️ | ||||||||||||||||||||||||||||||||||||||||||||||||||||||||||||||||||||||||||||||||||||||||||||||
| DD | Akebono | ✔️ | ✔️ | ✔️ | ✔️ | ||||||||||||||||||||||||||||||||||||||||||||||||||||||||||||||||||||||||||||||||||||||||||||||
| DD | Sazanami | ✔️ | ✔️ | ✔️ | ✔️ | ||||||||||||||||||||||||||||||||||||||||||||||||||||||||||||||||||||||||||||||||||||||||||||||
| DD | Ushio | ✔️ | ✔️ | ✔️ | ✔️ | ||||||||||||||||||||||||||||||||||||||||||||||||||||||||||||||||||||||||||||||||||||||||||||||
| DD | Akatsuki | ✔️ | |||||||||||||||||||||||||||||||||||||||||||||||||||||||||||||||||||||||||||||||||||||||||||||||||
| DD | Hibiki | ✔️ | |||||||||||||||||||||||||||||||||||||||||||||||||||||||||||||||||||||||||||||||||||||||||||||||||
| DD | Ikazuchi | ✔️ | |||||||||||||||||||||||||||||||||||||||||||||||||||||||||||||||||||||||||||||||||||||||||||||||||
| DD | Inazuma | ✔️ | |||||||||||||||||||||||||||||||||||||||||||||||||||||||||||||||||||||||||||||||||||||||||||||||||
| DD | Hatsuharu | ✔️ | |||||||||||||||||||||||||||||||||||||||||||||||||||||||||||||||||||||||||||||||||||||||||||||||||
| DD | Nenohi | ✔️ | |||||||||||||||||||||||||||||||||||||||||||||||||||||||||||||||||||||||||||||||||||||||||||||||||
| DD | Wakaba | ✔️ | |||||||||||||||||||||||||||||||||||||||||||||||||||||||||||||||||||||||||||||||||||||||||||||||||
| DD | Hatsushimo | ✔️ | |||||||||||||||||||||||||||||||||||||||||||||||||||||||||||||||||||||||||||||||||||||||||||||||||
| DD | Shiratsuyu | ✔️ | |||||||||||||||||||||||||||||||||||||||||||||||||||||||||||||||||||||||||||||||||||||||||||||||||
| DD | Shigure | ✔️ | |||||||||||||||||||||||||||||||||||||||||||||||||||||||||||||||||||||||||||||||||||||||||||||||||
| DD | Murasame | ✔️ | |||||||||||||||||||||||||||||||||||||||||||||||||||||||||||||||||||||||||||||||||||||||||||||||||
| DD | Yuudachi | ✔️ | |||||||||||||||||||||||||||||||||||||||||||||||||||||||||||||||||||||||||||||||||||||||||||||||||
| DD | Samidare | ✔️ | |||||||||||||||||||||||||||||||||||||||||||||||||||||||||||||||||||||||||||||||||||||||||||||||||
| DD | Suzukaze | ✔️ | |||||||||||||||||||||||||||||||||||||||||||||||||||||||||||||||||||||||||||||||||||||||||||||||||
| DD | Asashio | ✔️ | |||||||||||||||||||||||||||||||||||||||||||||||||||||||||||||||||||||||||||||||||||||||||||||||||
| DD | Ooshio | ✔️ | |||||||||||||||||||||||||||||||||||||||||||||||||||||||||||||||||||||||||||||||||||||||||||||||||
| DD | Michishio | ✔️ | |||||||||||||||||||||||||||||||||||||||||||||||||||||||||||||||||||||||||||||||||||||||||||||||||
| DD | Arashio | ✔️ | |||||||||||||||||||||||||||||||||||||||||||||||||||||||||||||||||||||||||||||||||||||||||||||||||
| DD | Arare | ✔️ | |||||||||||||||||||||||||||||||||||||||||||||||||||||||||||||||||||||||||||||||||||||||||||||||||
| DD | Kasumi | ✔️ | |||||||||||||||||||||||||||||||||||||||||||||||||||||||||||||||||||||||||||||||||||||||||||||||||
| DD | Kagerou | ✔️ | ✔️ | ✔️ | ✔️ | ||||||||||||||||||||||||||||||||||||||||||||||||||||||||||||||||||||||||||||||||||||||||||||||
| DD | Shiranui | ✔️ | ✔️ | ✔️ | ✔️ | ||||||||||||||||||||||||||||||||||||||||||||||||||||||||||||||||||||||||||||||||||||||||||||||
| DD | Kuroshio | ✔️ | ✔️ | ✔️ | ✔️ | ||||||||||||||||||||||||||||||||||||||||||||||||||||||||||||||||||||||||||||||||||||||||||||||
| CL | Tenryuu | ✔️ | |||||||||||||||||||||||||||||||||||||||||||||||||||||||||||||||||||||||||||||||||||||||||||||||||
| CL | Tatsuta | ✔️ | |||||||||||||||||||||||||||||||||||||||||||||||||||||||||||||||||||||||||||||||||||||||||||||||||
| CL | Kuma | ✔️ | ✔️ | ✔️ | ✔️ | ||||||||||||||||||||||||||||||||||||||||||||||||||||||||||||||||||||||||||||||||||||||||||||||
| CL | Tama | ✔️ | ✔️ | ✔️ | ✔️ | ||||||||||||||||||||||||||||||||||||||||||||||||||||||||||||||||||||||||||||||||||||||||||||||
| CL | Kiso | ✔️ | ✔️ | ✔️ | ✔️ | ||||||||||||||||||||||||||||||||||||||||||||||||||||||||||||||||||||||||||||||||||||||||||||||
| CL | Isuzu | ✔️ | ✔️ | ✔️ | ✔️ | ||||||||||||||||||||||||||||||||||||||||||||||||||||||||||||||||||||||||||||||||||||||||||||||
| CL | Natori | ✔️ | ✔️ | ✔️ | ✔️ | ||||||||||||||||||||||||||||||||||||||||||||||||||||||||||||||||||||||||||||||||||||||||||||||
| CL | Yura | ✔️ | ✔️ | ✔️ | ✔️ | ||||||||||||||||||||||||||||||||||||||||||||||||||||||||||||||||||||||||||||||||||||||||||||||
| CL | Jintsuu | ✔️ | ✔️ | ✔️ | ✔️ | ||||||||||||||||||||||||||||||||||||||||||||||||||||||||||||||||||||||||||||||||||||||||||||||
| CL | Naka | ✔️ | ✔️ | ✔️ | ✔️ | ||||||||||||||||||||||||||||||||||||||||||||||||||||||||||||||||||||||||||||||||||||||||||||||
| CA | Furutaka | ✔️ | |||||||||||||||||||||||||||||||||||||||||||||||||||||||||||||||||||||||||||||||||||||||||||||||||
| CA | Kako | ✔️ | |||||||||||||||||||||||||||||||||||||||||||||||||||||||||||||||||||||||||||||||||||||||||||||||||
| CA | Aoba | ✔️ | |||||||||||||||||||||||||||||||||||||||||||||||||||||||||||||||||||||||||||||||||||||||||||||||||
| CA | Nachi | ✔️ | |||||||||||||||||||||||||||||||||||||||||||||||||||||||||||||||||||||||||||||||||||||||||||||||||
| CA | Ashigara | ✔️ | |||||||||||||||||||||||||||||||||||||||||||||||||||||||||||||||||||||||||||||||||||||||||||||||||
| CA | Haguro | ✔️ | |||||||||||||||||||||||||||||||||||||||||||||||||||||||||||||||||||||||||||||||||||||||||||||||||
| CA | Maya | ✔️ | |||||||||||||||||||||||||||||||||||||||||||||||||||||||||||||||||||||||||||||||||||||||||||||||||
| CA | Choukai | ✔️ | |||||||||||||||||||||||||||||||||||||||||||||||||||||||||||||||||||||||||||||||||||||||||||||||||
| CVL | Houshou | ✔️ | ✔️ | ✔️ | |||||||||||||||||||||||||||||||||||||||||||||||||||||||||||||||||||||||||||||||||||||||||||||||
| SS | I-168 | ✔️ | ✔️ | ||||||||||||||||||||||||||||||||||||||||||||||||||||||||||||||||||||||||||||||||||||||||||||||||
| AV | Chitose | ✔️ | |||||||||||||||||||||||||||||||||||||||||||||||||||||||||||||||||||||||||||||||||||||||||||||||||
| AV | Chiyoda | ✔️ | |||||||||||||||||||||||||||||||||||||||||||||||||||||||||||||||||||||||||||||||||||||||||||||||||