Difference between revisions of "World 5/5-5"
Jigaraphale (talk | contribs) |
(→Tips: linkify bulges) |
||
| (5 intermediate revisions by one other user not shown) | |||
| Line 1: | Line 1: | ||
{{World/Hub}} | {{World/Hub}} | ||
| − | + | =World 5-5 Extra Operation: サーモン海域北方 - Northern Salmon Sea Area= | |
{{LabSortieworld | {{LabSortieworld | ||
| page = World 5/5-5 | | page = World 5/5-5 | ||
| Line 9: | Line 9: | ||
| jptext = 南方海域に敵の有力な機動部隊の接近が確認された。空母機動部隊を以て、これを迎撃せよ! | | jptext = 南方海域に敵の有力な機動部隊の接近が確認された。空母機動部隊を以て、これを迎撃せよ! | ||
| entext = The approach of a powerful enemy task force has been confirmed in southern waters. Form a carrier task force and intercept it! | | entext = The approach of a powerful enemy task force has been confirmed in southern waters. Form a carrier task force and intercept it! | ||
| − | | aircon = | + | | aircon = |
| − | {{ | + | {{AirConKai |
| − | + | |AS=392 | |
| − | + | |ASr=341 | |
| − | + | }} | |
| − | |||
| − | |||
| − | |||
| − | |||
| − | |||
| − | |||
| − | |||
| − | |||
| − | |||
| − | |||
| − | |||
| − | |||
| − | |||
| − | | AS = 392 | ||
| − | | | ||
| − | }} | ||
}} | }} | ||
| − | |||
| − | |||
| − | + | {{MapUnlock | |
| − | + | | unlock= [[5-4]] HP bar and [[6-1]] | |
| − | + | | clear= the boss's flagship must be sunk 5 times | |
| − | + | | reward= '''200 {{Item/Icon|Ranking Point Reward|size=25px}} [[Ranking Point]]s''' and '''1 {{Medal}} [[Medal]]''' | |
| + | | reset= Resets at midnight JST at the beginning of every month | ||
| + | | note= [[Support Expedition]]s are available on this map | ||
| + | }} | ||
===Stage Guide=== | ===Stage Guide=== | ||
| Line 111: | Line 96: | ||
===Tips=== | ===Tips=== | ||
| − | + | 5-5 is arguably the most difficult non-event map in the game. | |
| − | + | *'''The enemy composition at the boss node will be locked into either formation 5 or 6 after clearing'''. | |
| − | ** | + | **It can be advisable to display the enemy composition preview when reaching the boss, to make sure it is the easiest composition, resetting the game otherwise. |
| − | |||
| − | |||
| − | |||
| − | |||
| − | * | + | *When planning on clearing any quest that requires clearing 5-5 with an A/S-Rank, '''it is recommended to do so after clearing 5-5 for the month''', as the post-clear boss compositions are significantly easier than the pre-clear comps. |
| − | + | The fleet composition restrictions for most of these quests mean that the fleet will face some difficulty in defeating the pre-clear comps. | |
| − | * | + | **This is especially true if said quests require 2 DD, as they will have difficulty dealing any significant damage to the pre-clear boss comps during the daytime battle. |
| + | **Please note that [[Submarine Yo-Class]] at the boss node will be in Elite form '''post-clear''', so a {{color|red|dedicated ASW or even [[OASW]] ship}} must be brought if one wishes to secure an S-rank. | ||
| − | * | + | Pre-boss node {{MapRoute|P|red}} has the chance of containing an Elite Re-class in Line Ahead. |
| + | *Depending on the choice of ships (and also dependent on engagement modifiers & enemy fleet formation), [[bulge]]s equipped in [[Reinforcement Expansion]] may improve survivability against opening torpedoes. | ||
| − | + | As every World 5 map, [[Support Expedition]]s are available to help clear the map, something often useful to clear harder quests. | |
| + | |||
| + | Regarding nodes: | ||
| + | *{{MapRoute|B|red}} is a submarine node. | ||
| + | *{{MapRoute|D|violet|L|violet}} are [[maelstrom]] nodes. It is recommended to bring some radars to reduce fuel losses. | ||
| + | *{{MapRoute|G|purple|M|purple}} are night battle nodes. | ||
===Recommended Fleets=== | ===Recommended Fleets=== | ||
| − | + | (F)BB(V) using "'''[[Special Attacks]]'''" (Touches) are recommended for every fleet. | |
| − | + | *Equipping the flagship with at least one [[Template:Range Extension|'''Very Long range''' gun]] is recommended to trigger the Touch 1st. | |
| − | + | Regarding DD: | |
| − | + | *Bringing an [[OASW]] can help in passing submarine nodes as well as S ranking the boss. | |
| − | + | *Bringing an [[AACI]] is recommended. | |
| − | + | *Other cut-ins like the mixed ones can be good all-around solutions. | |
| − | + | {{FleetGuide | |
| − | | | + | | Map = Middle Route |
| − | + | | Fleet = '''2 (F)BB(V), 1 CA(V)/CL, 1 CA(V)/CLT, 2 DD | |
| − | + | '''2 (F)BB(V)/CV(B), 1 (F)BB(V)/CVL, 2 DD, 1 AO | |
| − | + | | LOS = Cn2: 67 | |
| − | + | | Route = {{MapRoute|B|red|F|blue|D|violet|H|red|N|red|O|blue|S|red}} | |
| − | * | + | | AS = 392 |
| − | + | | Note = Easier preboss, but will struggle against the double Re-Elite boss node formations. | |
| − | * | + | *CAV can provide fighter power. |
| + | *CLT and [[Opening Torpedo Salvo]] capable CL can enable powerful opening attacks. | ||
| + | The AO allows to bring an additional heavy ship, notably a CV(B), without the need to be Fast+. [[Souya]] is the best AO choice thanks to her greater survivability. | ||
| + | *If used alone, the CV(B) can use a combination of several {{Equipment/Link|Kikka Kai|Jet Keiun Kai|text=Jets|link=Jet}} alongside some fighters and/or a {{Equipment/Link|Saiun|Saiun (Eastern Caroline Air Group)|Saiun (4th Recon Squad)|text=Saiun}}. | ||
| + | | Quest = | ||
| + | }} | ||
| − | + | {{FleetGuide | |
| − | + | | Map = Middle Fast+ | |
| − | + | | Fleet = '''2 {{Class|Yamato|Kai Ni/Juu}}, 1 CV(B), 1 {{Class|Mogami|Kai Ni Toku}}, 2 DD | |
| − | * | + | | LOS = Cn2: 67 |
| + | | Speed = Fast+ | ||
| + | | Route = {{MapRoute|B|red|F|blue|D|violet|H|red|N|red|O|blue|S|red}} | ||
| + | | AS = 392 | ||
| + | | Note = A great fleet to clear this map, with great reach and clear rates. | ||
| + | *This fleet requires many late-game ships and equipment in order to work, with all ships [[RE]] opened and as many married as possible. | ||
| + | The DD must be 4 slots, with one as [[AACI]] and the other as [[TCI]]+[[OASW]], so far [[Hatsuzuki Kai Ni]] and [[Tashkent Kai]] respectively. | ||
| − | + | The CV(B) must carry several {{Jet Keiun}} {{Jet Kikka}} {{Equipment/Link|Kikka Kai|Jet Keiun Kai|text=Jets|link=Jet}}. | |
| − | + | *As Tashkent needs to be married for OASW with one sonar, [[Kaga Kai Ni Go]] can be used instead for the OASW, using an [[ASW aircraft]]. | |
| − | |||
| − | |||
| − | |||
| − | |||
| − | |||
| − | |||
| − | |||
| − | |||
| − | |||
| − | |||
| − | + | The CAV/AV can DA (with a gun in the RE), [[oTorp]], and utilize a {{Night Recon}} [[Night Recon]]. The other CAV can be used as substitutes, but with a lesser effectiveness. | |
| − | |||
| − | |||
| − | |||
| − | |||
| − | |||
| − | + | {{Class|Yamato}}, {{Class|Mogami}}, and [[Tashkent]] are recommended, as they can be Fast+ with a single {{Engine}} {{Equipment/Link|New Model High Temperature High Pressure Boiler|text=+13 Boiler}} at 7+ {{Star}}. | |
| − | |||
| − | |||
| − | |||
| − | + | Both (F)BB(V) should use 2 guns, an {{AP Shell}} [[AP Shell]], and a {{Very Large Radar}} [[Very Large Radar]] for better touch effectiveness. | |
| − | *Using more than 4BB(V)/CV(L) or 1 SS(V) gives a 35% chance of off-routing to node {{MapRoute|Q|blue}} | + | | Quest = |
| − | *[[Ise Kai Ni]] & [[Hyuuga Kai Ni]] are good options to get additional fighter power, however, they are weaker in terms of firepower compared to most | + | }} |
| − | + | ||
| + | {{FleetGuide | ||
| + | | Map = North Route Heavy | ||
| + | | Fleet = '''4-6 BB(V)/CV(B/L), 0-2 CA(V) | ||
| + | | LOS = Cn2: 81 | ||
| + | | Route = {{MapRoute|B|red|K|red|P|red|S|red}} | ||
| + | | AS = 392 | ||
| + | | Note = Strongest, but also costlier fleets. The biggest threat here is the Re-class on node {{MapRoute|P|red}}. | ||
| + | *CAV can provide fighter power, allowing for optimized set-ups on CV(B). | ||
| + | *1 CA can be used for [[AACI]]. | ||
| + | [[Ise Kai Ni]] & [[Hyuuga Kai Ni]] are good options to get additional fighter power, however, they are weaker in terms of firepower compared to most BB(B). | ||
| + | *SPB should not be used in smaller slots due to the potential presence of multiple [[Light Cruiser Tsu-Class]] along this route. | ||
| + | Using more than 4BB(V)/CV(L) or 1 SS(V) gives a 35 % chance of off-routing to node {{MapRoute|Q|blue}}. | ||
| + | | Quest = | ||
| + | }} | ||
| + | |||
| + | {{FleetGuide | ||
| + | | Map = North Route Medium | ||
| + | | Fleet = '''3 BB(V)/CV(B/L), 1 CV(L), 2 DD | ||
| + | | LOS = Cn2: 81 | ||
| + | | Route = {{MapRoute|B|red|F|blue|J|red|P|red|S|red}} | ||
| + | | AS = 392 | ||
| + | | Note = A route negligibly easier than the previous one. | ||
| + | *{{MapRoute|F|blue}} is a choice node. For the above fleet, routing to {{MapRoute|J|red}} is recommended as {{MapRoute|D|violet}} is a maelstrom node, and fleet comp will route to {{MapRoute|P|red}} after {{MapRoute|H|red}} anyway. | ||
| + | [[Ise Kai Ni]] & [[Hyuuga Kai Ni]] are good options to get additional fighter power, however, they are weaker in terms of firepower compared to most BB(B). | ||
| + | *SPB should not be used in smaller slots due to the potential presence of multiple [[Light Cruiser Tsu-Class]] along this route. | ||
| + | | Quest = | ||
| + | }} | ||
| − | | | + | {{FleetGuide |
| − | + | | Map = South Route | |
| − | + | | Fleet = '''2 (F)BB(V)/CV(B/L), 4 DD | |
| − | + | 2 (F)BB(V)/CV(B/L), 2 DD, 2 XX (XX cannot be (F)BB(V)/CV(B/L)) | |
| − | + | | LOS = Cn2: 67 | |
| − | + | | Route = {{MapRoute|A|blue|C|red|E|green|G|purple|I|blue|M|purple|O|blue|S|red}} | |
| − | + | | AS = 392 | |
| − | + | | Note = A weaker fleet with a lower bauxite consumption compared to other fleets. | |
| + | *The first battle is a relatively easy enemy torpedo squadron, but the next two battles are fairly dangerous Night Nodes. | ||
| + | When less than 4 DD are used, 4 {{Drum}} {{EquipmentLink|Drum Canister (Transport Use)|text=Drum}} carrying ship are required to route to the boss. | ||
| + | | Quest = | ||
| + | }} | ||
| − | | | + | {{FleetGuide |
| − | + | | Map = SS Fleet | |
| − | + | | Fleet = 6 SS(V) | |
| − | + | | LOS = Cn2: 81 | |
| − | * | + | | Route = Random: |
| − | + | *65 %: {{MapRoute|B|red|K|red|P|red|S|red}} | |
| − | + | *35 %: {{MapRoute|B|red|K|red|P|red|Q|blue}} | |
| − | + | | AS = 392 | |
| − | + | | Note = Not recommended. | |
| + | *Has a lower chance of reaching the boss node due to random off-routings, and difficulties killing the boss regardless of its composition. | ||
| + | *Has a low resource cost. | ||
| + | *Using 6 strong submarines (maybe having REs) utilizing Submarine Cut-ins can be a solution to slowly clear the map for cheap. | ||
| + | | Quest = | ||
| + | }} | ||
===Resource Nodes=== | ===Resource Nodes=== | ||
Latest revision as of 01:34, 4 January 2026
World 5-5 Extra Operation: サーモン海域北方 - Northern Salmon Sea Area
| Strategy Name | 第二次サーモン海戦 Second Battle of the Solomon Sea |
|---|---|
| Difficulty | ☆☆☆☆☆☆☆☆☆☆☆ |
| Item | |
| Strategy Content | 南方海域に敵の有力な機動部隊の接近が確認された。空母機動部隊を以て、これを迎撃せよ! The approach of a powerful enemy task force has been confirmed in southern waters. Form a carrier task force and intercept it! |
| Boss Air Control | |||
|---|---|---|---|
| AD | AP | AS | AS+ |
| 117 | 175 | 392 | 784 |
| Boss Route Air Control | |||
| AD | AP | AS | AS+ |
| 102 | 152 | 341 | 682 |
| 5-5 Unlocking & Progression | ||||
|---|---|---|---|---|
| Unlock conditions | 5-5 is unlocked after clearing 5-4 HP bar and 6-1 | |||
| Clear conditions | To clear the map: the boss's flagship must be sunk 5 times | |||
| Clearing rewards | 200 | |||
| Notes | Support Expeditions are available on this map | |||
| Map reset | Resets at midnight JST at the beginning of every month | |||
Stage Guide
| 5-5 Branching Rules | ||
|---|---|---|
| Nodes | Rules | |
| Start | A |
|
B | ||
B |
F |
|
K | ||
E |
G |
|
H | ||
H |
L |
|
N | ||
P | ||
I |
L |
|
M | ||
L |
N |
|
M |
L |
|
O | ||
N |
M |
|
O | ||
O |
R |
|
S | ||
P |
Q |
|
S | ||
Tips
5-5 is arguably the most difficult non-event map in the game.
- The enemy composition at the boss node will be locked into either formation 5 or 6 after clearing.
- It can be advisable to display the enemy composition preview when reaching the boss, to make sure it is the easiest composition, resetting the game otherwise.
- When planning on clearing any quest that requires clearing 5-5 with an A/S-Rank, it is recommended to do so after clearing 5-5 for the month, as the post-clear boss compositions are significantly easier than the pre-clear comps.
The fleet composition restrictions for most of these quests mean that the fleet will face some difficulty in defeating the pre-clear comps.
- This is especially true if said quests require 2 DD, as they will have difficulty dealing any significant damage to the pre-clear boss comps during the daytime battle.
- Please note that Submarine Yo-Class at the boss node will be in Elite form post-clear, so a dedicated ASW or even OASW ship must be brought if one wishes to secure an S-rank.
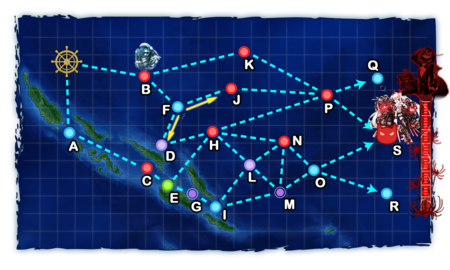
Pre-boss node P has the chance of containing an Elite Re-class in Line Ahead.
- Depending on the choice of ships (and also dependent on engagement modifiers & enemy fleet formation), bulges equipped in Reinforcement Expansion may improve survivability against opening torpedoes.
As every World 5 map, Support Expeditions are available to help clear the map, something often useful to clear harder quests.
Regarding nodes:
- B is a submarine node.
- D L are maelstrom nodes. It is recommended to bring some radars to reduce fuel losses.
- G M are night battle nodes.
Recommended Fleets
(F)BB(V) using "Special Attacks" (Touches) are recommended for every fleet.
- Equipping the flagship with at least one Very Long range gun is recommended to trigger the Touch 1st.
Regarding DD:
- Bringing an OASW can help in passing submarine nodes as well as S ranking the boss.
- Bringing an AACI is recommended.
- Other cut-ins like the mixed ones can be good all-around solutions.
| Middle Route | |||||||||||||||||||||||||||||||||
|---|---|---|---|---|---|---|---|---|---|---|---|---|---|---|---|---|---|---|---|---|---|---|---|---|---|---|---|---|---|---|---|---|---|
|
| ||||||||||||||||||||||||||||||||
| Fleet Notes | |||||||||||||||||||||||||||||||||
Easier preboss, but will struggle against the double Re-Elite boss node formations.
The AO allows to bring an additional heavy ship, notably a CV(B), without the need to be Fast+. Souya is the best AO choice thanks to her greater survivability. | |||||||||||||||||||||||||||||||||


| Middle Fast+ | |||||||||||||||||||||||||||||||||
|---|---|---|---|---|---|---|---|---|---|---|---|---|---|---|---|---|---|---|---|---|---|---|---|---|---|---|---|---|---|---|---|---|---|
|
| ||||||||||||||||||||||||||||||||
| Fleet Notes | |||||||||||||||||||||||||||||||||
A great fleet to clear this map, with great reach and clear rates.
The DD must be 4 slots, with one as AACI and the other as TCI+OASW, so far Hatsuzuki Kai Ni and Tashkent Kai respectively. The CV(B) must carry several
The CAV/AV can DA (with a gun in the RE), oTorp, and utilize a Yamato-class, Mogami-class, and Tashkent are recommended, as they can be Fast+ with a single Both (F)BB(V) should use 2 guns, an | |||||||||||||||||||||||||||||||||
| North Route Heavy | |||||||||||||||||||||||||||||||||
|---|---|---|---|---|---|---|---|---|---|---|---|---|---|---|---|---|---|---|---|---|---|---|---|---|---|---|---|---|---|---|---|---|---|
|
| ||||||||||||||||||||||||||||||||
| Fleet Notes | |||||||||||||||||||||||||||||||||
Strongest, but also costlier fleets. The biggest threat here is the Re-class on node P.
Ise Kai Ni & Hyuuga Kai Ni are good options to get additional fighter power, however, they are weaker in terms of firepower compared to most BB(B).
Using more than 4BB(V)/CV(L) or 1 SS(V) gives a 35 % chance of off-routing to node Q. | |||||||||||||||||||||||||||||||||
| North Route Medium | |||||||||||||||||||||||||||||||||
|---|---|---|---|---|---|---|---|---|---|---|---|---|---|---|---|---|---|---|---|---|---|---|---|---|---|---|---|---|---|---|---|---|---|
|
| ||||||||||||||||||||||||||||||||
| Fleet Notes | |||||||||||||||||||||||||||||||||
A route negligibly easier than the previous one.
Ise Kai Ni & Hyuuga Kai Ni are good options to get additional fighter power, however, they are weaker in terms of firepower compared to most BB(B).
| |||||||||||||||||||||||||||||||||
| South Route | |||||||||||||||||||||||||||||||||
|---|---|---|---|---|---|---|---|---|---|---|---|---|---|---|---|---|---|---|---|---|---|---|---|---|---|---|---|---|---|---|---|---|---|
|
| ||||||||||||||||||||||||||||||||
| Fleet Notes | |||||||||||||||||||||||||||||||||
A weaker fleet with a lower bauxite consumption compared to other fleets.
When less than 4 DD are used, 4 | |||||||||||||||||||||||||||||||||
| SS Fleet | |||||||||||||||||||||||||||||||||
|---|---|---|---|---|---|---|---|---|---|---|---|---|---|---|---|---|---|---|---|---|---|---|---|---|---|---|---|---|---|---|---|---|---|
|
| ||||||||||||||||||||||||||||||||
| Fleet Notes | |||||||||||||||||||||||||||||||||
Not recommended.
| |||||||||||||||||||||||||||||||||
Resource Nodes
E is a "Special Resource Node" rewarding fuel ![]() .
.
- See here for more details.
Enemy Compositions

| # | Empty Node | ||
|---|---|---|---|
| A | 気のせいだった。/敵影を見ず。/穏やかな海です。/穏やかな海峡です。/警戒が必要です。/静かな海です。 Must be my imagination./No enemy spotted./Calm seas./Calm straits./Be alert./Peaceful seas. | ||
| # | Empty Node | ||
| # | Enemy Form. |
Base EXP | Normal Battle Node | AD/AP AS/AS+ |
|---|---|---|---|---|
| B | Echelon Line Abreast |
200 | 0/0 0/0 | |
| Echelon Line Abreast |
220 | 0/0 0/0 | ||
| Echelon Line Abreast |
250 | 0/0 0/0 | ||
| # | Enemy Form. |
Base EXP | Normal Battle Node | AD/AP AS/AS+ |
| # | Enemy Form. |
Base EXP | Normal Battle Node | AD/AP AS/AS+ |
|---|---|---|---|---|
| C | Line Ahead Double Line |
130 | 0/0 0/0 | |
| Line Ahead Double Line |
160 | 0/0 0/0 | ||
| Line Ahead Double Line |
170 | 0/0 0/0 | ||
| # | Enemy Form. |
Base EXP | Normal Battle Node | AD/AP AS/AS+ |
| # | Maelstrom Node | ||
|---|---|---|---|
| D | Lost Normal | ||
| # | Maelstrom Node | ||
| # | Resource Node | ||
|---|---|---|---|
| E | Gained 40 | ||
| # | Resource Node | ||
| # | Selection Node | ||
|---|---|---|---|
| F | 艦隊の針路を選択できます。提督、どちらの針路をとられますか? You can decide the fleet's course. Admiral, which heading should we take? | ||
| # | Selection Node | ||
| # | Enemy Form. |
Base EXP | Night Battle Node | AD/AP AS/AS+ |
|---|---|---|---|---|
| G | Line Ahead Echelon |
180 | 0/0 0/0 | |
| Line Ahead Echelon |
190 | 0/0 0/0 | ||
| Line Ahead Echelon |
200 | 0/0 0/0 | ||
| # | Enemy Form. |
Base EXP | Night Battle Node | AD/AP AS/AS+ |
| # | Enemy Form. |
Base EXP | Normal Battle Node | AD/AP AS/AS+ |
|---|---|---|---|---|
| H | Double Line Diamond |
380 | 16/31 69/138 | |
| Double Line Diamond |
400 | 42/84 188/375 | ||
| Double Line Diamond |
420 | 69/137 306/612 | ||
| # | Enemy Form. |
Base EXP | Normal Battle Node | AD/AP AS/AS+ |
| # | Empty Node | ||
|---|---|---|---|
| I | 気のせいだった。/敵影を見ず。/穏やかな海です。/穏やかな海峡です。/警戒が必要です。/静かな海です。 Must be my imagination./No enemy spotted./Calm seas./Calm straits./Be alert./Peaceful seas. | ||
| # | Empty Node | ||
| # | Enemy Form. |
Base EXP | Normal Battle Node | AD/AP AS/AS+ |
|---|---|---|---|---|
| J | Double Line Diamond |
400 | 42/84 188/375 | |
| Double Line Diamond |
430 | 69/137 306/612 | ||
| Double Line Diamond |
450 | 69/137 306/612 | ||
| # | Enemy Form. |
Base EXP | Normal Battle Node | AD/AP AS/AS+ |
| # | Enemy Form. |
Base EXP | Normal Battle Node | AD/AP AS/AS+ |
|---|---|---|---|---|
| K | Double Line Diamond |
400 | 42/84 188/375 | |
| Double Line Diamond |
420 | 69/137 306/612 | ||
| Double Line Diamond |
450 | 76/152 341/681 | ||
| # | Enemy Form. |
Base EXP | Normal Battle Node | AD/AP AS/AS+ |
| # | Maelstrom Node | ||
|---|---|---|---|
| L | Lost Normal | ||
| # | Maelstrom Node | ||
| # | Enemy Form. |
Base EXP | Night Battle Node | AD/AP AS/AS+ |
|---|---|---|---|---|
| M | Line Ahead Double Line Echelon |
450 | 0/0 0/0 | |
| Line Ahead Double Line Echelon |
460 | 0/0 0/0 | ||
| Line Ahead Double Line Echelon |
480 | 0/0 0/0 | ||
| # | Enemy Form. |
Base EXP | Night Battle Node | AD/AP AS/AS+ |
| # | Enemy Form. |
Base EXP | Normal Battle Node | AD/AP AS/AS+ |
|---|---|---|---|---|
| N | Line Ahead Double Line Echelon |
280 | 0/0 0/0 | |
| Line Ahead Double Line Echelon |
350 | 0/0 0/0 | ||
| # | Enemy Form. |
Base EXP | Normal Battle Node | AD/AP AS/AS+ |
| # | Empty Node | ||
|---|---|---|---|
| O | 気のせいだった。/敵影を見ず。/穏やかな海です。/穏やかな海峡です。/警戒が必要です。/静かな海です。 Must be my imagination./No enemy spotted./Calm seas./Calm straits./Be alert./Peaceful seas. | ||
| # | Empty Node | ||
| # | Enemy Form. |
Base EXP | Normal Battle Node | AD/AP AS/AS+ |
|---|---|---|---|---|
| P | Line Ahead Double Line |
500 | 32/63 141/282 | |
| Line Ahead | 520 | 36/72 161/321 | ||
| Double Line | 530 | 36/72 161/321 | ||
| Line Ahead Double Line |
550 | 36/72 161/321 | ||
| # | Enemy Form. |
Base EXP | Normal Battle Node | AD/AP AS/AS+ |
| # | Empty Node | ||
|---|---|---|---|
| Q | 気のせいだった。/敵影を見ず。/穏やかな海です。/穏やかな海峡です。/警戒が必要です。/静かな海です。 Must be my imagination./No enemy spotted./Calm seas./Calm straits./Be alert./Peaceful seas. | ||
| # | Empty Node | ||
| # | Empty Node | ||
|---|---|---|---|
| R | 気のせいだった。/敵影を見ず。/穏やかな海です。/穏やかな海峡です。/警戒が必要です。/静かな海です。 Must be my imagination./No enemy spotted./Calm seas./Calm straits./Be alert./Peaceful seas. | ||
| # | Empty Node | ||
| # | Enemy Form. |
Base EXP | Boss Battle Node | AD/AP AS/AS+ |
|---|---|---|---|---|
| S | Diamond | 700 | 50/100 224/447 | |
| Diamond | 700 | 84/168 377/753 | ||
| Double Line | 700 | 88/175 392/783 | ||
| Line Ahead | 770 | 88/175 392/783 | ||
| Diamond (Clear)
|
600 | 80/159 356/711 | ||
| Double Line (Clear)
|
600 | 64/128 287/573 | ||
| # | Enemy Form. |
Base EXP | Boss Battle Node | AD/AP AS/AS+ |
Ship Drops
| Ship drops | |||||||||||||||||||||||||||||||||||||||||||||||||||||||||||||||||||||||||||||||||||||||||||||||||||
|---|---|---|---|---|---|---|---|---|---|---|---|---|---|---|---|---|---|---|---|---|---|---|---|---|---|---|---|---|---|---|---|---|---|---|---|---|---|---|---|---|---|---|---|---|---|---|---|---|---|---|---|---|---|---|---|---|---|---|---|---|---|---|---|---|---|---|---|---|---|---|---|---|---|---|---|---|---|---|---|---|---|---|---|---|---|---|---|---|---|---|---|---|---|---|---|---|---|---|---|
| Type | Ship? | B | C | G | H | J | K | M | N | P | S | ||||||||||||||||||||||||||||||||||||||||||||||||||||||||||||||||||||||||||||||||||||||||
| DD | Uzuki | ✔️ | |||||||||||||||||||||||||||||||||||||||||||||||||||||||||||||||||||||||||||||||||||||||||||||||||
| DD | Hatsukaze | ✔️ | |||||||||||||||||||||||||||||||||||||||||||||||||||||||||||||||||||||||||||||||||||||||||||||||||
| DD | Maikaze | ✔️ | ✔️ | ||||||||||||||||||||||||||||||||||||||||||||||||||||||||||||||||||||||||||||||||||||||||||||||||
| CL | Agano | ✔️ | |||||||||||||||||||||||||||||||||||||||||||||||||||||||||||||||||||||||||||||||||||||||||||||||||
| AS | Taigei | ✔️ | |||||||||||||||||||||||||||||||||||||||||||||||||||||||||||||||||||||||||||||||||||||||||||||||||
| DD | Yayoi | ✔️ | |||||||||||||||||||||||||||||||||||||||||||||||||||||||||||||||||||||||||||||||||||||||||||||||||
| DD | Yukikaze | ✔️ | |||||||||||||||||||||||||||||||||||||||||||||||||||||||||||||||||||||||||||||||||||||||||||||||||
| DD | Hamakaze | ✔️ | |||||||||||||||||||||||||||||||||||||||||||||||||||||||||||||||||||||||||||||||||||||||||||||||||
| DD | Akigumo | ✔️ | ✔️ | ✔️ | ✔️ | ||||||||||||||||||||||||||||||||||||||||||||||||||||||||||||||||||||||||||||||||||||||||||||||
| DD | Yuugumo | ✔️ | |||||||||||||||||||||||||||||||||||||||||||||||||||||||||||||||||||||||||||||||||||||||||||||||||
| DD | Makigumo | ✔️ | ✔️ | ✔️ | ✔️ | ||||||||||||||||||||||||||||||||||||||||||||||||||||||||||||||||||||||||||||||||||||||||||||||
| CL | Nagara | ✔️ | ✔️ | ✔️ | ✔️ | ✔️ | ✔️ | ✔️ | ✔️ | ✔️ | |||||||||||||||||||||||||||||||||||||||||||||||||||||||||||||||||||||||||||||||||||||||||
| CA | Myoukou | ✔️ | ✔️ | ✔️ | ✔️ | ✔️ | ✔️ | ✔️ | ✔️ | ✔️ | |||||||||||||||||||||||||||||||||||||||||||||||||||||||||||||||||||||||||||||||||||||||||
| CA | Takao | ✔️ | ✔️ | ✔️ | ✔️ | ✔️ | ✔️ | ✔️ | ✔️ | ✔️ | |||||||||||||||||||||||||||||||||||||||||||||||||||||||||||||||||||||||||||||||||||||||||
| CA | Atago | ✔️ | ✔️ | ✔️ | ✔️ | ✔️ | ✔️ | ✔️ | ✔️ | ✔️ | |||||||||||||||||||||||||||||||||||||||||||||||||||||||||||||||||||||||||||||||||||||||||
| CA | Suzuya | ✔️ | ✔️ | ||||||||||||||||||||||||||||||||||||||||||||||||||||||||||||||||||||||||||||||||||||||||||||||||
| CA | Kumano | ✔️ | ✔️ | ||||||||||||||||||||||||||||||||||||||||||||||||||||||||||||||||||||||||||||||||||||||||||||||||
| CA | Tone | ✔️ | ✔️ | ✔️ | ✔️ | ✔️ | ✔️ | ✔️ | ✔️ | ✔️ | |||||||||||||||||||||||||||||||||||||||||||||||||||||||||||||||||||||||||||||||||||||||||
| CA | Chikuma | ✔️ | ✔️ | ✔️ | ✔️ | ✔️ | ✔️ | ✔️ | ✔️ | ✔️ | |||||||||||||||||||||||||||||||||||||||||||||||||||||||||||||||||||||||||||||||||||||||||
| CVL | Ryuujou | ✔️ | ✔️ | ✔️ | ✔️ | ✔️ | ✔️ | ✔️ | ✔️ | ✔️ | |||||||||||||||||||||||||||||||||||||||||||||||||||||||||||||||||||||||||||||||||||||||||
| CVL | Zuihou | ✔️ | |||||||||||||||||||||||||||||||||||||||||||||||||||||||||||||||||||||||||||||||||||||||||||||||||
| FBB | Hiei | ✔️ | ✔️ | ✔️ | ✔️ | ✔️ | ✔️ | ✔️ | ✔️ | ||||||||||||||||||||||||||||||||||||||||||||||||||||||||||||||||||||||||||||||||||||||||||
| FBB | Kirishima | ✔️ | ✔️ | ✔️ | ✔️ | ✔️ | ✔️ | ✔️ | ✔️ | ||||||||||||||||||||||||||||||||||||||||||||||||||||||||||||||||||||||||||||||||||||||||||
| BB | Mutsu | ✔️ | |||||||||||||||||||||||||||||||||||||||||||||||||||||||||||||||||||||||||||||||||||||||||||||||||
| CV | Shoukaku | ✔️ | |||||||||||||||||||||||||||||||||||||||||||||||||||||||||||||||||||||||||||||||||||||||||||||||||
| CV | Zuikaku | ✔️ | |||||||||||||||||||||||||||||||||||||||||||||||||||||||||||||||||||||||||||||||||||||||||||||||||
| SS | I-8 | ✔️ | |||||||||||||||||||||||||||||||||||||||||||||||||||||||||||||||||||||||||||||||||||||||||||||||||
| SS | I-19 | ✔️ | |||||||||||||||||||||||||||||||||||||||||||||||||||||||||||||||||||||||||||||||||||||||||||||||||
| SS | I-58 | ✔️ | |||||||||||||||||||||||||||||||||||||||||||||||||||||||||||||||||||||||||||||||||||||||||||||||||
| DD | Mutsuki | ✔️ | ✔️ | ✔️ | ✔️ | ✔️ | ✔️ | ✔️ | ✔️ | ✔️ | |||||||||||||||||||||||||||||||||||||||||||||||||||||||||||||||||||||||||||||||||||||||||
| DD | Mochizuki | ✔️ | ✔️ | ✔️ | ✔️ | ✔️ | ✔️ | ✔️ | ✔️ | ✔️ | |||||||||||||||||||||||||||||||||||||||||||||||||||||||||||||||||||||||||||||||||||||||||
| DD | Ayanami | ✔️ | ✔️ | ✔️ | ✔️ | ✔️ | ✔️ | ✔️ | ✔️ | ✔️ | |||||||||||||||||||||||||||||||||||||||||||||||||||||||||||||||||||||||||||||||||||||||||
| DD | Shikinami | ✔️ | ✔️ | ✔️ | ✔️ | ✔️ | ✔️ | ✔️ | ✔️ | ✔️ | |||||||||||||||||||||||||||||||||||||||||||||||||||||||||||||||||||||||||||||||||||||||||
| DD | Shiratsuyu | ✔️ | ✔️ | ✔️ | ✔️ | ✔️ | ✔️ | ✔️ | ✔️ | ✔️ | |||||||||||||||||||||||||||||||||||||||||||||||||||||||||||||||||||||||||||||||||||||||||
| DD | Shigure | ✔️ | ✔️ | ✔️ | ✔️ | ✔️ | ✔️ | ✔️ | ✔️ | ✔️ | |||||||||||||||||||||||||||||||||||||||||||||||||||||||||||||||||||||||||||||||||||||||||
| DD | Suzukaze | ✔️ | ✔️ | ✔️ | ✔️ | ✔️ | ✔️ | ✔️ | ✔️ | ✔️ | |||||||||||||||||||||||||||||||||||||||||||||||||||||||||||||||||||||||||||||||||||||||||
| DD | Kagerou | ✔️ | ✔️ | ✔️ | ✔️ | ✔️ | ✔️ | ✔️ | ✔️ | ✔️ | |||||||||||||||||||||||||||||||||||||||||||||||||||||||||||||||||||||||||||||||||||||||||
| CL | Yura | ✔️ | ✔️ | ✔️ | ✔️ | ✔️ | ✔️ | ✔️ | ✔️ | ✔️ | |||||||||||||||||||||||||||||||||||||||||||||||||||||||||||||||||||||||||||||||||||||||||
| CL | Jintsuu | ✔️ | ✔️ | ✔️ | ✔️ | ✔️ | ✔️ | ✔️ | ✔️ | ✔️ | |||||||||||||||||||||||||||||||||||||||||||||||||||||||||||||||||||||||||||||||||||||||||
| CA | Haguro | ✔️ | ✔️ | ✔️ | ✔️ | ✔️ | ✔️ | ✔️ | ✔️ | ✔️ | |||||||||||||||||||||||||||||||||||||||||||||||||||||||||||||||||||||||||||||||||||||||||
| CA | Maya | ✔️ | ✔️ | ✔️ | ✔️ | ✔️ | ✔️ | ✔️ | ✔️ | ✔️ | |||||||||||||||||||||||||||||||||||||||||||||||||||||||||||||||||||||||||||||||||||||||||
| SS | I-168 | ✔️ | |||||||||||||||||||||||||||||||||||||||||||||||||||||||||||||||||||||||||||||||||||||||||||||||||
| AV | Chitose | ✔️ | ✔️ | ✔️ | ✔️ | ✔️ | ✔️ | ✔️ | ✔️ | ✔️ | |||||||||||||||||||||||||||||||||||||||||||||||||||||||||||||||||||||||||||||||||||||||||