World 1/1-3
< World 1
World 1-3: 製油所地帯沿岸 - Coastal Refinery Zone
| Strategy Name | 海上護衛作戦 Maritime Escort Operation |
|---|---|
| Difficulty | ☆ ☆ |
| Item | |
| Strategy Content | 製油所地帯沿岸部の海上輸送ラインを防衛せよ! Protect the supply lines around our coastal refineries! |
| Boss Air Control | |||
|---|---|---|---|
| AD | AP | AS | AS+ |
| 0 | 0 | 0 | 0 |
| 1-3 Unlocking & Progression | ||||
|---|---|---|---|---|
| Unlock conditions | 1-3 is unlocked after clearing 1-2 | |||
| Clear conditions | To clear the map: the boss's flagship must be sunk once | |||
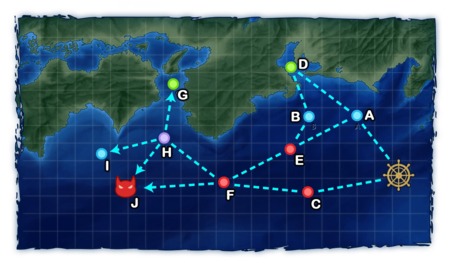
Stage Guide
| 1-3 Branching Rules | ||
|---|---|---|
| Nodes | Rules | |
| Start | A |
|
C | ||
A |
D |
|
E | ||
F |
H |
|
J | ||
H |
G |
|
I | ||
J | ||
Tips
This map is the first one to have an enemy battleship, which will enforce a second shelling phase during the day battle.
- It is important to bring strong enough ships to defeat this BB flagship.
This map is also great for farming fuel.
Recommended Fleet
| Standard Fleets | |||||||||||||||||||||||||||||||||
|---|---|---|---|---|---|---|---|---|---|---|---|---|---|---|---|---|---|---|---|---|---|---|---|---|---|---|---|---|---|---|---|---|---|
|
| ||||||||||||||||||||||||||||||||
| Fleet Notes | |||||||||||||||||||||||||||||||||
| XX cannot be BB or CV(B), it should be a FBB, BBV, CVL, CA(V), CL, or AV. | |||||||||||||||||||||||||||||||||
Resource Nodes
D G are "Normal Resource Nodes" rewarding both Fuel ![]() .
.
- See here for more details.
Fuel Farming
Node D is a good spot to farm fuel ![]() , the base gain being 10/15/20.
, the base gain being 10/15/20.
- Recommended fleets
|
| |||||||||||||||||||||||||||||||||||||||||||||||||||||||||
| Fleet Notes | ||||||||||||||||||||||||||||||||||||||||||||||||||||||||||
When using an AO, the reach rate is 100 %, but is only 80 % when using an AV instead.
As many
If done correctly, this can result in an outstanding fuel gain that surpasses expedition gains.
| ||||||||||||||||||||||||||||||||||||||||||||||||||||||||||
Enemy Compositions

1-3 A
| # | Empty Node | ||
|---|---|---|---|
| A | 気のせいだった。/敵影を見ず。/穏やかな海です。/穏やかな海峡です。/警戒が必要です。/静かな海です。 Must be my imagination./No enemy spotted./Calm seas./Calm straits./Be alert./Peaceful seas. | ||
| # | Empty Node | ||
1-3 B
| # | Empty Node | ||
|---|---|---|---|
| B | 気のせいだった。/敵影を見ず。/穏やかな海です。/穏やかな海峡です。/警戒が必要です。/静かな海です。 Must be my imagination./No enemy spotted./Calm seas./Calm straits./Be alert./Peaceful seas. | ||
| # | Empty Node | ||
1-3 C: 敵前衛艦隊 (PoiDB)
| # | Enemy Form. |
Base EXP | Normal Battle Node | AD/AP AS/AS+ |
|---|---|---|---|---|
| C | Line Ahead | 50 | 0/0 0/0 | |
| Line Ahead | 60 | 0/0 0/0 | ||
| Line Ahead | 70 | 0/0 0/0 | ||
| Line Ahead | 70 | 0/0 0/0 | ||
| Line Ahead | 80 | 0/0 0/0 | ||
| Line Ahead | 90 | 0/0 0/0 | ||
| # | Enemy Form. |
Base EXP | Normal Battle Node | AD/AP AS/AS+ |
1-3 D
| # | Resource Node | ||
|---|---|---|---|
| D | Gained 10~20 | ||
| # | Resource Node | ||
1-3 E: 敵前衛艦隊 (PoiDB)
| # | Enemy Form. |
Base EXP | Normal Battle Node | AD/AP AS/AS+ |
|---|---|---|---|---|
| E | Line Ahead | 50 | 0/0 0/0 | |
| Line Ahead | 60 | 0/0 0/0 | ||
| Line Ahead | 70 | 0/0 0/0 | ||
| Line Ahead | 70 | 0/0 0/0 | ||
| Line Ahead | 80 | 0/0 0/0 | ||
| Line Ahead | 90 | 0/0 0/0 | ||
| # | Enemy Form. |
Base EXP | Normal Battle Node | AD/AP AS/AS+ |
1-3 F: 敵支援艦隊 (PoiDB)
| # | Enemy Form. |
Base EXP | Normal Battle Node | AD/AP AS/AS+ |
|---|---|---|---|---|
| F | Line Ahead Double Line |
65 | 0/0 0/0 | |
| Line Ahead Double Line |
80 | 0/0 0/0 | ||
| Line Ahead Double Line |
85 | 0/0 0/0 | ||
| Line Ahead Double Line |
90 | 0/0 0/0 | ||
| # | Enemy Form. |
Base EXP | Normal Battle Node | AD/AP AS/AS+ |
1-3 G
| # | Resource Node | ||
|---|---|---|---|
| G | Gained 10~30 | ||
| # | Resource Node | ||
1-3 H
| # | Maelstrom Node | ||
|---|---|---|---|
| H | Lost Strong | ||
| # | Maelstrom Node | ||
1-3 I
| # | Empty Node | ||
|---|---|---|---|
| I | 気のせいだった。/敵影を見ず。/穏やかな海です。/穏やかな海峡です。/警戒が必要です。/静かな海です。 Must be my imagination./No enemy spotted./Calm seas./Calm straits./Be alert./Peaceful seas. | ||
| # | Empty Node | ||
1-3 J: 敵主力艦隊 (PoiDB)
| # | Enemy Form. |
Base EXP | Boss Battle Node | AD/AP AS/AS+ |
|---|---|---|---|---|
| J | Line Ahead Double Line |
110 | 0/0 0/0 | |
| Line Ahead Double Line |
120 | 0/0 0/0 | ||
| Line Ahead Double Line |
130 | 0/0 0/0 | ||
| # | Enemy Form. |
Base EXP | Boss Battle Node | AD/AP AS/AS+ |
Ship Drops
This map currently has "limited-time" drops that don't appear in the table below, see Drop List for more info.
| Ship drops | |||||||||||||||||||||||||||||||||||||||||||||||||||||||||||||||||||||||||||||||||||||||||||||||||||
|---|---|---|---|---|---|---|---|---|---|---|---|---|---|---|---|---|---|---|---|---|---|---|---|---|---|---|---|---|---|---|---|---|---|---|---|---|---|---|---|---|---|---|---|---|---|---|---|---|---|---|---|---|---|---|---|---|---|---|---|---|---|---|---|---|---|---|---|---|---|---|---|---|---|---|---|---|---|---|---|---|---|---|---|---|---|---|---|---|---|---|---|---|---|---|---|---|---|---|---|
| Type | Ship? | C | E | F | J | ||||||||||||||||||||||||||||||||||||||||||||||||||||||||||||||||||||||||||||||||||||||||||||||
| CL | Kitakami | ✔️ | |||||||||||||||||||||||||||||||||||||||||||||||||||||||||||||||||||||||||||||||||||||||||||||||||
| CL | Nagara | ✔️ | ✔️ | ||||||||||||||||||||||||||||||||||||||||||||||||||||||||||||||||||||||||||||||||||||||||||||||||
| CL | Sendai | ✔️ | ✔️ | ✔️ | ✔️ | ||||||||||||||||||||||||||||||||||||||||||||||||||||||||||||||||||||||||||||||||||||||||||||||
| CA | Kinugasa | ✔️ | |||||||||||||||||||||||||||||||||||||||||||||||||||||||||||||||||||||||||||||||||||||||||||||||||
| DD | Mutsuki | ✔️ | ✔️ | ✔️ | ✔️ | ||||||||||||||||||||||||||||||||||||||||||||||||||||||||||||||||||||||||||||||||||||||||||||||
| DD | Kisaragi | ✔️ | ✔️ | ✔️ | ✔️ | ||||||||||||||||||||||||||||||||||||||||||||||||||||||||||||||||||||||||||||||||||||||||||||||
| DD | Satsuki | ✔️ | ✔️ | ✔️ | ✔️ | ||||||||||||||||||||||||||||||||||||||||||||||||||||||||||||||||||||||||||||||||||||||||||||||
| DD | Fumizuki | ✔️ | ✔️ | ✔️ | ✔️ | ||||||||||||||||||||||||||||||||||||||||||||||||||||||||||||||||||||||||||||||||||||||||||||||
| DD | Nagatsuki | ✔️ | ✔️ | ✔️ | ✔️ | ||||||||||||||||||||||||||||||||||||||||||||||||||||||||||||||||||||||||||||||||||||||||||||||
| DD | Kikuzuki | ✔️ | ✔️ | ✔️ | ✔️ | ||||||||||||||||||||||||||||||||||||||||||||||||||||||||||||||||||||||||||||||||||||||||||||||
| DD | Mikazuki | ✔️ | ✔️ | ✔️ | ✔️ | ||||||||||||||||||||||||||||||||||||||||||||||||||||||||||||||||||||||||||||||||||||||||||||||
| DD | Mochizuki | ✔️ | ✔️ | ✔️ | ✔️ | ||||||||||||||||||||||||||||||||||||||||||||||||||||||||||||||||||||||||||||||||||||||||||||||
| DD | Fubuki | ✔️ | |||||||||||||||||||||||||||||||||||||||||||||||||||||||||||||||||||||||||||||||||||||||||||||||||
| DD | Shirayuki | ✔️ | ✔️ | ✔️ | ✔️ | ||||||||||||||||||||||||||||||||||||||||||||||||||||||||||||||||||||||||||||||||||||||||||||||
| DD | Hatsuyuki | ✔️ | ✔️ | ✔️ | ✔️ | ||||||||||||||||||||||||||||||||||||||||||||||||||||||||||||||||||||||||||||||||||||||||||||||
| DD | Miyuki | ✔️ | ✔️ | ✔️ | ✔️ | ||||||||||||||||||||||||||||||||||||||||||||||||||||||||||||||||||||||||||||||||||||||||||||||
| DD | Murakumo | ✔️ | |||||||||||||||||||||||||||||||||||||||||||||||||||||||||||||||||||||||||||||||||||||||||||||||||
| DD | Isonami | ✔️ | ✔️ | ✔️ | ✔️ | ||||||||||||||||||||||||||||||||||||||||||||||||||||||||||||||||||||||||||||||||||||||||||||||
| DD | Ayanami | ✔️ | ✔️ | ✔️ | ✔️ | ||||||||||||||||||||||||||||||||||||||||||||||||||||||||||||||||||||||||||||||||||||||||||||||
| DD | Shikinami | ✔️ | ✔️ | ✔️ | ✔️ | ||||||||||||||||||||||||||||||||||||||||||||||||||||||||||||||||||||||||||||||||||||||||||||||
| DD | Oboro | ✔️ | ✔️ | ✔️ | ✔️ | ||||||||||||||||||||||||||||||||||||||||||||||||||||||||||||||||||||||||||||||||||||||||||||||
| DD | Akebono | ✔️ | ✔️ | ✔️ | ✔️ | ||||||||||||||||||||||||||||||||||||||||||||||||||||||||||||||||||||||||||||||||||||||||||||||
| DD | Sazanami | ✔️ | |||||||||||||||||||||||||||||||||||||||||||||||||||||||||||||||||||||||||||||||||||||||||||||||||
| DD | Ushio | ✔️ | ✔️ | ✔️ | ✔️ | ||||||||||||||||||||||||||||||||||||||||||||||||||||||||||||||||||||||||||||||||||||||||||||||
| DD | Akatsuki | ✔️ | ✔️ | ✔️ | ✔️ | ||||||||||||||||||||||||||||||||||||||||||||||||||||||||||||||||||||||||||||||||||||||||||||||
| DD | Hibiki | ✔️ | ✔️ | ✔️ | ✔️ | ||||||||||||||||||||||||||||||||||||||||||||||||||||||||||||||||||||||||||||||||||||||||||||||
| DD | Ikazuchi | ✔️ | ✔️ | ✔️ | ✔️ | ||||||||||||||||||||||||||||||||||||||||||||||||||||||||||||||||||||||||||||||||||||||||||||||
| DD | Inazuma | ✔️ | ✔️ | ✔️ | ✔️ | ||||||||||||||||||||||||||||||||||||||||||||||||||||||||||||||||||||||||||||||||||||||||||||||
| DD | Hatsuharu | ✔️ | ✔️ | ✔️ | ✔️ | ||||||||||||||||||||||||||||||||||||||||||||||||||||||||||||||||||||||||||||||||||||||||||||||
| DD | Nenohi | ✔️ | ✔️ | ✔️ | ✔️ | ||||||||||||||||||||||||||||||||||||||||||||||||||||||||||||||||||||||||||||||||||||||||||||||
| DD | Wakaba | ✔️ | ✔️ | ✔️ | ✔️ | ||||||||||||||||||||||||||||||||||||||||||||||||||||||||||||||||||||||||||||||||||||||||||||||
| DD | Hatsushimo | ✔️ | ✔️ | ✔️ | ✔️ | ||||||||||||||||||||||||||||||||||||||||||||||||||||||||||||||||||||||||||||||||||||||||||||||
| DD | Shiratsuyu | ✔️ | ✔️ | ✔️ | ✔️ | ||||||||||||||||||||||||||||||||||||||||||||||||||||||||||||||||||||||||||||||||||||||||||||||
| DD | Shigure | ✔️ | ✔️ | ✔️ | ✔️ | ||||||||||||||||||||||||||||||||||||||||||||||||||||||||||||||||||||||||||||||||||||||||||||||
| DD | Murasame | ✔️ | ✔️ | ✔️ | ✔️ | ||||||||||||||||||||||||||||||||||||||||||||||||||||||||||||||||||||||||||||||||||||||||||||||
| DD | Yuudachi | ✔️ | ✔️ | ✔️ | ✔️ | ||||||||||||||||||||||||||||||||||||||||||||||||||||||||||||||||||||||||||||||||||||||||||||||
| DD | Samidare | ✔️ | |||||||||||||||||||||||||||||||||||||||||||||||||||||||||||||||||||||||||||||||||||||||||||||||||
| DD | Suzukaze | ✔️ | ✔️ | ✔️ | ✔️ | ||||||||||||||||||||||||||||||||||||||||||||||||||||||||||||||||||||||||||||||||||||||||||||||
| DD | Ooshio | ✔️ | ✔️ | ✔️ | ✔️ | ||||||||||||||||||||||||||||||||||||||||||||||||||||||||||||||||||||||||||||||||||||||||||||||
| DD | Michishio | ✔️ | ✔️ | ✔️ | ✔️ | ||||||||||||||||||||||||||||||||||||||||||||||||||||||||||||||||||||||||||||||||||||||||||||||
| DD | Arashio | ✔️ | ✔️ | ✔️ | ✔️ | ||||||||||||||||||||||||||||||||||||||||||||||||||||||||||||||||||||||||||||||||||||||||||||||
| DD | Arare | ✔️ | ✔️ | ✔️ | ✔️ | ||||||||||||||||||||||||||||||||||||||||||||||||||||||||||||||||||||||||||||||||||||||||||||||
| DD | Kasumi | ✔️ | ✔️ | ✔️ | ✔️ | ||||||||||||||||||||||||||||||||||||||||||||||||||||||||||||||||||||||||||||||||||||||||||||||
| DD | Shiranui | ✔️ | ✔️ | ✔️ | ✔️ | ||||||||||||||||||||||||||||||||||||||||||||||||||||||||||||||||||||||||||||||||||||||||||||||
| DD | Kuroshio | ✔️ | ✔️ | ✔️ | |||||||||||||||||||||||||||||||||||||||||||||||||||||||||||||||||||||||||||||||||||||||||||||||
| CL | Tenryuu | ✔️ | |||||||||||||||||||||||||||||||||||||||||||||||||||||||||||||||||||||||||||||||||||||||||||||||||
| CL | Tatsuta | ✔️ | |||||||||||||||||||||||||||||||||||||||||||||||||||||||||||||||||||||||||||||||||||||||||||||||||
| CL | Kuma | ✔️ | |||||||||||||||||||||||||||||||||||||||||||||||||||||||||||||||||||||||||||||||||||||||||||||||||
| CL | Tama | ✔️ | ✔️ | ✔️ | ✔️ | ||||||||||||||||||||||||||||||||||||||||||||||||||||||||||||||||||||||||||||||||||||||||||||||
| CL | Kiso | ✔️ | ✔️ | ✔️ | ✔️ | ||||||||||||||||||||||||||||||||||||||||||||||||||||||||||||||||||||||||||||||||||||||||||||||
| CL | Isuzu | ✔️ | ✔️ | ||||||||||||||||||||||||||||||||||||||||||||||||||||||||||||||||||||||||||||||||||||||||||||||||
| CL | Natori | ✔️ | ✔️ | ||||||||||||||||||||||||||||||||||||||||||||||||||||||||||||||||||||||||||||||||||||||||||||||||
| CL | Yura | ✔️ | ✔️ | ||||||||||||||||||||||||||||||||||||||||||||||||||||||||||||||||||||||||||||||||||||||||||||||||
| CL | Jintsuu | ✔️ | ✔️ | ✔️ | ✔️ | ||||||||||||||||||||||||||||||||||||||||||||||||||||||||||||||||||||||||||||||||||||||||||||||
| CL | Naka | ✔️ | ✔️ | ✔️ | ✔️ | ||||||||||||||||||||||||||||||||||||||||||||||||||||||||||||||||||||||||||||||||||||||||||||||
| CA | Furutaka | ✔️ | |||||||||||||||||||||||||||||||||||||||||||||||||||||||||||||||||||||||||||||||||||||||||||||||||
| CA | Kako | ✔️ | |||||||||||||||||||||||||||||||||||||||||||||||||||||||||||||||||||||||||||||||||||||||||||||||||
| CA | Aoba | ✔️ | |||||||||||||||||||||||||||||||||||||||||||||||||||||||||||||||||||||||||||||||||||||||||||||||||
| CVL | Houshou | ✔️ | |||||||||||||||||||||||||||||||||||||||||||||||||||||||||||||||||||||||||||||||||||||||||||||||||
| AV | Chitose | ✔️ | ✔️ | ||||||||||||||||||||||||||||||||||||||||||||||||||||||||||||||||||||||||||||||||||||||||||||||||
| AV | Chiyoda | ✔️ | ✔️ | ||||||||||||||||||||||||||||||||||||||||||||||||||||||||||||||||||||||||||||||||||||||||||||||||