Spring 2025 Event/E-6
 
| |||||||||
|---|---|---|---|---|---|---|---|---|---|
 
Time until the end of the event:
| |||||||||
第二遊撃部隊の帰投
![]()
![]()
![]()


| Information | ||||
|---|---|---|---|---|
| Event Tag | ||||
| Boss Gauges | Hard (甲): 3300 HP + 5170 HP + 6180 HP | |||
| Medium (乙): 2200 HP + 4620 HP + 5580 HP | ||||
| Easy (丙): 2200 HP + 4620 HP + 5580 HP | ||||
| Casual (丁): 1650 HP + 4070 HP + 4980 HP | ||||
| Map Bosses | Destroyer Ra-Class Zeta
| |||
Abyssal Heavy Cruiser Water Princess
| ||||
New Heavy Cruiser Princess
| ||||
| Rewards[edit] | ||||
|---|---|---|---|---|
| Ship |  Minneapolis | |||
| Choice | 丁 Casual |
丙 Easy |
乙 Medium |
甲 Hard |
Equipment Slots |
3 | 4 | 5 | |
| OR | ||||
Development Material |
20 | 25 | 30 | |
| Reward | 丁 Casual |
丙 Easy |
乙 Medium |
甲 Hard |
|---|---|---|---|---|
Improvement Material |
6 | 8 | 10 | |
Medal |
1 | 2 | 3 | |
First Class Medal |
1 | |||
 8inch Triple Gun Mount Mk.9 |
1 (★4) | 1 (★6) | 1 (★8) | |
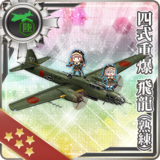
 Type 0 Fighter Model 62 Kai (Night Fighter-bomber) |
1 (★1) | |||
 5inch Single High-angle Gun Mount Battery |
1 (★6) | |||
 15m Duplex Rangefinder Kai + Type 21 Radar Kai 2 + Skilled Fire Direction Center |
1 | |||
 Type 0 Fighter Model 62 Kai (Skilled/Night Fighter-bomber) |
1 (★2) |

The event guides are to be constructed through the respective Event map page guide sandbox and reviewed by editors before being approved here.
- Do not update the guides through this page unless it is a minor fix. Please only update guides through their respective sandbox pages.
Branching Table
| E-6 Branching Rules (Start Points) ▼/▲ | ||
|---|---|---|
| Nodes | Rules | |
| Start | 1 |
|
2 |
| |
3 |
| |
| E-6 Branching Rules (Start Point 1) ▼/▲ | ||
|---|---|---|
| Nodes | Rules | |
A |
B |
|
C |
| |
C2 |
D |
|
D |
C1 |
|
E |
| |
F |
| |
E |
F |
|
| E-6 Branching Rules ▼/▲ (Start Point 2 - Northern Area) | ||
|---|---|---|
| Nodes | Rules | |
G |
H |
Active Branching |
J | ||
H |
E |
|
C2 |
| |
E |
D |
|
C2 |
| |
D |
C1 |
|
C2 |
| |
C2 |
I |
|
| E-6 Branching Rules ▼/▲ (Start Point 2 & 3 - Southern Area) | ||
|---|---|---|
| Nodes | Rules | |
J |
J1 |
|
J2 |
| |
J3 |
| |
J1 |
J2 |
|
P |
| |
R |
| |
J2 |
J3 |
Does not meet the requirements to go to K or P |
K |
| |
P |
| |
J3 |
J4 |
|
M |
| |
K |
J3 |
Active Branching |
L | ||
N |
O |
|
O1 |
| |
O2 |
| |
O1 |
O |
|
O2 |
| |
R |
S |
Active Branching |
T | ||
S |
W |
|
X |
| |
T |
U |
|
V |
| |
X |
Y |
|
Z |
| |
* = Rule under review
? = Ship type/amount under review
Branching compositions are reported over the course of the event.
- Please refer to KCNav for up to date map content (fleets used, LoS/speed requirements/drops/LBAS ranges, ...)
Historical Bonuses
The bonuses on E6 are complex and there is little data as of now so these are subject to change.
| Ships [1] [Toggle Names] |
Damage | ||||||||
|---|---|---|---|---|---|---|---|---|---|
| Map-wide | Node F |
Node I |
Phase 1: Phase 2+: Node O |
Node V |
Node X |
Node Z | |||
| Coastal Defense Ships (DE) | 1.12x | - | 1.08x | - | |||||
| Destroyers (DD) | 1.06x | 1.08x | 1.06x | 1.09x | |||||
| Light Cruisers (CL) Training Cruisers (CT) NOT CLT |
1.08x | 1.08x | 1.06x | 1.12x | |||||
| Torpedo Cruisers (CLT) | - | - | - | - | |||||
| Seaplane Tenders (AV) | 1.08x | - | |||||||
| Standard Aircraft Carriers (CV(B)) | - | - | 1.08x | 1.04x | |||||
| Light Aircraft Carriers (CVL) | 1.06x | 1.09x | |||||||
| Heavy Cruisers (CA(V)) | - | 1.12x | |||||||
| Battleships ((F)BB(V)) | 1.04x | ||||||||
|
1.17x | 1.04x | 1.04x | 1.08x | 1.11x | 1.08x | 1.14x | ||
|
1.12x | - | 1.04x | - | - | - | |||
|
1.14x | 1.14x | 1.14x | - | 1.14x | 1.16x | 1.18x | ||
Ashigara |
1.09x | - | - | ||||||
Ooyodo |
1.04x | ||||||||
Kasumi |
1.08x | ||||||||
Sugi Kaya |
- | 1.12x | |||||||
|
1.05x | - | |||||||
|
1.09x | ||||||||
Fletcher Heywood L. Edwards Phoenix Minneapolis |
- | 1.04x | - | 1.04x | |||||
- Note that Ashigara, Ooyodo, Kasumi, Asashimo, Kiyoshimo, Take, Sugi and Kaya stack bonuses from multiple different groups.
| Equipment | Node F/I/O/S/T/V/X | Node Z | ||
|---|---|---|---|---|
|
1 = 1.07x 2+ = 1.11x |
1 = 1.15x 2+ = 1.18x |


- The plane bonus only works on a non-zero slot.
- LBAS


- Each bonus is only applied once (does not stack)
| Ships | Debuff |
|---|---|
| Node S/T | |
(id 1895-1897) |
-28 |
| Node X | |
| -48 | |
| Node Z | |
| -68 | |
(id 2006~2010) |
-48 |
(id 1895-1897) |
-36 |
| -30 | |
(id 2090) | |
Ships with special routing on the map:
| Ships [Toggle Names] | |||
|---|---|---|---|
| |||
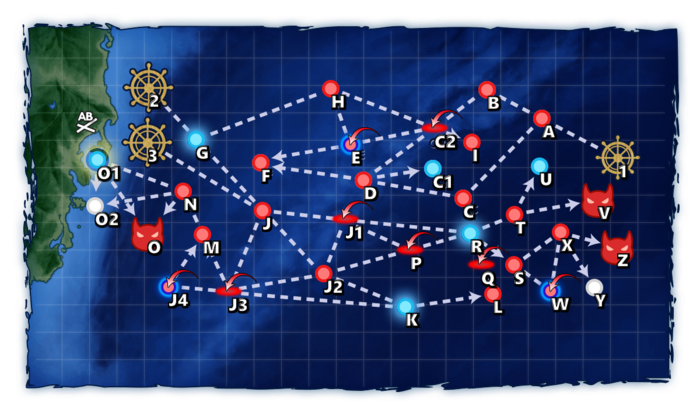
Map Overview
E6 is a single and combined fleet, three-phase map consisting of three boss phases.
- 3 LBAS are available to sortie on this map
- This map uses 3 locks:
 Operation Rei-go Unit, Starting point 1 (reused from E-4 and E-5)
 4th Carrier Division, Starting point 2
 2nd Strike Force, Starting point 3
- During phases 2 & 3, all 3 tags


 can be mixed in all difficulties when starting from point 3.
 - The tag being applied to new ships will still follow the above rules, and the starting point requirements will evolve depending on the current map phase.
- During phases 2 & 3, all 3 tags
- An Emergency Anchorage Repair node is present on O1
Do note that a Yamato-class is required for unlocking the shortcut.
Gimmick 1 - Unlock
To unlock the next part of the map, the following steps have to be performed:
| F | |
|---|---|
| Hard | S x3 |
| Medium | A+ x3 |
| Easy | A+ x3 |
| Casual | A+ x3 |
| Node F Striking | |||||||||||||||||||||||||||||||||||||||||||||
|---|---|---|---|---|---|---|---|---|---|---|---|---|---|---|---|---|---|---|---|---|---|---|---|---|---|---|---|---|---|---|---|---|---|---|---|---|---|---|---|---|---|---|---|---|---|
|
| ||||||||||||||||||||||||||||||||||||||||||||
| Fleet Notes | |||||||||||||||||||||||||||||||||||||||||||||
| A lighter fleet that passes through 1 extra node. There is no reason to pick this comp over the combined one. | |||||||||||||||||||||||||||||||||||||||||||||
| LBAS Notes | |||||||||||||||||||||||||||||||||||||||||||||
| All LBAS should be sent to node F. | |||||||||||||||||||||||||||||||||||||||||||||
| Node F STF | |||||||||||||||||||||||||||||||||||||||||||||||||
|---|---|---|---|---|---|---|---|---|---|---|---|---|---|---|---|---|---|---|---|---|---|---|---|---|---|---|---|---|---|---|---|---|---|---|---|---|---|---|---|---|---|---|---|---|---|---|---|---|---|
|
| ||||||||||||||||||||||||||||||||||||||||||||||||
| Fleet Notes | |||||||||||||||||||||||||||||||||||||||||||||||||
| A stronger fleet that goes through 1 less node. It can notably utilize a Special Attack.
In order to avoid extra battle at E, the fleet must contain:
| |||||||||||||||||||||||||||||||||||||||||||||||||
| LBAS Notes | |||||||||||||||||||||||||||||||||||||||||||||||||
| All LBAS should be sent to node F. One base may optionally be sent to node D to increase the pass rate. | |||||||||||||||||||||||||||||||||||||||||||||||||
- The use of
 Smokes is recommended on node D.
Gimmick 2 - Unlock
To unlock the 1st boss, the following steps have to be performed:
| I | L | M | |
|---|---|---|---|
| Hard | S x2 | S x2 | S x2 |
| Medium | A+ x2 | A+ x2 | S x2 |
| Easy | A+ x2 | A+ x2 | S x2 |
| Casual | A+ x2 | A+ x2 | A+ x2 |
| Node I STF | |||||||||||||||||||||||||||||||||||||||||||||||||
|---|---|---|---|---|---|---|---|---|---|---|---|---|---|---|---|---|---|---|---|---|---|---|---|---|---|---|---|---|---|---|---|---|---|---|---|---|---|---|---|---|---|---|---|---|---|---|---|---|---|
|
| ||||||||||||||||||||||||||||||||||||||||||||||||
| Fleet Notes | |||||||||||||||||||||||||||||||||||||||||||||||||
If the fleet is not fast+, it will pass through extra nodes E and D, therefore requiring some additional OASW
| |||||||||||||||||||||||||||||||||||||||||||||||||
| LBAS Notes | |||||||||||||||||||||||||||||||||||||||||||||||||
| All LBAS should be sent on the node. | |||||||||||||||||||||||||||||||||||||||||||||||||
| Node L STF | |||||||||||||||||||||||||||||||||||||||||||||||||
|---|---|---|---|---|---|---|---|---|---|---|---|---|---|---|---|---|---|---|---|---|---|---|---|---|---|---|---|---|---|---|---|---|---|---|---|---|---|---|---|---|---|---|---|---|---|---|---|---|---|
|
| ||||||||||||||||||||||||||||||||||||||||||||||||
| Fleet Notes | |||||||||||||||||||||||||||||||||||||||||||||||||
| ? | |||||||||||||||||||||||||||||||||||||||||||||||||
| LBAS Notes | |||||||||||||||||||||||||||||||||||||||||||||||||
| All LBAS should be sent on the node. | |||||||||||||||||||||||||||||||||||||||||||||||||
- Node M
- Refer to #Phase 1 - Boss's fleet for composition and routing.
Phase 1 - Boss
| Short Route STF | |||||||||||||||||||||||||||||||||||||||||||||||||
|---|---|---|---|---|---|---|---|---|---|---|---|---|---|---|---|---|---|---|---|---|---|---|---|---|---|---|---|---|---|---|---|---|---|---|---|---|---|---|---|---|---|---|---|---|---|---|---|---|---|
|
| ||||||||||||||||||||||||||||||||||||||||||||||||
| Fleet Notes | |||||||||||||||||||||||||||||||||||||||||||||||||
The AO/LHA should be
| |||||||||||||||||||||||||||||||||||||||||||||||||
| LBAS Notes | |||||||||||||||||||||||||||||||||||||||||||||||||
| All LBAS should be sent on the boss.
If necessary, 1 LBAS can be sent on the submarine node. | |||||||||||||||||||||||||||||||||||||||||||||||||
| Short Route TCF | |||||||||||||||||||||||||||||||||||||||||||||||||
|---|---|---|---|---|---|---|---|---|---|---|---|---|---|---|---|---|---|---|---|---|---|---|---|---|---|---|---|---|---|---|---|---|---|---|---|---|---|---|---|---|---|---|---|---|---|---|---|---|---|
|
| ||||||||||||||||||||||||||||||||||||||||||||||||
| Fleet Notes | |||||||||||||||||||||||||||||||||||||||||||||||||
| ? | |||||||||||||||||||||||||||||||||||||||||||||||||
| LBAS Notes | |||||||||||||||||||||||||||||||||||||||||||||||||
| All LBAS should be sent on the boss.
If necessary, 1 LBAS can be sent on the submarine node. | |||||||||||||||||||||||||||||||||||||||||||||||||
| Long Route STF | |||||||||||||||||||||||||||||||||||||||||||||||||
|---|---|---|---|---|---|---|---|---|---|---|---|---|---|---|---|---|---|---|---|---|---|---|---|---|---|---|---|---|---|---|---|---|---|---|---|---|---|---|---|---|---|---|---|---|---|---|---|---|---|
|
| ||||||||||||||||||||||||||||||||||||||||||||||||
| Fleet Notes | |||||||||||||||||||||||||||||||||||||||||||||||||
| A longer route that notably passes through the challenging J2 node.
The use of | |||||||||||||||||||||||||||||||||||||||||||||||||
| LBAS Notes | |||||||||||||||||||||||||||||||||||||||||||||||||
| All LBAS should be sent on the boss.
If necessary, 1 LBAS can be sent on the submarine node. | |||||||||||||||||||||||||||||||||||||||||||||||||
Special Attack can be used, preferably a Big Seven one, but are not required.
Bringing a Yamato-class will lengthen the route.
Once on LD, the CG will change to the following:
| Destroyer Ra-Class ζ |
|---|
|


Phase 2 - Boss
From this phase onwards, all 3 tags ![]()
![]()
![]() can be mixed in all difficulties when starting from point 3.
can be mixed in all difficulties when starting from point 3.
| Start 2 STF | |||||||||||||||||||||||||||||||||||||||||||||||||
|---|---|---|---|---|---|---|---|---|---|---|---|---|---|---|---|---|---|---|---|---|---|---|---|---|---|---|---|---|---|---|---|---|---|---|---|---|---|---|---|---|---|---|---|---|---|---|---|---|---|
|
| ||||||||||||||||||||||||||||||||||||||||||||||||
| Fleet Notes | |||||||||||||||||||||||||||||||||||||||||||||||||
| Tags cannot be mixed on Hard mode. | |||||||||||||||||||||||||||||||||||||||||||||||||
| LBAS Notes | |||||||||||||||||||||||||||||||||||||||||||||||||
| All LBAS should be sent on the boss.
If necessary, 1 LBAS can be sent on the submarine node. | |||||||||||||||||||||||||||||||||||||||||||||||||
| Start 3 STF | |||||||||||||||||||||||||||||||||||||||||||||||||
|---|---|---|---|---|---|---|---|---|---|---|---|---|---|---|---|---|---|---|---|---|---|---|---|---|---|---|---|---|---|---|---|---|---|---|---|---|---|---|---|---|---|---|---|---|---|---|---|---|---|
|
| ||||||||||||||||||||||||||||||||||||||||||||||||
| Fleet Notes | |||||||||||||||||||||||||||||||||||||||||||||||||
| Other tags can be mixed on all difficulties. | |||||||||||||||||||||||||||||||||||||||||||||||||
| LBAS Notes | |||||||||||||||||||||||||||||||||||||||||||||||||
| All LBAS should be sent on the boss.
If necessary, 1 LBAS can be sent on the submarine node. | |||||||||||||||||||||||||||||||||||||||||||||||||
The use of ![]() Smokes is recommended on node J2.
Smokes is recommended on node J2.
The use of a Special Attack is highly recommended, preferably a Nelson-class one.
- The use of support fleets is recommended.
Bringing a Yamato-class will lengthen the route.
Once on LD, the CG will change to the following:
| Abyssal Heavy Cruiser Water Princess |
|---|
|


Gimmick 3 - Shortcut
To unlock the shortcut, the following steps have to be performed:
| O | F | I | J1 | P | Q | |
|---|---|---|---|---|---|---|
| Hard | A+ x2 | S | S | AS | AS | AS |
| Medium | A+ x2 | A+ | A+ | AS | - | - |
| Easy | A+ x2 | A+ | A+ | AS | - | - |
| Casual | A+ | A+ | A+ | - | - | - |
| Node J1 STF | |||||||||||||||||||||||||||||||||||||||||||||||||
|---|---|---|---|---|---|---|---|---|---|---|---|---|---|---|---|---|---|---|---|---|---|---|---|---|---|---|---|---|---|---|---|---|---|---|---|---|---|---|---|---|---|---|---|---|---|---|---|---|---|
|
| ||||||||||||||||||||||||||||||||||||||||||||||||
| Fleet Notes | |||||||||||||||||||||||||||||||||||||||||||||||||
| Using an AACI is recommended. | |||||||||||||||||||||||||||||||||||||||||||||||||
| LBAS Notes | |||||||||||||||||||||||||||||||||||||||||||||||||
| ASW LBAS can be sent on the pre-node. | |||||||||||||||||||||||||||||||||||||||||||||||||
| Node Q STF | |||||||||||||||||||||||||||||||||||||||||||||||||
|---|---|---|---|---|---|---|---|---|---|---|---|---|---|---|---|---|---|---|---|---|---|---|---|---|---|---|---|---|---|---|---|---|---|---|---|---|---|---|---|---|---|---|---|---|---|---|---|---|---|
|
| ||||||||||||||||||||||||||||||||||||||||||||||||
| Fleet Notes | |||||||||||||||||||||||||||||||||||||||||||||||||
Using an AACI is recommended.
| |||||||||||||||||||||||||||||||||||||||||||||||||
| LBAS Notes | |||||||||||||||||||||||||||||||||||||||||||||||||
| All LBAS should be sent on the pre-node L, with maybe an ASW LBAS on the sub node. | |||||||||||||||||||||||||||||||||||||||||||||||||
- Refer to #Phase 1 - Boss's fleet for composition and routing.
- Refer to #Gimmick 1 - Unlock's fleet for composition and routing.
- Refer to #Gimmick 2 - Unlock's fleet for composition and routing.
- Only 2 (F)BB(V) can be used.
- Refer to #Phase 2 - Boss's fleet for composition and routing.
Phase 3 - Boss
| Short Route STF | |||||||||||||||||||||||||||||||||||||||||||||||||
|---|---|---|---|---|---|---|---|---|---|---|---|---|---|---|---|---|---|---|---|---|---|---|---|---|---|---|---|---|---|---|---|---|---|---|---|---|---|---|---|---|---|---|---|---|---|---|---|---|---|
|
| ||||||||||||||||||||||||||||||||||||||||||||||||
| Fleet Notes | |||||||||||||||||||||||||||||||||||||||||||||||||
Requires the shortcut to be opened.
| |||||||||||||||||||||||||||||||||||||||||||||||||
| LBAS Notes | |||||||||||||||||||||||||||||||||||||||||||||||||
| All LBAS should be sent on the boss. | |||||||||||||||||||||||||||||||||||||||||||||||||
| Long Route Start 2 STF | |||||||||||||||||||||||||||||||||||||||||||||||||
|---|---|---|---|---|---|---|---|---|---|---|---|---|---|---|---|---|---|---|---|---|---|---|---|---|---|---|---|---|---|---|---|---|---|---|---|---|---|---|---|---|---|---|---|---|---|---|---|---|---|
|
| ||||||||||||||||||||||||||||||||||||||||||||||||
| Fleet Notes | |||||||||||||||||||||||||||||||||||||||||||||||||
?
The use of | |||||||||||||||||||||||||||||||||||||||||||||||||
| LBAS Notes | |||||||||||||||||||||||||||||||||||||||||||||||||
| All LBAS should be sent on the boss. | |||||||||||||||||||||||||||||||||||||||||||||||||
| Long Route Start 3 STF | |||||||||||||||||||||||||||||||||||||||||||||||||
|---|---|---|---|---|---|---|---|---|---|---|---|---|---|---|---|---|---|---|---|---|---|---|---|---|---|---|---|---|---|---|---|---|---|---|---|---|---|---|---|---|---|---|---|---|---|---|---|---|---|
|
| ||||||||||||||||||||||||||||||||||||||||||||||||
| Fleet Notes | |||||||||||||||||||||||||||||||||||||||||||||||||
?
| |||||||||||||||||||||||||||||||||||||||||||||||||
| LBAS Notes | |||||||||||||||||||||||||||||||||||||||||||||||||
| All LBAS should be sent on the boss. | |||||||||||||||||||||||||||||||||||||||||||||||||
| Fastest Heavy CTF | |||||||||||||||||||||||||||||||||||||||||||||||||
|---|---|---|---|---|---|---|---|---|---|---|---|---|---|---|---|---|---|---|---|---|---|---|---|---|---|---|---|---|---|---|---|---|---|---|---|---|---|---|---|---|---|---|---|---|---|---|---|---|---|
|
| ||||||||||||||||||||||||||||||||||||||||||||||||
| Fleet Notes | |||||||||||||||||||||||||||||||||||||||||||||||||
Requires the shortcut to be opened.
| |||||||||||||||||||||||||||||||||||||||||||||||||
| LBAS Notes | |||||||||||||||||||||||||||||||||||||||||||||||||
| All LBAS should be sent on the boss. | |||||||||||||||||||||||||||||||||||||||||||||||||
- The use of a Special Attack is recommended but not necessary, preferably a Nelson-class one.
- The use of an AACI is recommended.
- The use of support fleets is recommended.
- The use of Smokes is recommended on node X.
- For Last Dance Debuffed, it is recommended to smoke on the Boss Node Z instead.
- This is done in order to protect the escort fleet from the enemy opening torpedo attack and the following day attacks, allowing a maximum of ships to survive and be effective on yasen.
- Battleships, cruisers, and some destroyers should equip
 Surface Surface Radars to hit through the smoke.
Bringing a Yamato-class will lengthen the route unless it is F++.
Gimmick 4 - Debuff
Once LD has been reached, the following steps have to be performed to debuff the boss.
| F | O | V | I | Q | LBAS | |
|---|---|---|---|---|---|---|
| Hard | S x2 | S x2 | A+ x2 | S x2 | AS x2 | AS x2 |
| Medium | S x2 | A+ x2 | A+ x2 | S x2 | - | AS x2 |
| Easy | - | A+ x2 | A+ x2 | S x2 | - | AS |
| Casual | - | A+ x2 | A+ x2 | A+ | - | - |
- Refer to #Gimmick 1 - Unlock's fleet for composition and routing.
- Refer to #Phase 1 - Boss's fleet for composition and routing.
- Refer to #Phase 2 - Boss's fleet for composition and routing.
- Refer to #Gimmick 2 - Unlock's fleet for composition and routing.
- Only 2 (F)BB(V) can be used.
- Refer to #Gimmick 3 - Shortcut's fleet for composition and routing.
| LBAS | AS |
|---|---|
| Hard | 707 |
| Medium | 623 |
| Easy | 396 |
| Casual | 332 |
Once on LD, the CG will change to the following:
| New Heavy Cruiser Princess |
|---|
|


Enemy Compositions
| Type | Ships |
|---|---|
| DD |
| Type | Ships |
|---|---|
| DD |
| Type | Ships |
|---|---|
| DE | |
| DD | |
| AS |
| Type | Ships |
|---|---|
| DD |
| Type | Ships |
|---|---|
| DE | |
| DD | |
| SSV | |
| AS |
| Type | Ships |
|---|---|
| DD |
| Type | Ships |
|---|---|
| DD |
| Type | Ships |
|---|---|
| DD | |
| SSV |
| Type | Ships |
|---|---|
| DE | |
| DD | |
| CA | |
| SSV | |
| AS |
| Type | Ships |
|---|---|
| DE | |
| DD | |
| CA | |
| AS |
| Type | Ships |
|---|---|
| DE | |
| DD | |
| SSV |
| Type | Ships |
|---|---|
| DE | |
| DD |
| Type | Ships |
|---|---|
| DE | |
| DD | |
| CA |
| Type | Ships |
|---|---|
| DE | |
| DD | |
| CL | |
| SS | |
| SSV | |
| AS |
| Type | Ships |
|---|---|
| DE | |
| DD | |
| CA | |
| CV |
| # | Formation | Normal Battle Node | AD/AP AS/AS+ |
|---|---|---|---|
| A | Line Ahead Double Line Echelon |
0/0 0/0 | |
| # | Formation | Normal Battle Node | AD/AP AS/AS+ |
| # | Formation | Normal Battle Node | AD/AP AS/AS+ |
|---|---|---|---|
| B | Echelon Line Abreast |
0/0 0/0 | |
| Echelon Line Abreast |
0/0 0/0 | ||
| # | Formation | Normal Battle Node | AD/AP AS/AS+ |
| # | Formation | Normal Battle Node | AD/AP AS/AS+ |
|---|---|---|---|
| C | Line Ahead Double Line Vanguard |
0/0 0/0 | |
| # | Formation | Normal Battle Node | AD/AP AS/AS+ |
| # | Empty Node | ||
|---|---|---|---|
| C1 | 敵影を見ず。 No enemy spotted. | ||
| # | Empty Node | ||
| # | Formation | Air Defense Node | AD/AP AS/AS+ |
|---|---|---|---|
| C2 | Diamond | 103/206 462/924 | |
| Diamond | 108/215 483/966 | ||
| # | Formation | Air Defense Node | AD/AP AS/AS+ |
| # | Formation | Normal Battle Node | AD/AP AS/AS+ |
|---|---|---|---|
| D | Line Ahead Echelon Vanguard |
0/0 0/0 | |
| # | Formation | Normal Battle Node | AD/AP AS/AS+ |
| # | Formation | Supported Battle Node | AD/AP AS/AS+ |
|---|---|---|---|
| E | Echelon Line Abreast |
45/89 198/396 | |
| Echelon Line Abreast |
45/89 198/396 | ||
| # | Formation | Supported Battle Node | AD/AP AS/AS+ |
| # | Formation | Normal Battle Node | AD/AP AS/AS+ |
|---|---|---|---|
| F | Line Ahead Vanguard |
57/113 252/504 | |
| Line Ahead | 57/113 252/504 | ||
| # | Formation | Normal Battle Node | AD/AP AS/AS+ |
| # | Selection Node | ||
|---|---|---|---|
| G | 艦隊の針路を選択できます。提督、どちらの針路をとられますか? You can decide the fleet's course. Admiral, which heading should we take? | ||
| # | Selection Node | ||
| # | Formation | Normal Battle Node | AD/AP AS/AS+ |
|---|---|---|---|
| H | Line Ahead Diamond Vanguard |
45/89 198/396 | |
| # | Formation | Normal Battle Node | AD/AP AS/AS+ |
| # | Formation | Normal Battle Node | AD/AP AS/AS+ |
|---|---|---|---|
| I | Line Ahead Vanguard |
57/113 252/504 | |
| Line Ahead | 57/113 252/504 | ||
| # | Formation | Normal Battle Node | AD/AP AS/AS+ |
| # | Formation | Normal Battle Node | AD/AP AS/AS+ |
|---|---|---|---|
| J | Echelon Line Abreast |
0/0 0/0 | |
| Echelon Line Abreast |
0/0 0/0 | ||
| Echelon Line Abreast |
0/0 0/0 | ||
| # | Formation | Normal Battle Node | AD/AP AS/AS+ |
| # | Formation | Air Defense Node | AD/AP AS/AS+ |
|---|---|---|---|
| J1 | Diamond | 166/332 746/1491 | |
| Diamond | 181/361 810/1620 | ||
| Diamond | 186/371 833/1665 | ||
| # | Formation | Air Defense Node | AD/AP AS/AS+ |
| # | Formation | Normal Battle Node | AD/AP AS/AS+ |
|---|---|---|---|
| J2 | Line Ahead Diamond Vanguard |
51/101 225/450 | |
| # | Formation | Normal Battle Node | AD/AP AS/AS+ |
| # | Formation | Air Defense Node | AD/AP AS/AS+ |
|---|---|---|---|
| J3 | Diamond | 88/175 392/783 | |
| Diamond | 113/225 504/1008 | ||
| Diamond | 149/297 666/1332 | ||
| # | Formation | Air Defense Node | AD/AP AS/AS+ |
| # | Formation | Supported Battle Node | AD/AP AS/AS+ |
|---|---|---|---|
| J4 | Echelon Line Abreast |
46/91 204/408 | |
| Echelon Line Abreast |
50/100 224/447 | ||
| # | Formation | Supported Battle Node | AD/AP AS/AS+ |
| # | Selection Node | ||
|---|---|---|---|
| K | 艦隊の針路を選択できます。提督、どちらの針路をとられますか? You can decide the fleet's course. Admiral, which heading should we take? | ||
| # | Selection Node | ||
| # | Formation | Normal Battle Node | AD/AP AS/AS+ |
|---|---|---|---|
| L | Line Ahead Double Line Echelon |
0/0 0/0 | |
| # | Formation | Normal Battle Node | AD/AP AS/AS+ |
| # | Formation | Normal Battle Node | AD/AP AS/AS+ |
|---|---|---|---|
| M | Line Ahead Double Line Diamond |
45/89 198/396 | |
| # | Formation | Normal Battle Node | AD/AP AS/AS+ |
| # | Formation | Normal Battle Node | AD/AP AS/AS+ |
|---|---|---|---|
| N | Line Ahead Double Line |
0/0 0/0 | |
| Line Ahead | 0/0 0/0 | ||
| # | Formation | Normal Battle Node | AD/AP AS/AS+ |
| # | Formation | Boss Battle Node | AD/AP AS/AS+ |
|---|---|---|---|
| O | Cruising Formation 3 | 113/225 504/1008 | |
| Cruising Formation 3 (Final)
|
157/313 702/1404 | ||
| # | Formation | Boss Battle Node | AD/AP AS/AS+ |
| # | Repair Node | ||
|---|---|---|---|
| # | Repair Node | ||
| # | Formation | Air Defense Node | AD/AP AS/AS+ |
|---|---|---|---|
| P | Diamond | 166/332 746/1491 | |
| Diamond | 181/361 810/1620 | ||
| Diamond | 186/371 833/1665 | ||
| # | Formation | Air Defense Node | AD/AP AS/AS+ |
| # | Formation | Air Defense Node | AD/AP AS/AS+ |
|---|---|---|---|
| Q | Diamond | 103/206 462/924 | |
| Diamond | 108/215 483/966 | ||
| # | Formation | Air Defense Node | AD/AP AS/AS+ |
| # | Selection Node | ||
|---|---|---|---|
| R | 艦隊の針路を選択できます。提督、どちらの針路をとられますか? You can decide the fleet's course. Admiral, which heading should we take? | ||
| # | Selection Node | ||
| # | Formation | Normal Battle Node | AD/AP AS/AS+ |
|---|---|---|---|
| S | Line Ahead Double Line Vanguard |
0/0 0/0 | |
| # | Formation | Normal Battle Node | AD/AP AS/AS+ |
| # | Formation | Normal Battle Node | AD/AP AS/AS+ |
|---|---|---|---|
| T | Diamond | 51/101 225/450 | |
| Line Ahead Double Line |
51/101 225/450 | ||
| # | Formation | Normal Battle Node | AD/AP AS/AS+ |
| # | Formation | Boss Battle Node | AD/AP AS/AS+ |
|---|---|---|---|
| V | Cruising Formation 4 | 72/144 323/645 | |
| Cruising Formation 4 (Final)
|
109/217 486/972 | ||
| # | Formation | Boss Battle Node | AD/AP AS/AS+ |
| # | Formation | Supported Battle Node | AD/AP AS/AS+ |
|---|---|---|---|
| W | Echelon Line Abreast |
45/89 198/396 | |
| Echelon Line Abreast |
45/89 198/396 | ||
| # | Formation | Supported Battle Node | AD/AP AS/AS+ |
| # | Formation | Normal Battle Node | AD/AP AS/AS+ |
|---|---|---|---|
| X | Echelon (HA) |
16/31 69/138 | |
| Echelon (HA) |
16/31 69/138 | ||
| Echelon | 0/0 0/0 | ||
| # | Formation | Normal Battle Node | AD/AP AS/AS+ |
| # | Formation | Boss Battle Node | AD/AP AS/AS+ |
|---|---|---|---|
| Z | Cruising Formation 4 | 100/199 446/891 | |
| Cruising Formation 4 (Final)
|
100/199 447/894 | ||
| # | Formation | Boss Battle Node | AD/AP AS/AS+ |
| Type | Ships |
|---|---|
| DD |
| Type | Ships |
|---|---|
| DD |
| Type | Ships |
|---|---|
| DD | |
| AS |
| Type | Ships |
|---|---|
| DD |
| Type | Ships |
|---|---|
| DD |
| Type | Ships |
|---|---|
| DD |
| Type | Ships |
|---|---|
| DE | |
| DD | |
| AS |
| Type | Ships |
|---|---|
| DE | |
| DD | |
| CL | |
| FBB | |
| SSV | |
| AS |
| Type | Ships |
|---|---|
| DD |
| Type | Ships |
|---|---|
| DE |
| Type | Ships |
|---|---|
| DE | |
| DD | |
| CA | |
| AS |
| Type | Ships |
|---|---|
| DE | |
| DD | |
| SSV | |
| AS |
| Type | Ships |
|---|---|
| DE | |
| DD | |
| CA | |
| BB | |
| CV |
| # | Formation | Normal Battle Node | AD/AP AS/AS+ |
|---|---|---|---|
| A | Line Ahead Double Line Echelon |
0/0 0/0 | |
| # | Formation | Normal Battle Node | AD/AP AS/AS+ |
| # | Formation | Normal Battle Node | AD/AP AS/AS+ |
|---|---|---|---|
| B | Echelon Line Abreast |
0/0 0/0 | |
| Echelon Line Abreast |
0/0 0/0 | ||
| # | Formation | Normal Battle Node | AD/AP AS/AS+ |
| # | Formation | Normal Battle Node | AD/AP AS/AS+ |
|---|---|---|---|
| C | Line Ahead Double Line Vanguard |
0/0 0/0 | |
| # | Formation | Normal Battle Node | AD/AP AS/AS+ |
| # | Empty Node | ||
|---|---|---|---|
| C1 | 敵影を見ず。 No enemy spotted. | ||
| # | Empty Node | ||
| # | Formation | Air Defense Node | AD/AP AS/AS+ |
|---|---|---|---|
| C2 | Diamond | 77/154 345/690 | |
| Diamond | 86/171 383/765 | ||
| # | Formation | Air Defense Node | AD/AP AS/AS+ |
| # | Formation | Normal Battle Node | AD/AP AS/AS+ |
|---|---|---|---|
| D | Line Ahead Echelon Vanguard |
0/0 0/0 | |
| # | Formation | Normal Battle Node | AD/AP AS/AS+ |
| # | Formation | Supported Battle Node | AD/AP AS/AS+ |
|---|---|---|---|
| E | Echelon Line Abreast |
36/72 161/321 | |
| Echelon Line Abreast |
36/72 161/321 | ||
| # | Formation | Supported Battle Node | AD/AP AS/AS+ |
| # | Formation | Normal Battle Node | AD/AP AS/AS+ |
|---|---|---|---|
| F | Line Ahead Vanguard |
50/100 224/447 | |
| Line Ahead | 50/100 224/447 | ||
| # | Formation | Normal Battle Node | AD/AP AS/AS+ |
| # | Selection Node | ||
|---|---|---|---|
| G | 艦隊の針路を選択できます。提督、どちらの針路をとられますか? You can decide the fleet's course. Admiral, which heading should we take? | ||
| # | Selection Node | ||
| # | Formation | Normal Battle Node | AD/AP AS/AS+ |
|---|---|---|---|
| H | Line Ahead Diamond Vanguard |
36/71 159/318 | |
| # | Formation | Normal Battle Node | AD/AP AS/AS+ |
| # | Formation | Normal Battle Node | AD/AP AS/AS+ |
|---|---|---|---|
| I | Line Ahead Vanguard |
50/100 224/447 | |
| Line Ahead | 50/100 224/447 | ||
| # | Formation | Normal Battle Node | AD/AP AS/AS+ |
| # | Formation | Normal Battle Node | AD/AP AS/AS+ |
|---|---|---|---|
| J | Echelon Line Abreast |
0/0 0/0 | |
| Echelon Line Abreast |
0/0 0/0 | ||
| Echelon Line Abreast |
0/0 0/0 | ||
| # | Formation | Normal Battle Node | AD/AP AS/AS+ |
| # | Formation | Air Defense Node | AD/AP AS/AS+ |
|---|---|---|---|
| J1 | Diamond | 143/285 639/1278 | |
| Diamond | 138/276 620/1239 | ||
| Diamond | 153/305 684/1368 | ||
| # | Formation | Air Defense Node | AD/AP AS/AS+ |
| # | Formation | Normal Battle Node | AD/AP AS/AS+ |
|---|---|---|---|
| J2 | Line Ahead Diamond Vanguard |
45/89 198/396 | |
| # | Formation | Normal Battle Node | AD/AP AS/AS+ |
| # | Formation | Air Defense Node | AD/AP AS/AS+ |
|---|---|---|---|
| J3 | Diamond | 73/146 327/654 | |
| Diamond | 100/199 447/894 | ||
| Diamond | 133/266 597/1194 | ||
| # | Formation | Air Defense Node | AD/AP AS/AS+ |
| # | Formation | Supported Battle Node | AD/AP AS/AS+ |
|---|---|---|---|
| J4 | Echelon | 43/85 189/378 | |
| Echelon | 41/81 180/360 | ||
| # | Formation | Supported Battle Node | AD/AP AS/AS+ |
| # | Selection Node | ||
|---|---|---|---|
| K | 艦隊の針路を選択できます。提督、どちらの針路をとられますか? You can decide the fleet's course. Admiral, which heading should we take? | ||
| # | Selection Node | ||
| # | Formation | Normal Battle Node | AD/AP AS/AS+ |
|---|---|---|---|
| L | Line Ahead Double Line Echelon |
0/0 0/0 | |
| # | Formation | Normal Battle Node | AD/AP AS/AS+ |
| # | Formation | Normal Battle Node | AD/AP AS/AS+ |
|---|---|---|---|
| M | Line Ahead Double Line Diamond |
36/71 159/318 | |
| # | Formation | Normal Battle Node | AD/AP AS/AS+ |
| # | Formation | Normal Battle Node | AD/AP AS/AS+ |
|---|---|---|---|
| N | Line Ahead Double Line |
0/0 0/0 | |
| Line Ahead | 0/0 0/0 | ||
| # | Formation | Normal Battle Node | AD/AP AS/AS+ |
| # | Formation | Boss Battle Node | AD/AP AS/AS+ |
|---|---|---|---|
| O | Cruising Formation 3 | 100/199 447/894 | |
| Cruising Formation 3 (Final)
|
136/271 609/1218 | ||
| # | Formation | Boss Battle Node | AD/AP AS/AS+ |
| # | Repair Node | ||
|---|---|---|---|
| # | Repair Node | ||
| # | Formation | Air Defense Node | AD/AP AS/AS+ |
|---|---|---|---|
| P | Diamond | 143/285 639/1278 | |
| Diamond | 138/276 620/1239 | ||
| Diamond | 153/305 684/1368 | ||
| # | Formation | Air Defense Node | AD/AP AS/AS+ |
| # | Formation | Air Defense Node | AD/AP AS/AS+ |
|---|---|---|---|
| Q | Diamond | 77/154 345/690 | |
| Diamond | 86/171 383/765 | ||
| Diamond | 138/275 617/1233 | ||
| # | Formation | Air Defense Node | AD/AP AS/AS+ |
| # | Selection Node | ||
|---|---|---|---|
| R | 艦隊の針路を選択できます。提督、どちらの針路をとられますか? You can decide the fleet's course. Admiral, which heading should we take? | ||
| # | Selection Node | ||
| # | Formation | Normal Battle Node | AD/AP AS/AS+ |
|---|---|---|---|
| S | Line Ahead Double Line Vanguard |
0/0 0/0 | |
| # | Formation | Normal Battle Node | AD/AP AS/AS+ |
| # | Formation | Normal Battle Node | AD/AP AS/AS+ |
|---|---|---|---|
| T | Diamond | 45/89 198/396 | |
| Line Ahead Double Line |
45/89 198/396 | ||
| # | Formation | Normal Battle Node | AD/AP AS/AS+ |
| # | Formation | Boss Battle Node | AD/AP AS/AS+ |
|---|---|---|---|
| V | Cruising Formation 4 | 63/125 279/558 | |
| Cruising Formation 4 (Final)
|
96/191 428/855 | ||
| # | Formation | Boss Battle Node | AD/AP AS/AS+ |
| # | Formation | Supported Battle Node | AD/AP AS/AS+ |
|---|---|---|---|
| # | Formation | Supported Battle Node | AD/AP AS/AS+ |
| # | Formation | Normal Battle Node | AD/AP AS/AS+ |
|---|---|---|---|
| X | Echelon (HA) |
12/23 51/102 | |
| Echelon (HA) |
12/23 51/102 | ||
| Echelon | 0/0 0/0 | ||
| # | Formation | Normal Battle Node | AD/AP AS/AS+ |
| # | Formation | Boss Battle Node | AD/AP AS/AS+ |
|---|---|---|---|
| Z | Cruising Formation 4 | 84/167 375/750 | |
| Cruising Formation 4 (Final)
|
86/171 383/765 | ||
| # | Formation | Boss Battle Node | AD/AP AS/AS+ |
| Type | Ships |
|---|---|
| DD |
| Type | Ships |
|---|---|
| DD | |
| SSV |
| Type | Ships |
|---|---|
| DD |
| Type | Ships |
|---|---|
| DD |
| Type | Ships |
|---|---|
| DD |
| Type | Ships |
|---|---|
| DD |
| Type | Ships |
|---|---|
| DD | |
| SSV |
| Type | Ships |
|---|---|
| DE | |
| DD | |
| CL | |
| CA | |
| SS | |
| SSV | |
| AS |
| Type | Ships |
|---|---|
| DD |
| Type | Ships |
|---|---|
| DD | |
| SSV |
| Type | Ships |
|---|---|
| DE | |
| DD | |
| CA | |
| FBB | |
| AS |
| Type | Ships |
|---|---|
| DE | |
| DD | |
| CA |
| Type | Ships |
|---|---|
| DE | |
| DD | |
| CA | |
| BB | |
| CV |
| # | Formation | Normal Battle Node | AD/AP AS/AS+ |
|---|---|---|---|
| A | Line Ahead Double Line Echelon |
0/0 0/0 | |
| # | Formation | Normal Battle Node | AD/AP AS/AS+ |
| # | Formation | Normal Battle Node | AD/AP AS/AS+ |
|---|---|---|---|
| B | Echelon Line Abreast |
0/0 0/0 | |
| Echelon Line Abreast |
0/0 0/0 | ||
| Echelon Line Abreast |
0/0 0/0 | ||
| # | Formation | Normal Battle Node | AD/AP AS/AS+ |
| # | Formation | Normal Battle Node | AD/AP AS/AS+ |
|---|---|---|---|
| C | Line Ahead Double Line Vanguard |
0/0 0/0 | |
| # | Formation | Normal Battle Node | AD/AP AS/AS+ |
| # | Empty Node | ||
|---|---|---|---|
| C1 | 敵影を見ず。 No enemy spotted. | ||
| # | Empty Node | ||
| # | Formation | Air Defense Node | AD/AP AS/AS+ |
|---|---|---|---|
| C2 | Diamond | 77/154 345/690 | |
| Diamond | 73/145 326/651 | ||
| # | Formation | Air Defense Node | AD/AP AS/AS+ |
| # | Formation | Normal Battle Node | AD/AP AS/AS+ |
|---|---|---|---|
| D | Line Ahead Echelon Vanguard |
0/0 0/0 | |
| # | Formation | Normal Battle Node | AD/AP AS/AS+ |
| # | Formation | Supported Battle Node | AD/AP AS/AS+ |
|---|---|---|---|
| E | Echelon Line Abreast |
19/38 84/168 | |
| Echelon Line Abreast |
36/72 161/321 | ||
| Echelon Line Abreast |
36/72 161/321 | ||
| # | Formation | Supported Battle Node | AD/AP AS/AS+ |
| # | Formation | Normal Battle Node | AD/AP AS/AS+ |
|---|---|---|---|
| F | Line Ahead Vanguard |
46/91 204/408 | |
| Line Ahead | 46/91 204/408 | ||
| # | Formation | Normal Battle Node | AD/AP AS/AS+ |
| # | Selection Node | ||
|---|---|---|---|
| G | 艦隊の針路を選択できます。提督、どちらの針路をとられますか? You can decide the fleet's course. Admiral, which heading should we take? | ||
| # | Selection Node | ||
| # | Formation | Normal Battle Node | AD/AP AS/AS+ |
|---|---|---|---|
| H | Line Ahead Diamond Vanguard |
43/85 189/378 | |
| # | Formation | Normal Battle Node | AD/AP AS/AS+ |
| # | Formation | Normal Battle Node | AD/AP AS/AS+ |
|---|---|---|---|
| I | Line Ahead Vanguard |
46/91 204/408 | |
| Line Ahead | 46/91 204/408 | ||
| # | Formation | Normal Battle Node | AD/AP AS/AS+ |
| # | Formation | Normal Battle Node | AD/AP AS/AS+ |
|---|---|---|---|
| J | Echelon Line Abreast |
0/0 0/0 | |
| Echelon Line Abreast |
0/0 0/0 | ||
| Echelon Line Abreast |
0/0 0/0 | ||
| # | Formation | Normal Battle Node | AD/AP AS/AS+ |
| # | Formation | Air Defense Node | AD/AP AS/AS+ |
|---|---|---|---|
| J1 | Diamond | 120/239 536/1071 | |
| Diamond | 138/276 620/1239 | ||
| Diamond | 144/288 647/1293 | ||
| # | Formation | Air Defense Node | AD/AP AS/AS+ |
| # | Formation | Normal Battle Node | AD/AP AS/AS+ |
|---|---|---|---|
| J2 | Line Ahead Diamond Vanguard |
36/72 161/321 | |
| # | Formation | Normal Battle Node | AD/AP AS/AS+ |
| # | Formation | Air Defense Node | AD/AP AS/AS+ |
|---|---|---|---|
| J3 | Diamond | 69/137 308/615 | |
| Diamond | 91/182 408/816 | ||
| Diamond | 124/247 554/1107 | ||
| # | Formation | Air Defense Node | AD/AP AS/AS+ |
| # | Formation | Supported Battle Node | AD/AP AS/AS+ |
|---|---|---|---|
| J4 | Echelon | 19/38 84/168 | |
| Echelon | 43/85 189/378 | ||
| # | Formation | Supported Battle Node | AD/AP AS/AS+ |
| # | Selection Node | ||
|---|---|---|---|
| K | 艦隊の針路を選択できます。提督、どちらの針路をとられますか? You can decide the fleet's course. Admiral, which heading should we take? | ||
| # | Selection Node | ||
| # | Formation | Normal Battle Node | AD/AP AS/AS+ |
|---|---|---|---|
| L | Line Ahead Double Line Echelon |
0/0 0/0 | |
| # | Formation | Normal Battle Node | AD/AP AS/AS+ |
| # | Formation | Normal Battle Node | AD/AP AS/AS+ |
|---|---|---|---|
| M | Line Ahead Double Line Diamond |
43/85 189/378 | |
| # | Formation | Normal Battle Node | AD/AP AS/AS+ |
| # | Formation | Normal Battle Node | AD/AP AS/AS+ |
|---|---|---|---|
| N | Line Ahead Double Line |
0/0 0/0 | |
| Line Ahead | 0/0 0/0 | ||
| # | Formation | Normal Battle Node | AD/AP AS/AS+ |
| # | Formation | Boss Battle Node | AD/AP AS/AS+ |
|---|---|---|---|
| O | Cruising Formation 3 | 91/182 408/816 | |
| Cruising Formation 3 (Final)
|
126/251 563/1125 | ||
| # | Formation | Boss Battle Node | AD/AP AS/AS+ |
| # | Repair Node | ||
|---|---|---|---|
| # | Repair Node | ||
| # | Formation | Air Defense Node | AD/AP AS/AS+ |
|---|---|---|---|
| P | Diamond | 120/239 536/1071 | |
| Diamond | 138/276 620/1239 | ||
| Diamond | 144/288 647/1293 | ||
| # | Formation | Air Defense Node | AD/AP AS/AS+ |
| # | Formation | Air Defense Node | AD/AP AS/AS+ |
|---|---|---|---|
| Q | Diamond | 77/154 345/690 | |
| Diamond | 73/145 326/651 | ||
| Diamond | 87/174 390/780 | ||
| # | Formation | Air Defense Node | AD/AP AS/AS+ |
| # | Selection Node | ||
|---|---|---|---|
| R | 艦隊の針路を選択できます。提督、どちらの針路をとられますか? You can decide the fleet's course. Admiral, which heading should we take? | ||
| # | Selection Node | ||
| # | Formation | Normal Battle Node | AD/AP AS/AS+ |
|---|---|---|---|
| S | Line Ahead Double Line Vanguard |
0/0 0/0 | |
| # | Formation | Normal Battle Node | AD/AP AS/AS+ |
| # | Formation | Normal Battle Node | AD/AP AS/AS+ |
|---|---|---|---|
| T | Diamond | 36/72 161/321 | |
| Line Ahead Double Line |
36/72 161/321 | ||
| # | Formation | Normal Battle Node | AD/AP AS/AS+ |
| # | Formation | Boss Battle Node | AD/AP AS/AS+ |
|---|---|---|---|
| V | Cruising Formation 4 | 54/108 242/483 | |
| Cruising Formation 4 (Final)
|
87/174 390/780 | ||
| # | Formation | Boss Battle Node | AD/AP AS/AS+ |
| # | Formation | Supported Battle Node | AD/AP AS/AS+ |
|---|---|---|---|
| # | Formation | Supported Battle Node | AD/AP AS/AS+ |
| # | Formation | Normal Battle Node | AD/AP AS/AS+ |
|---|---|---|---|
| X | Echelon (HA) |
12/23 51/102 | |
| Echelon (HA) |
12/23 51/102 | ||
| Echelon | 0/0 0/0 | ||
| # | Formation | Normal Battle Node | AD/AP AS/AS+ |
| # | Formation | Boss Battle Node | AD/AP AS/AS+ |
|---|---|---|---|
| Z | Cruising Formation 4 | 84/167 375/750 | |
| Cruising Formation 4 (Final)
|
86/171 383/765 | ||
| # | Formation | Boss Battle Node | AD/AP AS/AS+ |
| Type | Ships |
|---|---|
| DD |
| Type | Ships |
|---|---|
| DD |
| Type | Ships |
|---|---|
| DD |
| Type | Ships |
|---|---|
| DD |
| Type | Ships |
|---|---|
| DD |
| Type | Ships |
|---|---|
| DD |
| Type | Ships |
|---|---|
| DD |
| Type | Ships |
|---|---|
| DD |
| Type | Ships |
|---|---|
| DD | |
| SSV | |
| AS |
| Type | Ships |
|---|---|
| DE | |
| DD | |
| CL | |
| CA | |
| SS | |
| SSV | |
| AS |
| Type | Ships |
|---|---|
| DD |
| Type | Ships |
|---|---|
| DD | |
| SSV |
| Type | Ships |
|---|---|
| DE | |
| DD | |
| CL | |
| CA | |
| FBB | |
| SS | |
| SSV | |
| AS |
| Type | Ships |
|---|---|
| DE | |
| DD | |
| CA | |
| SSV | |
| AS |
| Type | Ships |
|---|---|
| DE | |
| DD | |
| CA | |
| BB | |
| CV | |
| AS |
| # | Formation | Normal Battle Node | AD/AP AS/AS+ |
|---|---|---|---|
| A | Line Ahead Double Line Echelon |
0/0 0/0 | |
| # | Formation | Normal Battle Node | AD/AP AS/AS+ |
| # | Formation | Normal Battle Node | AD/AP AS/AS+ |
|---|---|---|---|
| B | Echelon Line Abreast |
0/0 0/0 | |
| Echelon Line Abreast |
0/0 0/0 | ||
| # | Formation | Normal Battle Node | AD/AP AS/AS+ |
| # | Formation | Normal Battle Node | AD/AP AS/AS+ |
|---|---|---|---|
| C | Line Ahead Double Line Vanguard |
0/0 0/0 | |
| # | Formation | Normal Battle Node | AD/AP AS/AS+ |
| # | Empty Node | ||
|---|---|---|---|
| C1 | 敵影を見ず。 No enemy spotted. | ||
| # | Empty Node | ||
| # | Formation | Air Defense Node | AD/AP AS/AS+ |
|---|---|---|---|
| C2 | Diamond | 49/98 219/438 | |
| Diamond | 32/64 143/285 | ||
| # | Formation | Air Defense Node | AD/AP AS/AS+ |
| # | Formation | Normal Battle Node | AD/AP AS/AS+ |
|---|---|---|---|
| D | Line Ahead Echelon Vanguard |
0/0 0/0 | |
| # | Formation | Normal Battle Node | AD/AP AS/AS+ |
| # | Formation | Supported Battle Node | AD/AP AS/AS+ |
|---|---|---|---|
| E | Echelon Line Abreast |
19/38 84/168 | |
| Echelon Line Abreast |
36/72 161/321 | ||
| # | Formation | Supported Battle Node | AD/AP AS/AS+ |
| # | Formation | Normal Battle Node | AD/AP AS/AS+ |
|---|---|---|---|
| F | Line Ahead Vanguard |
41/81 180/360 | |
| # | Formation | Normal Battle Node | AD/AP AS/AS+ |
| # | Selection Node | ||
|---|---|---|---|
| G | 艦隊の針路を選択できます。提督、どちらの針路をとられますか? You can decide the fleet's course. Admiral, which heading should we take? | ||
| # | Selection Node | ||
| # | Formation | Normal Battle Node | AD/AP AS/AS+ |
|---|---|---|---|
| H | Line Ahead Diamond Vanguard |
19/38 84/168 | |
| # | Formation | Normal Battle Node | AD/AP AS/AS+ |
| # | Formation | Normal Battle Node | AD/AP AS/AS+ |
|---|---|---|---|
| I | Line Ahead Vanguard |
41/81 180/360 | |
| Line Ahead | 43/85 189/378 | ||
| # | Formation | Normal Battle Node | AD/AP AS/AS+ |
| # | Formation | Normal Battle Node | AD/AP AS/AS+ |
|---|---|---|---|
| J | Echelon Line Abreast |
0/0 0/0 | |
| Echelon Line Abreast |
0/0 0/0 | ||
| # | Formation | Normal Battle Node | AD/AP AS/AS+ |
| # | Formation | Air Defense Node | AD/AP AS/AS+ |
|---|---|---|---|
| J1 | Diamond | 71/141 315/630 | |
| Diamond | 106/212 476/951 | ||
| Diamond | 111/221 497/993 | ||
| # | Formation | Air Defense Node | AD/AP AS/AS+ |
| # | Formation | Normal Battle Node | AD/AP AS/AS+ |
|---|---|---|---|
| J2 | Line Ahead Diamond Vanguard |
19/38 84/168 | |
| # | Formation | Normal Battle Node | AD/AP AS/AS+ |
| # | Formation | Air Defense Node | AD/AP AS/AS+ |
|---|---|---|---|
| J3 | Diamond | 41/81 180/360 | |
| Diamond | 59/118 264/528 | ||
| Diamond | 83/165 369/738 | ||
| # | Formation | Air Defense Node | AD/AP AS/AS+ |
| # | Formation | Supported Battle Node | AD/AP AS/AS+ |
|---|---|---|---|
| J4 | Echelon Line Abreast |
19/38 84/168 | |
| Echelon | 43/85 189/378 | ||
| # | Formation | Supported Battle Node | AD/AP AS/AS+ |
| # | Selection Node | ||
|---|---|---|---|
| K | 艦隊の針路を選択できます。提督、どちらの針路をとられますか? You can decide the fleet's course. Admiral, which heading should we take? | ||
| # | Selection Node | ||
| # | Formation | Normal Battle Node | AD/AP AS/AS+ |
|---|---|---|---|
| L | Line Ahead Double Line Echelon |
0/0 0/0 | |
| # | Formation | Normal Battle Node | AD/AP AS/AS+ |
| # | Formation | Normal Battle Node | AD/AP AS/AS+ |
|---|---|---|---|
| M | Line Ahead Double Line Diamond |
19/38 84/168 | |
| # | Formation | Normal Battle Node | AD/AP AS/AS+ |
| # | Formation | Normal Battle Node | AD/AP AS/AS+ |
|---|---|---|---|
| N | Line Ahead Double Line |
0/0 0/0 | |
| Line Ahead | 0/0 0/0 | ||
| Line Ahead | 0/0 0/0 | ||
| # | Formation | Normal Battle Node | AD/AP AS/AS+ |
| # | Formation | Boss Battle Node | AD/AP AS/AS+ |
|---|---|---|---|
| O | Cruising Formation 3 | 41/81 180/360 | |
| Cruising Formation 3 (Final)
|
81/161 360/720 | ||
| # | Formation | Boss Battle Node | AD/AP AS/AS+ |
| # | Repair Node | ||
|---|---|---|---|
| # | Repair Node | ||
| # | Formation | Air Defense Node | AD/AP AS/AS+ |
|---|---|---|---|
| P | Diamond | 71/141 315/630 | |
| Diamond | 106/212 476/951 | ||
| Diamond | 111/221 497/993 | ||
| # | Formation | Air Defense Node | AD/AP AS/AS+ |
| # | Formation | Air Defense Node | AD/AP AS/AS+ |
|---|---|---|---|
| Q | Diamond | 49/98 219/438 | |
| Diamond | 32/64 143/285 | ||
| Diamond | 73/145 326/651 | ||
| # | Formation | Air Defense Node | AD/AP AS/AS+ |
| # | Selection Node | ||
|---|---|---|---|
| R | 艦隊の針路を選択できます。提督、どちらの針路をとられますか? You can decide the fleet's course. Admiral, which heading should we take? | ||
| # | Selection Node | ||
| # | Formation | Normal Battle Node | AD/AP AS/AS+ |
|---|---|---|---|
| S | Line Ahead Double Line Vanguard |
0/0 0/0 | |
| # | Formation | Normal Battle Node | AD/AP AS/AS+ |
| # | Formation | Normal Battle Node | AD/AP AS/AS+ |
|---|---|---|---|
| T | Line Ahead Double Line |
19/38 84/168 | |
| Diamond | 19/38 84/168 | ||
| # | Formation | Normal Battle Node | AD/AP AS/AS+ |
| # | Formation | Boss Battle Node | AD/AP AS/AS+ |
|---|---|---|---|
| V | Cruising Formation 4 | 32/64 143/285 | |
| Cruising Formation 4 (Final)
|
56/111 249/498 | ||
| # | Formation | Boss Battle Node | AD/AP AS/AS+ |
| # | Formation | Supported Battle Node | AD/AP AS/AS+ |
|---|---|---|---|
| W | Echelon Line Abreast |
19/38 84/168 | |
| Echelon | 36/72 161/321 | ||
| # | Formation | Supported Battle Node | AD/AP AS/AS+ |
| # | Formation | Normal Battle Node | AD/AP AS/AS+ |
|---|---|---|---|
| X | Echelon (HA) |
12/23 51/102 | |
| Echelon (HA) |
12/23 51/102 | ||
| Echelon | 0/0 0/0 | ||
| # | Formation | Normal Battle Node | AD/AP AS/AS+ |
| # | Formation | Boss Battle Node | AD/AP AS/AS+ |
|---|---|---|---|
| Z | Cruising Formation 4 | 71/141 315/630 | |
| Cruising Formation 4 (Final)
|
75/150 336/672 | ||
| # | Formation | Boss Battle Node | AD/AP AS/AS+ |
Ship Drops
| Ship drops | |||||||||||||||||||||||||||||||||||||||||||||||||||||||||||||||||||||||||||||||||||||||||||||||||||
|---|---|---|---|---|---|---|---|---|---|---|---|---|---|---|---|---|---|---|---|---|---|---|---|---|---|---|---|---|---|---|---|---|---|---|---|---|---|---|---|---|---|---|---|---|---|---|---|---|---|---|---|---|---|---|---|---|---|---|---|---|---|---|---|---|---|---|---|---|---|---|---|---|---|---|---|---|---|---|---|---|---|---|---|---|---|---|---|---|---|---|---|---|---|---|---|---|---|---|---|
| Type | Ship? | C | D | F | H | I | J2 | L | M | N | O | S | T | V | X | Z | |||||||||||||||||||||||||||||||||||||||||||||||||||||||||||||||||||||||||||||||||||
| DE | Inagi | Casual+ | Casual+ | Easy+ | Casual+ | ||||||||||||||||||||||||||||||||||||||||||||||||||||||||||||||||||||||||||||||||||||||||||||||
| DE | Ukuru | Hard+ | Hard+ | Medium+ | Casual+ | Hard+ | Medium+ | Casual+ | Casual+ | Casual+ | |||||||||||||||||||||||||||||||||||||||||||||||||||||||||||||||||||||||||||||||||||||||||
| DD | Kaya | Casual+ | Casual+ | Casual+ | |||||||||||||||||||||||||||||||||||||||||||||||||||||||||||||||||||||||||||||||||||||||||||||||
| DD | Sugi | Casual+ | Casual+ | ||||||||||||||||||||||||||||||||||||||||||||||||||||||||||||||||||||||||||||||||||||||||||||||||
| DD | Hatsukaze | Casual+ | Casual+ | Casual+ | Casual+ | Medium+ | Casual+ | Casual+ | Casual+ | Casual+ | Casual+ | Casual+ | Casual+ | Casual+ | Casual+ | ||||||||||||||||||||||||||||||||||||||||||||||||||||||||||||||||||||||||||||||||||||
| DD | Nowaki | Casual+ | Casual+ | Easy+ | Casual+ | Casual+ | Casual+ | Casual+ | Casual+ | Casual+ | Casual+ | ||||||||||||||||||||||||||||||||||||||||||||||||||||||||||||||||||||||||||||||||||||||||
| DD | Maikaze | Casual+ | Casual+ | Hard+ | Easy+ | Casual+ | Casual+ | Casual+ | Casual+ | Casual+ | Casual+ | ||||||||||||||||||||||||||||||||||||||||||||||||||||||||||||||||||||||||||||||||||||||||
| DD | Hamanami | Medium+ | Hard+ | Easy+ | Casual+ | Medium+ | Casual+ | Casual+ | |||||||||||||||||||||||||||||||||||||||||||||||||||||||||||||||||||||||||||||||||||||||||||
| DD | Okinami | Casual+ | |||||||||||||||||||||||||||||||||||||||||||||||||||||||||||||||||||||||||||||||||||||||||||||||||
| DD | Asashimo | Casual+ | Casual+ | Easy+ | Casual+ | ||||||||||||||||||||||||||||||||||||||||||||||||||||||||||||||||||||||||||||||||||||||||||||||
| DD | Hayashimo | Hard+ | Casual+ | Hard+ | Casual+ | Casual+ | Casual+ | Casual+ | Casual+ | Casual+ | Casual+ | Casual+ | Casual+ | Casual+ | |||||||||||||||||||||||||||||||||||||||||||||||||||||||||||||||||||||||||||||||||||||
| DD | Akishimo | Casual+ | Casual+ | Medium+ | Casual+ | Casual+ | Casual+ | Casual+ | Casual+ | Casual+ | Casual+ | ||||||||||||||||||||||||||||||||||||||||||||||||||||||||||||||||||||||||||||||||||||||||
| DD | Kiyoshimo | Hard+ | Hard+ | Hard+ | Hard+ | Casual+ | Casual+ | Casual+ | |||||||||||||||||||||||||||||||||||||||||||||||||||||||||||||||||||||||||||||||||||||||||||
| CL | Ooyodo | Casual+ | Casual+ | Hard+ | |||||||||||||||||||||||||||||||||||||||||||||||||||||||||||||||||||||||||||||||||||||||||||||||
| CA | Tuscaloosa | Hard+ | Casual+ | Casual+ | Casual+ | Casual+ | |||||||||||||||||||||||||||||||||||||||||||||||||||||||||||||||||||||||||||||||||||||||||||||
| CA | Mikuma | Casual+ | |||||||||||||||||||||||||||||||||||||||||||||||||||||||||||||||||||||||||||||||||||||||||||||||||
| CA | Northampton | Hard+ | Casual+ | ||||||||||||||||||||||||||||||||||||||||||||||||||||||||||||||||||||||||||||||||||||||||||||||||
| FBB | Iowa | Medium+ | Casual+ | ||||||||||||||||||||||||||||||||||||||||||||||||||||||||||||||||||||||||||||||||||||||||||||||||
| BB | Musashi | Casual+ | |||||||||||||||||||||||||||||||||||||||||||||||||||||||||||||||||||||||||||||||||||||||||||||||||
| CV | Lexington | Casual+ | |||||||||||||||||||||||||||||||||||||||||||||||||||||||||||||||||||||||||||||||||||||||||||||||||
| CV | Saratoga | Casual+ | |||||||||||||||||||||||||||||||||||||||||||||||||||||||||||||||||||||||||||||||||||||||||||||||||
| CV | Intrepid | Casual+ | |||||||||||||||||||||||||||||||||||||||||||||||||||||||||||||||||||||||||||||||||||||||||||||||||
| CV | Hornet | Casual+ | |||||||||||||||||||||||||||||||||||||||||||||||||||||||||||||||||||||||||||||||||||||||||||||||||
| SS | I-26 | Casual+ | Casual+ | Hard+ | |||||||||||||||||||||||||||||||||||||||||||||||||||||||||||||||||||||||||||||||||||||||||||||||
| SSV | I-36 | Easy+ | Hard+ | Hard+ | Casual+ | Casual+ | Hard+ | Casual+ | Casual+ | Casual+ | |||||||||||||||||||||||||||||||||||||||||||||||||||||||||||||||||||||||||||||||||||||||||
| AS | Heian Maru | Hard+ | Medium+ | Casual+ | Casual+ | Casual+ | Casual+ | ||||||||||||||||||||||||||||||||||||||||||||||||||||||||||||||||||||||||||||||||||||||||||||
| AS | Taigei | Casual+ | Casual+ | Medium+ | Casual+ | ||||||||||||||||||||||||||||||||||||||||||||||||||||||||||||||||||||||||||||||||||||||||||||||
| AO | Shimane Maru | Casual+ | |||||||||||||||||||||||||||||||||||||||||||||||||||||||||||||||||||||||||||||||||||||||||||||||||
| DD | Akigumo | Medium+ | Easy+ | Casual+ | Hard+ | Casual+ | Casual+ | Casual+ | Casual+ | Casual+ | Casual+ | Casual+ | Casual+ | Casual+ | Casual+ | ||||||||||||||||||||||||||||||||||||||||||||||||||||||||||||||||||||||||||||||||||||
| CL | Kitakami | Casual+ | Casual+ | Casual+ | |||||||||||||||||||||||||||||||||||||||||||||||||||||||||||||||||||||||||||||||||||||||||||||||
| CL | Ooi | Easy+ | Casual+ | Casual+ | |||||||||||||||||||||||||||||||||||||||||||||||||||||||||||||||||||||||||||||||||||||||||||||||
| CL | Kinu | Casual+ | |||||||||||||||||||||||||||||||||||||||||||||||||||||||||||||||||||||||||||||||||||||||||||||||||
| CL | Abukuma | Casual+ | |||||||||||||||||||||||||||||||||||||||||||||||||||||||||||||||||||||||||||||||||||||||||||||||||
| CL | Sendai | Easy+ | Casual+ | Casual+ | Casual+ | Casual+ | Casual+ | Casual+ | Casual+ | Casual+ | Casual+ | Casual+ | Casual+ | Casual+ | Casual+ | ||||||||||||||||||||||||||||||||||||||||||||||||||||||||||||||||||||||||||||||||||||
| CA | Kinugasa | Casual+ | |||||||||||||||||||||||||||||||||||||||||||||||||||||||||||||||||||||||||||||||||||||||||||||||||
| CA | Myoukou | Casual+ | |||||||||||||||||||||||||||||||||||||||||||||||||||||||||||||||||||||||||||||||||||||||||||||||||
| CA | Takao | Casual+ | |||||||||||||||||||||||||||||||||||||||||||||||||||||||||||||||||||||||||||||||||||||||||||||||||
| CA | Atago | Casual+ | |||||||||||||||||||||||||||||||||||||||||||||||||||||||||||||||||||||||||||||||||||||||||||||||||
| CA | Mogami | Hard+ | Easy+ | Casual+ | Easy+ | Casual+ | Easy+ | Casual+ | Casual+ | Casual+ | Casual+ | Casual+ | Casual+ | Casual+ | Casual+ | Casual+ | |||||||||||||||||||||||||||||||||||||||||||||||||||||||||||||||||||||||||||||||||||
| CA | Suzuya | Casual+ | Casual+ | Medium+ | Casual+ | Casual+ | Casual+ | Casual+ | Casual+ | Casual+ | Casual+ | Casual+ | |||||||||||||||||||||||||||||||||||||||||||||||||||||||||||||||||||||||||||||||||||||||
| CA | Kumano | Easy+ | Easy+ | Hard+ | Casual+ | Casual+ | Easy+ | Casual+ | Casual+ | Casual+ | Casual+ | ||||||||||||||||||||||||||||||||||||||||||||||||||||||||||||||||||||||||||||||||||||||||
| CA | Tone | Medium+ | Casual+ | Medium+ | Casual+ | Hard+ | Casual+ | Casual+ | Casual+ | Casual+ | Casual+ | Casual+ | Casual+ | Casual+ | |||||||||||||||||||||||||||||||||||||||||||||||||||||||||||||||||||||||||||||||||||||
| CA | Chikuma | Hard+ | Hard+ | Casual+ | Easy+ | Casual+ | Medium+ | Casual+ | Casual+ | Casual+ | Casual+ | Casual+ | Casual+ | Casual+ | Casual+ | ||||||||||||||||||||||||||||||||||||||||||||||||||||||||||||||||||||||||||||||||||||
| FBB | Kongou | Casual+ | |||||||||||||||||||||||||||||||||||||||||||||||||||||||||||||||||||||||||||||||||||||||||||||||||
| FBB | Haruna | Casual+ | |||||||||||||||||||||||||||||||||||||||||||||||||||||||||||||||||||||||||||||||||||||||||||||||||
| BB | Ise | Medium+ | Casual+ | Casual+ | |||||||||||||||||||||||||||||||||||||||||||||||||||||||||||||||||||||||||||||||||||||||||||||||
| BB | Hyuuga | Easy+ | Casual+ | Casual+ | |||||||||||||||||||||||||||||||||||||||||||||||||||||||||||||||||||||||||||||||||||||||||||||||
| BB | Nagato | Casual+ | |||||||||||||||||||||||||||||||||||||||||||||||||||||||||||||||||||||||||||||||||||||||||||||||||
| BB | Mutsu | Casual+ | |||||||||||||||||||||||||||||||||||||||||||||||||||||||||||||||||||||||||||||||||||||||||||||||||
| CV | Akagi | Casual+ | |||||||||||||||||||||||||||||||||||||||||||||||||||||||||||||||||||||||||||||||||||||||||||||||||
| CV | Kaga | Casual+ | |||||||||||||||||||||||||||||||||||||||||||||||||||||||||||||||||||||||||||||||||||||||||||||||||
| CV | Shoukaku | Casual+ | |||||||||||||||||||||||||||||||||||||||||||||||||||||||||||||||||||||||||||||||||||||||||||||||||
| CV | Zuikaku | Casual+ | |||||||||||||||||||||||||||||||||||||||||||||||||||||||||||||||||||||||||||||||||||||||||||||||||
| CT | Katori | Medium+ | Casual+ | Hard+ | Casual+ | Casual+ | |||||||||||||||||||||||||||||||||||||||||||||||||||||||||||||||||||||||||||||||||||||||||||||
|
| |||||||||
|---|---|---|---|---|---|---|---|---|---|
|
Time until the end of the event:
| |||||||||
Trivia
- The engagements in E6 is off the coast of Cam Ranh Bay and the waters in the vicinity of the Spratly Islands (Vietnam).
- This entire operation is based on a what if "the US Forces pursued or blocked off the retreat of the Rei-Go Fleet in December of 1944". In reality this never happened, but this was part of the plot for the KanColle Operation Rei Go Stage Play.
- Starting Point 1, Node V, and Node Z are on the edge of the vicinity of the Spratly Islands (note that if you look at the maps it is still quite far away from the actual Spratly Islands).
- The Fourth Carrier Division members particularly Ise, Hyuuga, and Ryuuhou were part of the support for the actual operation but were not able to engage enemies as the only notable pursuit was done by the US Submarine USS Baja.
- The Air Base is in the location of Cam Ranh Bay Air Base. As stated in the Trivia Section for E4, it is assumed to be the location of the old US air base was, and is currently used by the Vietnam Air Force.
- The Abyssal Formations in the various boss nodes are a reference to the Stage Play setting.